Amit Bansal

Oracle Patch Set update (PSU 2) released for 10.2.0.4 and 11.1.0.7

Oracle has recently released Oracle Patch Set update (PSU 2) along with CPU October 2009. As informed earlier , PSU are released quarterly along with CPU patches.

If you are running 10.2.0.4 RAC database, you need to apply following patches

1) Apply Patch 8833280 (10.2.0.4.2 PSU 2) on Oracle Database 10.2.0.4
2) Apply Patch 8436582 (10.2.0.4 CRS Bundle Patch #4) on Oracle Clusterware 10.2.0.4
3) Apply Patch 8705958 (10.2.0.4 CRS PSU 2 ) on Oracle Clusterware 10.2.0.4

1)  Patch 8833280 (10.2.0.4.2 PSU 2) for Oracle Database 10.2.0.4

2) Patch 8436582 (10.2.0.4 CRS Bundle Patch #4) for Oracle Clusterware 10.2.0.4 CRS PSU2 patch contains fixes for bugs fixed in Bundle patch 4

3)  Patch 8705958 (10.2.0.4 CRS PSU 2 ) for Oracle Clusterware 10.2.0.4

Critical Patch Update (CPU) are released each quarter and contain security fixes identified by Oracle. Oracle has recently introduced, Patch Set Update (PSUs) which are proactive cumulative patches containing recommended bug fixes that are released on a regular and predictable schedule (it also contains Security fixes part of CPU). PSUs are on the same quarterly schedule as the Critical Patch Updates (CPU), specifically the Tuesday closest to the 15th of January, April, July, and October.

It is recommended to apply latest Database Patchet (aleady on 10.2.0.4) along with latest Patch Set Update (PSU2) to Oracle Database as this helps to fix the critical bugs and also serve as a new baseline version for reporting issues to Oracle.

In case of RAC, you also need to apply CRS Patch Bundle to fix the CRS issues identified by Oracle.

Please note that Patch Set Updates can be applied on the base release version or on any earlier Patch Set Update. For example, 10.2.0.4.2 can be applied on 10.2.0.4.1 and 10.2.0.4.0 . Once a Patch Set Update has been applied, the recommended way to get future security content is to apply subsequent Patch Set Updates. Reverting from an applied Patch Set Update back to the Critical Patch Update, while technically possible, requires significant time and effort, and is not advised.

To know further, please read following My Oracle Support articles

Note 405820.1 – 10.2.0.X CRS Bundle Patch Information

Note 854428.1 – Intro to Patch Set Updates (PSU)

Note 8833280.8 lists down the bugs fixed as part of PSU2.

Sqlplus connection on AIX taking too long

Recently we faced a performance issue, where in sqlplus connection from application server A (AIX 5.3) to Database server DB (different physical server,10gR2 on AIX 5.3) was taking nearly 1-2 minutes.  We did some quick check’s to narrow down the problematic area.i.e Is it network or database server or some issue with application server?

1)Vmstat output reported Normal Run queue’s/memory utilisation/idle cpu on Application server A and Database Server DB . Rules out resource issue.

2) Connections from other application server B was taking normal time. Rules out Database server issue

3) If incorrect password was entered in connection details, second attempt resulted in normal quick response time. Indicates some network issues.

4) System Admin checked for network issues with traceroute command and reported normal results.

Even though SA confirmed that there was no network issue, we were sure that this has to do something with DNS/Network. As we had identical environment from where connection was working fine , so we initiated tracing of session using truss

<span style="font-family: verdana, geneva;"><strong>truss -aeo /tmp/sqlplus_timing.txt sqlplus username/passwd@DB</strong></span>

Issuing a tail command on trace for Application Server A reported following

<strong>open("/etc/netsvc.conf", O_RDONLY)              Err#13 EACCES
open("/etc/irs.conf", O_RDONLY)                 Err#2  ENOENT
getdomainname(0x09001000A00A0E98, 1024)         = 0</strong>
__libc_sbrk(0x0000000000010020)                 = 0x000000001021CBE0
getdomainname(0x09001000A00A0E98, 1024)         = 0
open("/etc/hesiod.conf", O_RDONLY)              Err#2  ENOENT
getdomainname(0x09001000A00A0E98, 1024)         = 0
socket(2, 2, 0)                                 = 9
getsockopt(9, 65535, 4104, 0x0FFFFFFFFFFF5B74, 0x0FFFFFFFFFFF5B70) = 0
connext(9, 0x09001000A0015B50, 16)              = 0
send(9, 0x0FFFFFFFFFFF6A80, 32, 0)              = 32
_poll(0x0FFFFFFFFFFF5C20, 1, 5000)              = 1
nrecvfrom(9, 0x0FFFFFFFFFFF7DB0, 1024, 0, 0x0FFFFFFFFFFF63E0, 0x0FFFFFFFFFFF5C08) = 78
send(9, 0x0FFFFFFFFFFF6A80, 22, 0)              = 22
_poll(0x0FFFFFFFFFFF5C20, 1, 5000)              = 1
nrecvfrom(9, 0x0FFFFFFFFFFF7DB0, 1024, 0, 0x0FFFFFFFFFFF63E0, 0x0FFFFFFFFFFF5C08) = 22
close(9)                                        = 0
socket(2, 2, 0)                                 = 9
sendto(9, 0x0FFFFFFFFFFF6A80, 22, 0, 0x09001000A0015B60, 16) = 22
_poll(0x0FFFFFFFFFFF5C20, 1, 5000) (sleeping...)
_poll(0x0FFFFFFFFFFF5C20, 1, 5000)              = 0
close(9)                                        = 0
socket(2, 2, 0)                                 = 9
sendto(9, 0x0FFFFFFFFFFF6A80, 22, 0, 0x09001000A0015B60, 16) = 22
_poll(0x0FFFFFFFFFFF5C20, 1, 5000) (sleeping...)
_poll(0x0FFFFFFFFFFF5C20, 1, 5000)              = 0
close(9)                                        = 0
socket(2, 2, 0)                                 = 9
sendto(9, 0x0FFFFFFFFFFF6A80, 22, 0, 0x09001000A0015B60, 16) = 22
_poll(0x0FFFFFFFFFFF5C20, 1, 10000) <strong>(sleeping...)</strong>
_poll(0x0FFFFFFFFFFF5C20, 1, 10000)             = 0
close(9)                                        = 0

We can see lot of sleeping messages for _poll system call.  We did not find these wait’s in truss output of Application Server B . Going up in truss output file, we see EACCESS (permission issue) on /etc/netsvc.conf and ENONT (file/directory not present) on /etc/irs.conf file.  On application server B, there were no EACCESS errors on /etc/netsvc.conf but ENONT errors were reported for /etc/irs.conf . Look’s like we need to check etc/netsvc.conf file permissions.

Comparing file permission’s, we noticed that permission on /etc/netsvc.conf had changed on Server A and  root user alone had read permission on file. Granting read permission on /etc/netsvc.conf to other’s resolved the issue immediately.

As per AIX Doc’s, /etc/netsvc.conf file is used to specify the ordering of name resolution for the sendmail command, gethostbyname subroutine, gethostaddr subroutine, and gethostent subroutine and alias resolution for the sendmail command. It is also used to override the default order and the order given in the /etc/irs.conf file by creating the /etc/netsvc.conf configuration file and specifying the desired ordering.

e.g If the resolver cannot find the name in the /etc/hosts file and you want to the resolver to use NIS, enter:

hosts = local , nis

If the resolver cannot find the name in the /etc/hosts file and you want to the resolver to use NIS, enter:
hosts = local , nis

I had usually seen /etc/resolv.conf file to specify name resolution.  AIX Doc’s for name resolution specifies following process for name resolution

To resolve a name in a domain network, the resolver routine first queries the domain name server database, which might be local if the host is a domain name server or on a foreign host. Name servers translate domain names into Internet addresses. The group of names for which a name server is responsible is its zone of authority. If the resolver routine is using a remote name server, the routine uses the domain name protocol (DOMAIN) to query for the mapping. To resolve a name in a flat network, the resolver routine checks for an entry in the local /etc/hosts file. When NIS or NIS+ is used, the /etc/hosts file on the master server is checked.

By default, resolver routines attempt to resolve names using the above resources. BIND/DNS is tried first. If the /etc/resolv.conf file does not exist or if BIND/DNS could not find the name, NIS is queried if it is running. NIS is authoritative over the local /etc/hosts, so the search ends here if it is running. If NIS is not running, then the local /etc/hosts file is searched. If none of these services can find the name, then the resolver routines return with HOST_NOT_FOUND. If all of the services are unavailable, then the resolver routines return with SERVICE_UNAVAILABLE.

The default order described above can be overwritten by creating the /etc/irs.conf configuration file and specifying the desired order. Also, both the default and /etc/irs.conf orderings can be overwritten with the environment variable, NSORDER. If either the /etc/irs.conf file or NSORDER environment variable are defined, then at least one value must be specified along with the option.

As mentioned, /etc/irs.conf is used to modify the default order and /etc/netsvc.conf can be used to override the order given in /etc/irs.conf. I couldn’t find any reference explaining the time limit used by resolver, but seem’s like after checking for some limited time, it fall’s back on default order of name resolution.


Link:11gR2 RAC installation steps on OEL4

If you are looking for steps for 11gR2 RAC installation, you can refer to this article by Rajeev Ramdas at Dbastreet.com. Article lists down steps for installing 11gR2 RAC on 64 bit Oracle Enterprise Linux 4 (OEL4) using ASM for storage. As Raw devices are no longer supported, OCR and Voting Disks are also stored on ASM. Yes, this is one more cool New Feature available in 11gR2.

Using Oracle Wallet to Execute Shell script/cron without hard coded Oracle database password

You have been asked to schedule a shell script which need to connect to a  particular user and perform some action? How do you pass the password to script without hardcoding it in script. If password is written in a script, isn’t it a security threat?


Well with 10gR2 , Oracle Wallet provides you with facility to store database credentials in client side Oracle Wallet. Once stored, you can connect to database using sqlplus /@connect_string

Let’s see how it works.

Create a Oracle Wallet
Syntax – mkstore -wrl -create

$mkstore -wrl /u02/app/oracle/product/11.2.0/dbhome_1/network/admin/wallet
 -create
Enter wallet password:

Two files are created.

$ls -ltr
total 8
-rw------- 1 oracle oinstall 3880 Sep  8 22:48 ewallet.p12
-rw------- 1 oracle oinstall 3957 Sep  8 22:48 cwallet.sso

If you schedule cron through oracle user, keep the privileges as such. Please note that if a user has a read permission on these files, it can login to database.So it’s like your House Key which you would like to keep safely with you 🙂

Next step is to add database credential to the wallet. Before this, create a tnsnames entry you will use to access the database

AMIT_TEST11R2 =
  (DESCRIPTION =
    (ADDRESS = (PROTOCOL = TCP)(HOST = db11g)(PORT = 1521))
    (CONNECT_DATA =
      (SERVER = DEDICATED)
      (SERVICE_NAME = test11r2)
    )
  )

Add user credential to Oracle Wallet. Syntax is

mkstore -wrl wallet_location -createCredential db_connect_string username password</span>
  $mkstore -wrl /u02/app/oracle/product/11.2.0/dbhome_1/network/admin/wallet
-createCredential amit_test11r2 amit amit
  Enter wallet password:

To confirm, if the credential has been added , use listCredential option

  $mkstore -wrl /u02/app/oracle/product/11.2.0/dbhome_1/owm/wallets/oracle
 -listCredential
Oracle Secret Store Tool : Version 11.2.0.1.0 - Production
Copyright (c) 2004, 2009, Oracle and/or its affiliates. All rights reserved.

Enter wallet password:             

List credential (index: connect_string username)
1: amit_test11r2 amit

Now add following entries in client sqlnet.ora file

WALLET_LOCATION =
  (SOURCE =    (METHOD = FILE)
   (METHOD_DATA =      (DIRECTORY = /u02/app/oracle/product/11.2.0/dbhome_1/network/admin/wallet)    )  )
SQLNET.WALLET_OVERRIDE = TRUE

Ensure that auto-login is enabled for wallet.

Start Oracle Wallet manager
$owm
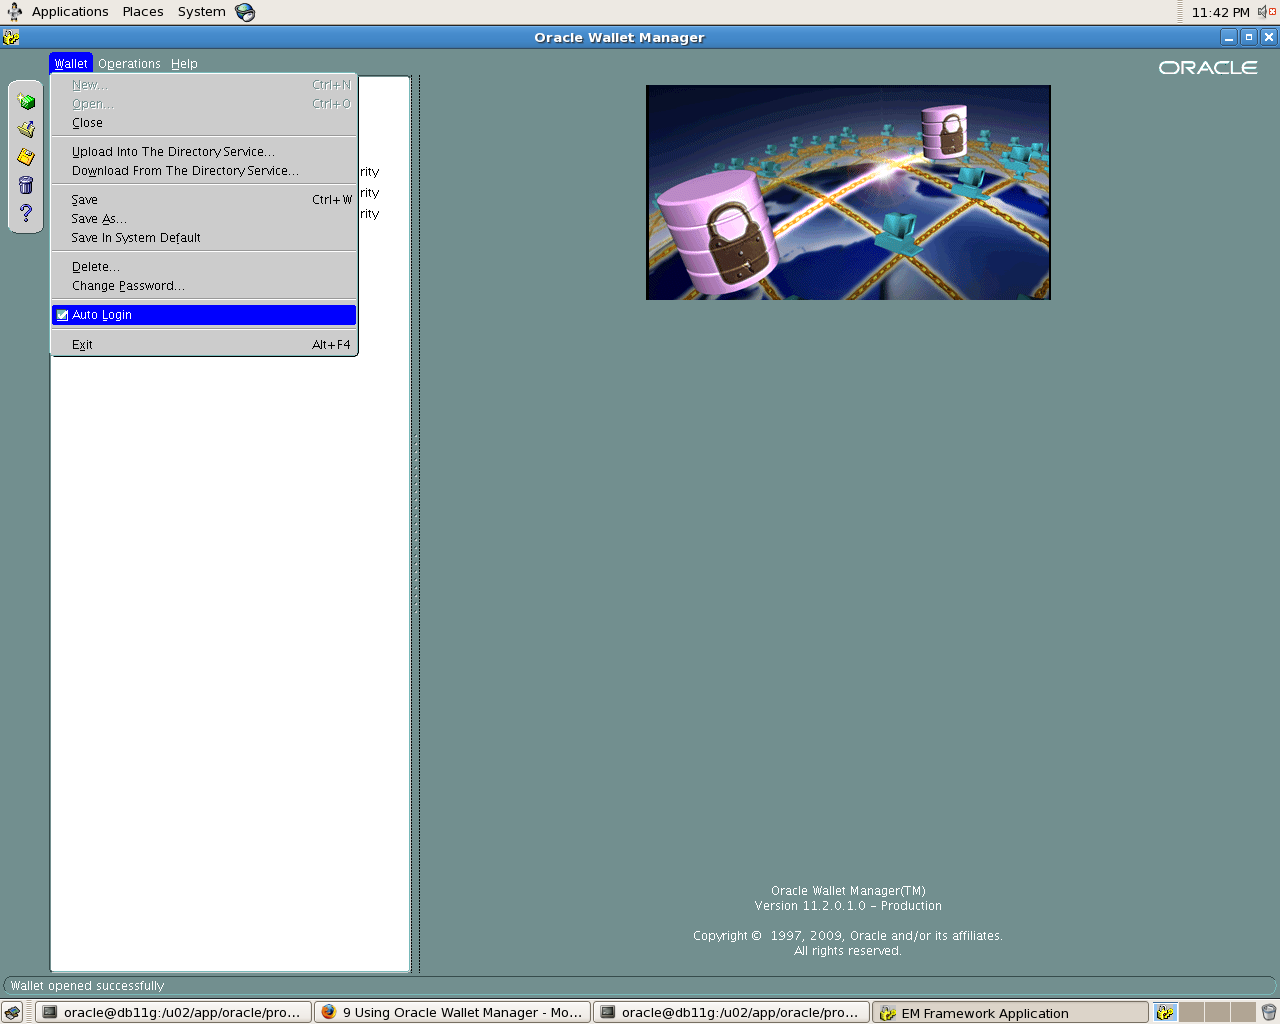
To enable auto login:

1. Select Wallet from the menu bar.
2.Select Auto Login. A message at the bottom of the window indicates that auto login is enabled.

Wallet Auto Login

Now let’s try connecting to database

[oracle@db11g admin]$ sqlplus /@amit_test11r2

SQL*Plus: Release 11.2.0.1.0 Production on Tue Sep 8 23:34:37 2009

Copyright (c) 1982, 2009, Oracle.  All rights reserved.

SQL> show user
USER is "AMIT"

We have been able to login without specifying a password. In case you change password for Database User, you will have to modify credentials .If you don’t, your DB login will fail with ORA-1017.

SQL> alter user amit identified by amitbansal;

User altered.

[oracle@db11g admin]$ sqlplus /@amit_test11r2

SQL*Plus: Release 11.2.0.1.0 Production on Tue Sep 8 23:35:34 2009

Copyright (c) 1982, 2009, Oracle.  All rights reserved.

ERROR:
ORA-01017: invalid username/password; logon denied

To modify credential you need to use modifyCredential option. Syntax for command is

mkstore -wrl <wallet_location> -modifyCredential <dbase_alias> <username> <password>

[oracle@db11g wallet]$ mkstore -wrl /u02/app/oracle/product/11.2.0/dbhome_1/network/admin/wallet/
 -modifyCredential amit_test11r2 amit amitbansal
Oracle Secret Store Tool : Version 11.2.0.1.0 - Production
Copyright (c) 2004, 2009, Oracle and/or its affiliates. All rights reserved.

Enter wallet password:             

Modify credential
Modify 1

To delete credentials use deleteCredential option with tnsalias

 $mkstore -wrl /u02/app/oracle/product/11.2.0/dbhome_1/network/admin/wallet/
 -deleteCredential amit_test11r2
Oracle Secret Store Tool : Version 11.2.0.1.0 - Production
Copyright (c) 2004, 2009, Oracle and/or its affiliates. All rights reserved.

Enter wallet password:             

Delete credential
Delete 1

You can add more users to these wallet , but you will have to use a separate TNSALIAS for it. Note that TNSALIAS is a unique identifier for each user to connect to database.

11gR2: Monitoring Real Time SQL Plan Execution from Oracle Enterprise Manager

Ever since 11gR2 has been released, it has created a lot of buzz in Oracle Blogosphere with various posts on 11g Release 2 (11gR2 ) New Features primarily ASM New features. I would like to introduce you all to a feature which has been incorporated in 11gR2 Oracle Enterprise Manager to display Real-Time SQL Monitoring information . I would say that this was much awaited feature which had to be implemented in OEM and comes as a handy tool for DBA’s to tune/monitor sql execution.

Oracle 11gR1 introduced two new views V$SQL_MONITOR and V$SQL_MONITOR_PLAN to provide runtime execution statistics. This was part of feature called Real-Time SQL Monitoring which allows you to monitor sql in near real-time as the statement executes.

To recap, please find below description for both views

V$SQL_MONITOR displays SQL statements whose execution have been (or are being) monitored by Oracle. An entry is created in V$SQL_MONITOR every time the execution of a SQL statement is being monitored. SQL monitoring is automatically started when a SQL statement runs parallel or when it has consumed at least 5 seconds of CPU or I/O time.

V$SQL_PLAN_MONITOR displays plan level monitoring statistics for each SQL statement found in V$SQL_MONITOR. Each row in V$SQL_PLAN_MONITOR corresponds to an operation of the execution plan being monitored. Timing information could be viewed by joining V$SQL_PLAN_MONITOR with V$ACTIVE_SESSION_HISTORY on SQL_ID, SQL_EXEC_START, SQL_EXEC_ID, and SQL_PLAN_LINE_ID (simply named PLAN_LINE_ID in V$SQL_PLAN_MONITOR).

In 11gR1, you could use DBMS_SQLTUNE.REPORT_SQL_MONITOR to generate html/text reports . Greg Rahn has written a post describing it in detail.

11gR2 Oracle Enterprise Manager provides a graphical interface which makes job easier.

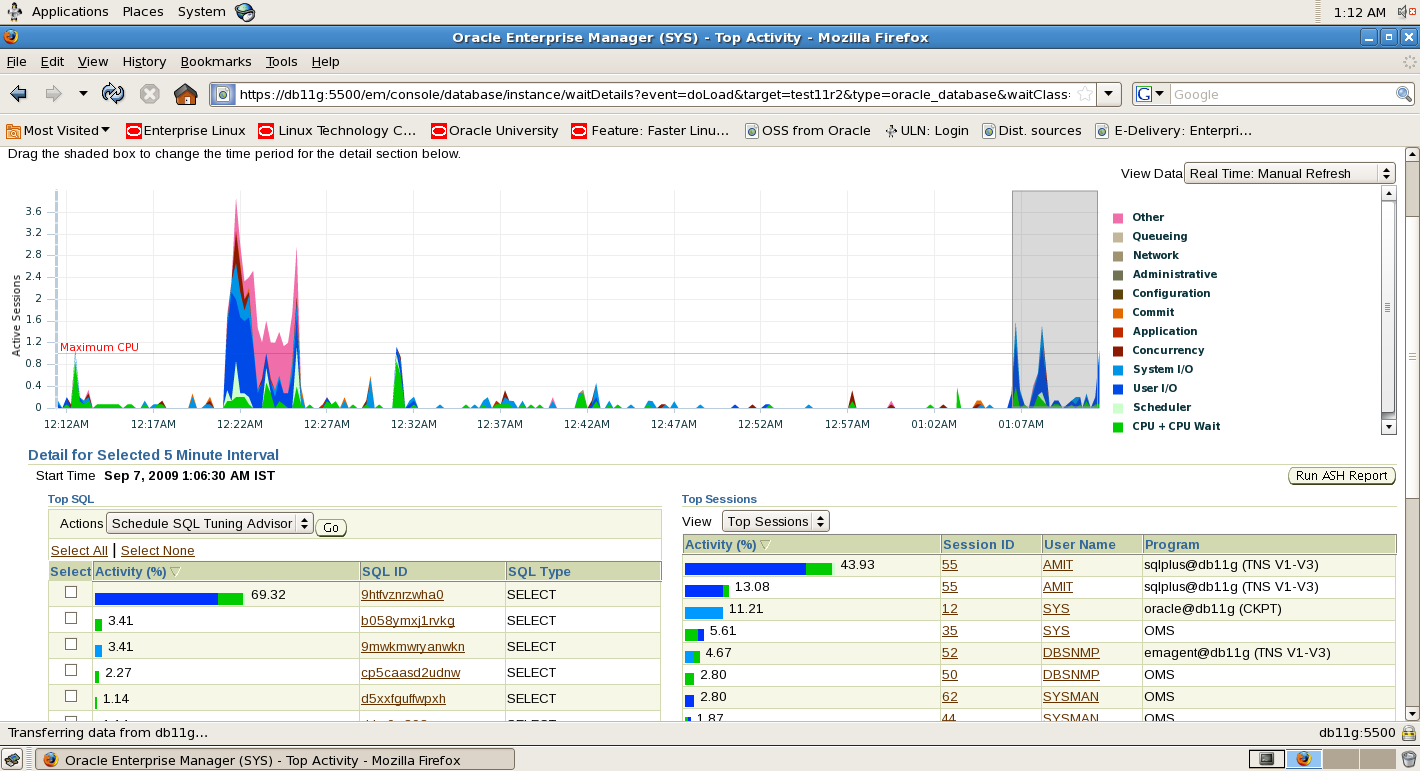
Click on “Top Activity” link under Performance Page to view the Active session details. This shows wait events classified by wait class along with Top Sql and Top sessions activity.

Top Activity

Click on “SQL Monitoring” link under Performance Page to view the Monitored SQL. SQL’s having execution time >5 second or parallel queries will be displayed here. You can also use MONITOR hint to monitor a sql statement.
Green circle shows that the SQL is being currently executing. Click on the symbol to view plan

Sql_monitor_1
This shows following details

Overview – SQL_ID and user details
Time and Wait statistics – Gives Duration for query, DB time and Wait activity %. Moving mouse on wait activity graph will give you the breakup of wait events.
I/O Statistics – This section gives I/O details
Detils – This section includes two sub headings

Plan Statistics

This gives execution plan details
sql_monitor_2

These graphs are dynamic and are refreshed as the SQL is being executed.

Activity

This gives ASH Report for session

ash_screenshot

You can also get a report by clicking on Report link
sql_report
Below screenshot shows execution plan for Parallel SQL query execution

sql_monitor_parallel_execution

parallel_execution_plan
This has additional section under Details section called “Parallel”. This gives parallel server details giving DB Time,wait activity %,IO Requests and Buffer gets detail.
Parallel Severs Breakdown

You have option to save/mail the report
11gr2_sql_monitor2

Moving mouse pointer on User under “Overview” section also shows Session information

session_info 
Right click on the report to get Session Details

session_details

To enable SQL Monitoring, STATISTICS_LEVEL parameter need’s to be set to ALL or TYPICAL. Additionally CONTROL_MANAGEMENT_PACK_ACCESS parameter must be set to DIAGNOSTIC+TUNING which requires you to have Oracle Database tuning pack.