Amit Bansal

Using current_scn for RMAN incremental ? Think again..

I am bloging about experience we had using rman incremental backup for syncing standby database.

We had a standby database which lagged by considerable time and we decided to use rman incremental database to make it current. We have done this in past and used normal procedure of taking current_scn from V$database on standby and took rman incremental backup from this scn on primary database.

When we did the recovery it finished successfully but on starting MRP  it still required old archive log.
We tried manual recovery and still it was failing and asking for same old archive. This was strange and I ran following queries to find out the SCN

SELECT CURRENT_SCN FROM V$DATABASE;
CURRENT_SCN
 -----------
 10641805448174

Checking the minimum checkpoint_change# for V$datafile reported following SCN which was less then current_SCN.

SQL> select min(checkpoint_change#) from V$datafile;
 MIN(CHECKPOINT_CHANGE#)
 ------------------------------
 10641804610367

At this time I decided to check first_change# for the archive required by standby

select first_change# from GV$ARCHIVED_LOG where THREAD#=2 and SEQUENCE#=699;
 FIRST_CHANGE#
 ------------------------------
 10618920961649

This value was way less and was different then the initial current_scn which we used to take rman incremental backup. Checking on My Oracle Support , found note 836986.1 which recommended running following query

SQL> select min(fhscn) from x$kcvfh;
MIN(FHSCN)
 ----------------
 10618920961649

This matches with the scn from V$archived_log. Note recommends to take lower value of x$kcvfh and V$database.
So we took backup again with this SCN from primary. Since we have RAC database, we used channels on both instance

run
 {
 allocate channel c1 device type disk format '/VOL301/rmanbackup/stby_PROD_%U' connect 'sys/password@PROD1';
 allocate channel c2 device type disk format '/VOL301/rmanbackup/stby_PROD_%U' connect 'sys/password@PROD1';
 allocate channel c3 device type disk format '/VOL301/rmanbackup/stby_PROD_%U' connect 'sys/password@PROD2';
 allocate channel c4 device type disk format '/VOL301/rmanbackup/stby_PROD_%U' connect 'sys/password@PROD2';
 backup incremental from scn 10618920961649 database format '/VOL301/rmanbackup/stby_PROD_%U' tag 'Tag_INCR_PROD';
 }

We copied the backups and also restored the controlfile and cataloged the backups. Restoring now did the trick

run
 {
 allocate channel c1 device type disk ;
 allocate channel c2 device type disk ;
 allocate channel c3 device type disk ;
 allocate channel c4 device type disk ;
 recover database noredo;
 }

I think x$kcvfh should also be part of documentation as it wil help people check both scn before proceeding. Anyways this seems to be some special case as we have used this rman incremental approach lot of times and faced this first time.
If anyone has clue on what caused this, then I would be really interested to know it.

Poll on Sql Plan Management

Dominic is conducting poll on SPM and Sql Profiles usage on his website. Link can be found here 

I have been using SPM and SQL Profiles (using coe_xfr_profile.sql) to fix plans for queries  and believe me its very easy and quick way of fixing problems in production database. I have not yet used SPM to baseline everything and only using it on need basis for fixing sql with bad plans. I have been reading about  Automatic SQL tuning advisor in 11g and would be  trying to use it and  see the recommendations proposed by it (will keep accept_sql_profiles to false 🙂 )

Oracle Direct connector for HDFS

Some time back oracle had announced Oracle Big Data appliance. Along with this Oracle released Big Data Connectors to facilitate data access between data stored in a Hadoop cluster and Oracle Database. I tried installing Oracle Direct Connector for HDFS (Hadoop distributed file system) and documenting steps below.

To use Oracle Direct Connector we need to install hadoop software on the system where Oracle Database is running. We access HDFS using preprocessor feature of external table (available in 11g)
You can download the software (from edelivery.oracle.com) and unzip it to directory. This provides a file hdfs_stream which will be used in preprocessor clause

To get started , we need to create directory for external table file location and oracle direct connector bin directory

SQL> CREATE OR REPLACE DIRECTORY hadoop_test_dir as '/home/oracle/ext_table';
SQL> CREATE OR REPLACE DIRECTORY hdfs_bin_path AS '/home/oracle/product/orahdfs-1.0.0.0.0/bin';

I will be using scott user and we need to provide following permissions to it

GRANT CREATE SESSION TO scott;
 GRANT EXECUTE ON SYS.UTL_FILE TO scott;
 GRANT READ, WRITE on DIRECTORY hadoop_test_dir TO scott;
 GRANT EXECUTE ON DIRECTORY hdfs_bin_path TO scott;

Create the external table

drop TABLE "SCOTT"."TEST_DATA_EXT_TAB" ;
CREATE TABLE "SCOTT"."TEST_DATA_EXT_TAB"
 (OBJECT_ID NUMBER,
 OBJECT_NAME VARCHAR2(128),
 OBJECT_TYPE VARCHAR2(19)
 )
 ORGANIZATION EXTERNAL
 ( TYPE ORACLE_LOADER
 DEFAULT DIRECTORY HADOOP_TEST_DIR
 ACCESS PARAMETERS
 ( RECORDS DELIMITED BY NEWLINE
 PREPROCESSOR HDFS_BIN_PATH:'hdfs_stream'
 FIELDS TERMINATED BY ','
 )
 LOCATION ( 'test_data1.txt','test_data2.txt','test_data3.txt','test_data4.txt')
 );

Selecting from table gives error as no file is present

select count(*) from "SCOTT"."TEST_DATA_EXT_TAB"
 *
 ERROR at line 1:
 ORA-29913: error in executing ODCIEXTTABLEOPEN callout
 ORA-29400: data cartridge error
 KUP-04040: file test_data1.txt in HADOOP_TEST_DIR not found

Create a configuration files with location of files on hdfs and database connection string. This will be used to populate the dummy external table files

[oracle@oradbdev01]~/product/orahdfs-1.0.0.0.0/log% cat ../myconf.xml
<?xml version="1.0"?>
 <configuration>
 <property>
 <name>oracle.hadoop.hdfs.exttab.tableName</name>
 <value>SCOTT.TEST_DATA_EXT_TAB</value>
 </property>
 <property>
 <name>oracle.hadoop.hdfs.exttab.datasetPaths</name>
 <value>/user/oracle/TEST_DATA/part*</value>
 </property>
 <property>
 <name>oracle.hadoop.hdfs.exttab.connection.url</name>
 <value>
 jdbc:oracle:thin:@oradbdev01:1521:tintin1
 </value>
 </property>
 <property>
 <name>oracle.hadoop.hdfs.exttab.connection.user</name>
 <value>SCOTT</value>
 </property>
</configuration>

Set HADOOP_CLASSPATH in hadoop_env.sh to include $ORACLE_HOME/jdbc/lib/ojdbc6.jar

export CLASSPATH=$CLASSPATH:${OLH_HOME}/jlib/oraloader.jar:${OLH_HOME}/jlib/ojdbc6.jar:${OLH_HOME}/jlib/oraclepki.jar

Run the ExternalTable command as below to create the files for external table. It will prompt for password for database user mentioned in conf file

[oracle@oradbdev01]~/product/orahdfs-1.0.0.0.0/jlib% hadoop jar orahdfs.jar oracle.hadoop.hdfs.exttab.ExternalTable -conf ../myconf.xml -publish
 [Enter Database Password:]
 Oracle Direct HDFS Release 1.0.0.0.0 - Production
Copyright (c) 2011, Oracle and/or its affiliates. All rights reserved.
SCOTT.TEST_DATA_EXT_TAB publish operation succeeded
Details:
HADOOP_TEST_DIR:test_data2.txt file created with the following paths
 hdfs://oradbdev03:9000/user/oracle/TEST_DATA/part-m-00000
HADOOP_TEST_DIR:test_data1.txt file created with the following paths
 hdfs://oradbdev03:9000/user/oracle/TEST_DATA/part-m-00001
HADOOP_TEST_DIR:test_data3.txt file created with the following paths
 hdfs://oradbdev03:9000/user/oracle/TEST_DATA/part-m-00002
HADOOP_TEST_DIR:test_data4.txt file created with the following paths
 hdfs://oradbdev03:9000/user/oracle/TEST_DATA/part-m-00003

test_data*.txt files will be populated by above data.

Now let’s select from the table

SQL> select /*+ parallel (a,4) */ count(*) from "SCOTT"."TEST_DATA_EXT_TAB" a;
COUNT(*)
 ----------
 153450496
Elapsed: 00:02:13.69

As you can see we can also use parallel hint in query.

Oracle documentation had mentioned setting following parameter in conf file

<property>
 <name>oracle.hadoop.hdfs.exttab.datasetCompressionCodec</name>
 <value>org.apache.hadoop.io.compress.DefaultCodec</value>
 </property>

But setting this causes no rows to be returned and following error is recorded in logfile

cat directhdfs-log_13387-0126121327579379.log
 12/01/26 12:03:00 WARN util.NativeCodeLoader: Unable to load native-hadoop library for your platform... using builtin-java classes where applicable
 Error reading data from hdfs://oradbdev03:9000/user/oracle/TEST_DATA/part-m-00002: unknown compression method

Solution is to unset CompressionCodec parameter.

[oracle@oradbdev01]~/product/orahdfs-1.0.0.0.0/log% cat /home/oracle/ext_table/test_data1.txt
 CompressionCodec=
 hdfs://oradbdev03:9000/user/oracle/TEST_DATA/part-m-00001

You need to set this parameter only if the hdfs files are compressed. In case files are compressed (mostly we have compressed files on hadoop) we need to use appropriate codec.e.g for gz format use org.apache.hadoop.io.compress.GzipCodec


Copying Oracle Scheduler jobs with Arguments

Oracle provides dbms_scheduler.copy_job function to copy oracle scheduler jobs which works great. But problem is that it cannot copy  jobs which have  arguments.

Need to copy jobs can arise due to following scenarios

1)Runaway jobs – When Scheduler job is running without any SID. This means OS session is not present and this will not clear. These jobs have to be recreated to resolve the issue.
2)Jobs can not be stopped – many times jobs cannot be stopped by dbms_scheduler.stop_job(<jobname>,true) as they error out with “Internal error”
3)We need to have similar job but under different schema or with different name

I have written below code which would prompt for username and jobname and will copy the job along with its arguments

declare
l_owner varchar2(30) :='&job_owner';
l_old_job varchar2(30) :='&job_name';
l_new_job varchar2(30);
cnt integer;
cursor c_arg is select argument_position,value from DBA_SCHEDULER_JOB_ARGS where job_name = l_old_job and owner = l_owner order by argument_position;
begin
l_new_job :='INTERMEDIATE_CPY';
select count(*) into cnt from dba_scheduler_jobs where job_name = l_new_job and owner = l_owner;
		if ( cnt > 0 ) then
			dbms_output.put_line ('dropping scheduler job INTERMEDIATE_CPY');
			 dbms_scheduler.drop_job(l_owner||'.'||l_new_job,true);
			end if;
sys.dbms_scheduler.copy_job(l_owner||'.'||l_old_job,l_owner||'.'||l_new_job);
sys.dbms_scheduler.drop_job(l_owner||'.'||l_old_job,true);
sys.dbms_scheduler.copy_job(l_owner||'.'||l_new_job,l_owner||'.'||l_old_job);
for v_arg in c_arg
	loop
		dbms_output.put_line('Setting ARGUMENT_POSITION '||v_arg.argument_position||' to value '||v_arg.value);
	 sys.dbms_scheduler.set_job_argument_value(job_name =>l_owner||'.'||l_old_job,ARGUMENT_POSITION=>v_arg.argument_position,ARGUMENT_VALUE =>v_arg.value);
	 end loop;
	 sys.dbms_scheduler.enable(l_owner||'.'||l_old_job);
	sys.dbms_scheduler.drop_job(l_owner||'.'||l_new_job,true);
end;
/

In case you don’t copy the arguments, jobs will fail with status as STOPPED and give REASON as “Job slave process was terminated”. Also it can generate following ORA-07445 error

ORA-07445: exception encountered: core dump [kpubsuuc()+197] [SIGSEGV] [Address not mapped to object] [0x000000000] [] []

EM12c:Automated discovery of Targets

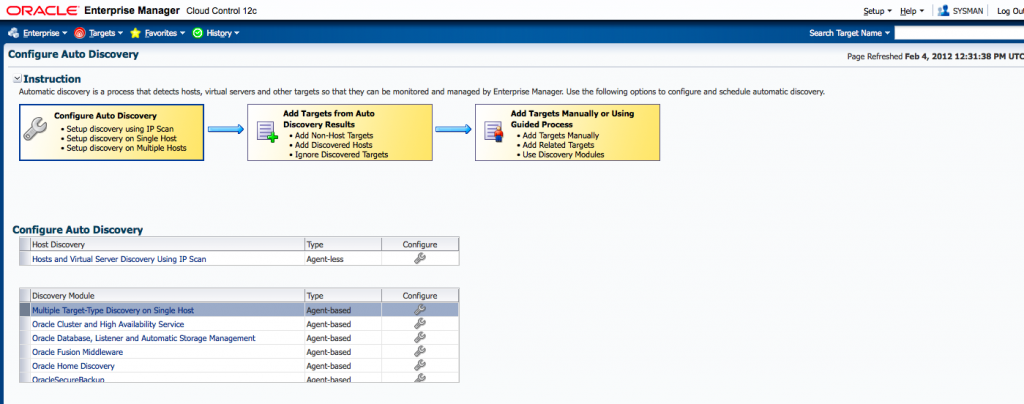
In this post we will discuss the Automated discovery of Targets in Enterprise Manager Cloud Control(EM 12c). Once you have installed agents, you can schedule automatic discovery of new targets. Let’s get started

1)Click on Add Target>Configure Auto Discovery from the Setup menu

2)Click the Configure icon in the Multiple Target-type Discovery on Single Host row in the Discovery table.

3)Select the host in the table and click Configure.

4)Set the schedule at which the discovery job will be run, in days. This schedule will be applied to all selected hosts. By default the job will run every 24 hours.

Select the Oracle component types you want to search the host for and click Ok.

5)Click “Run Discovery now” and it will report the discovered targets.

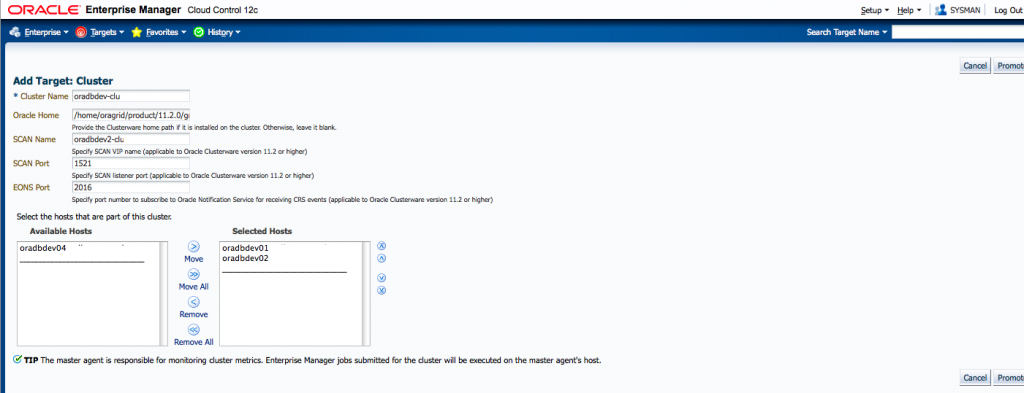
6) Next is to configure the Targets. We will first start with oradbdev-clu i.e RAC cluster

We have added all the hosts part of cluster. In case management agent is not installed on all hosts , they will not appear in “Available hosts” list

7)Next we select Cluster database tintin and click on configure

8)You will be required to put dbsnmp password for configuring database montioring. By default dbsnmp account is locked. You can verify using following sql

select username,account_status from dba_users where username='DBSNMP';
USERNAME ACCOUNT_STATUS
------------------------------ --------------------------------
DBSNMP EXPIRED & LOCKED

Unlock and reset password as below

sql>alter user DBSNMP account unlock identified by oracle;

Do test connection and verify all information is correct.

9)Then configure ASM instances and you will be required to enter ASM password

10)We are done now. We can go to Targets ->Databases ->Tintin to view the database. It would look like below