Upgrading Oracle RAC Database -10g

Continuing my experiments with our 2 Node 10g RAC Test system, I carried out upgrade of Oracle Clusterware and Oracle RAC Database from 10.2.0.1 to 10.2.0.4. I have tried to document the steps for upgrading Oracle Clusterware(Rolling Upgrade) and RAC Database upgrade in this post. In case you observe any mistakes, please let me know

First step is to download the 10.2.0.4 Patchset from metalink. In our case ,we downloaded Patch 6810189 (10g Release 2 (10.2.0.4) Patch Set 3 for Linux x86). You can follow Patch Readme for detailed steps.

We will be doing Rolling upgrade for Oracle Clusterware i.e we will only bring one node down for patching while other node will be available and accepting database connections. Before you start the process, take backup of following so as to restore it in case of failed upgrade

a) Full OS backup (as some binaries are present in /etc ,etc)

b) Full Database Backup (Cold or hot backup)

c) Backup of OCR and voting disk

Let’s begin it

1)Shutdown the DBconsole and Isqlplus

<span style="font-size: small; font-family: arial,helvetica,sans-serif;">$ emctl stop dbconsole
$ isqlplusctl stop
</span>

2) Shutdown the associated service on the node

<span style="font-size: small; font-family: arial,helvetica,sans-serif;">[oracle@blrraclnx1 ~]$ srvctl stop service -d orcl -s orcl_taf -i orcl1</span>

3) Shutdown Database Instance and ASM instance on node (if present)

<span style="font-size: small; font-family: arial,helvetica,sans-serif;">[oracle@blrraclnx1 ~]$  srvctl stop instance -d orcl -i orcl1
</span>

To stop ASM, use following command

<span style="font-size: small; font-family: arial,helvetica,sans-serif;">[oracle@blrraclnx1 ~]$ srvctl stop asm -n blrraclnx1
</span>

4)Next step is to stop Nodeapps services on the node

<span style="font-size: small; font-family: arial,helvetica,sans-serif;">[oracle@blrraclnx1 ~]$ srvctl stop nodeapps -n blrraclnx1</span>

Before proceeding to installing Oracle Clusterware Patch, let’s confirm if services have been stopped

HA Resource                                   Target     State
-----------                                   ------     -----
<strong>ora.blrraclnx1.ASM1.asm                       OFFLINE    OFFLINE
ora.blrraclnx1.LISTENER1_BLRRACLNX1.lsnr      OFFLINE    OFFLINE
ora.blrraclnx1.gsd                            OFFLINE    OFFLINE
ora.blrraclnx1.ons                            OFFLINE    OFFLINE
ora.blrraclnx1.vip                            OFFLINE    OFFLINE</strong>
ora.blrraclnx2.ASM2.asm                       ONLINE     ONLINE on blrraclnx2
ora.blrraclnx2.LISTENER1_BLRRACLNX2.lsnr      ONLINE     ONLINE on blrraclnx2
ora.blrraclnx2.gsd                            ONLINE     ONLINE on blrraclnx2
ora.blrraclnx2.ons                            ONLINE     ONLINE on blrraclnx2
ora.blrraclnx2.vip                            ONLINE     ONLINE on blrraclnx2
ora.orcl.db                                   ONLINE     ONLINE on blrraclnx2
<strong>ora.orcl.orcl1.inst                           OFFLINE    OFFLINE</strong>
ora.orcl.orcl2.inst                           ONLINE     ONLINE on blrraclnx2
ora.orcl.orcl_taf.cs                          ONLINE     ONLINE on blrraclnx2
<strong>ora.orcl.orcl_taf.orcl1.srv                   OFFLINE    OFFLINE</strong>
ora.orcl.orcl_taf.orcl2.srv                   ONLINE     ONLINE on blrraclnx2

5)Set DISPLAY variable and execute runinstaller from Patch Directory

<span style="font-size: small; font-family: arial,helvetica,sans-serif;">[oracle@blrraclnx1 Disk1]$ ./runInstaller
</span>

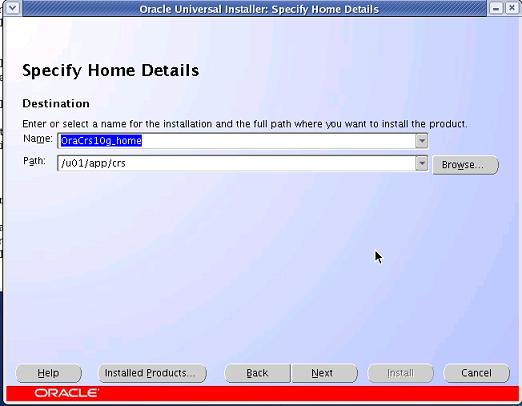
This will open OUI screen. Select Oracle Clusterware Home for Patching. Find below screenshot for same

crs10204patch

crs10204patch

This will automatically select all the nodes available in cluster and propogate patch binaries to the other node.

10204patch2

10204patch2


6) On the Summary screen, click Install.OUI will prompt you now to run, following two scripts as Root which will upgrade Oracle Clusterware

<span style="font-size: small; font-family: arial,helvetica,sans-serif;"># $ORA_CRS_home/bin/crsctl stop crs
# $ORA_CRS_home/install/root102.sh
</span>

Now we need to repeat the steps 1-4 and step 6 on Node 2. Step 5 is not required as binaries have been already copied over to node 2.

RAC Database Patching cannot be done in a rolling fashion and requires Database to be shutdown.

1)Shutdown the DBconsole and Isqlplus

<span style="font-size: small; font-family: arial,helvetica,sans-serif;">$ emctl stop dbconsole
$ isqlplusctl stop

</span>

2) Shutdown the associated service for database

<span style="font-size: small; font-family: arial,helvetica,sans-serif;">[oracle@blrraclnx1 ~]$ srvctl stop service -d orcl </span>

3) Shutdown Database Instance and ASM instance on node (if present)

<span style="font-size: small; font-family: arial,helvetica,sans-serif;">[oracle@blrraclnx1 ~]$  srvctl stop database -d orcl
</span>

To stop ASM, use following command on both the nodes

&lt;span style=&quot;font-size: small; font-family: arial,helvetica,sans-serif;&quot;&gt;[oracle@blrraclnx1 ~]$ srvctl stop asm -n blrraclnx1
&lt;/span&gt;<span style=\"font-size: small; font-family: arial,helvetica,sans-serif;\">[oracle@blrraclnx1 ~]$ srvctl stop asm -n blrraclnx2</span>

4)Next step is to stop Listener on both the nodes

<span style="font-size: small; font-family: arial,helvetica,sans-serif;">[oracle@blrraclnx1 ~]$ srvctl stop listener -n blrraclnx1 -l LISTENER1_BLRRACLNX1
</span><span style="font-size: small; font-family: arial,helvetica,sans-serif;">[oracle@blrraclnx1 ~]$ srvctl stop </span><span style="font-size: small; font-family: arial,helvetica,sans-serif;">listener</span><span style="font-size: small; font-family: arial,helvetica,sans-serif;"> -n blrraclnx2 -l LISTENER1_BLRRACLNX2
</span>

5)Set DISPLAY variable and execute runinstaller from Patch Directory

<span style="font-size: small; font-family: arial,helvetica,sans-serif;">[oracle@blrraclnx1 Disk1]$ ./runInstaller
</span>

This will open OUI screen. Select Database Home for Patching.


6) On the Summary screen, click Install.When prompted, run the $ORACLE_HOME/root.sh script as the root
user on both the nodes. On completion of this , we need to perform post installation steps.

7)Start listener and ASM Instance on both the nodes

<span style="font-size: small; font-family: arial,helvetica,sans-serif;">[oracle@blrraclnx1 ~]$ srvctl start listener -n blrraclnx1 -l LISTENER1_BLRRACLNX1
[oracle@blrraclnx1 ~]$ srvctl start listener -n blrraclnx2 -l LISTENER1_BLRRACLNX2
[oracle@blrraclnx1 ~]$ srvctl start asm -n blrraclnx1
[oracle@blrraclnx1 ~]$ srvctl start asm -n blrraclnx2</span>

8)For Oracle RAC Installation, we need to set CLUSTER_DATABASE=FALSE before upgrading

<span style="font-size: small; font-family: arial,helvetica,sans-serif;">[oracle@blrraclnx1 ~]sqlplus "/ as sysdba"
SQL&gt;startup nomount
SQL&gt; alter system set cluster_database=false scope=spfile;

System altered.
SQL&gt;shutdown immediate;
SQL&gt;startup upgrade
SQL&gt;spool 10204patch.log
SQL&gt;@?/rdbms/admin/catupgrd.sql
SQL&gt;spool off</span>

Log file needs to be reviewed for any errors. catupgrd.sql took 42 minutes on my system. In case CLUSTER_DATABASE parameter is not set to False, you will get following error while starting database in upgrade mode

ORA-39701: database must be mounted EXCLUSIVE for UPGRADE or DOWNGRADE

We need to Restart the database now and run utlrp.sql.

<span style="font-size: small; font-family: arial,helvetica,sans-serif;">SQL&gt; SHUTDOWN IMMEDIATE
SQL&gt; STARTUP
SQL&gt; @?/rdbms/admin/utlrp.sql</span>

Confirm whether Database has been upgraded successfully by querying DBA_REGISTRY;

select comp_name,version,status from dba_registry;

Now set Cluster_database parameter to TRUE and start Database

<span style="font-size: small; font-family: arial,helvetica,sans-serif;">SQL&gt;alter system set cluster_database=true scope=spfile;
SQL&gt;Shutdown immediate;
[oracle@blrraclnx1 ~]$ srvctl start database -d orcl
[oracle@blrraclnx1 ~]$ srvctl start service -d orcl</span>

To upgrade DBConsole, run following command

<span style="font-size: small; font-family: arial,helvetica,sans-serif;">emca -upgrade db -cluster
</span>

This completes the upgrade process.
Verification of CRS Integrity Was Unsuccessful

While going through the routine checks from Grid Control, I found a critical alert stating “clusterware integrity check failed” and by clicking on this message it says that there is problem with some metric collections on RAC environment.

To check the node reachability status following query was run:

$ $CRS_HOME/bin/cluvfy comp nodecon -n all

This will check the internode connectivity for all nodes in the cluster. It came out with following message:

$ $CRS_HOME/bin/cluvfy comp nodecon -n all
Verifying node connectivity
Verification of node connectivity was unsuccessful on all the nodes.

Even the CRS component check was unsuccessful:

$ $CRS_HOME/bin/cluvfy comp crs -n all

It came out with the following message:

$ $CRS_HOME/bin/cluvfy comp crs -n all
Verifying CRS integrity
Verification of CRS integrity was unsuccessful on all the nodes.

After this it was quite obvious to check the CRS status:

$ crsctl check crs
CSS appears healthy
CRS appears healthy
EVM appears healthy
$crs_stat -t

Name           Type           Target    State     Host
------------------------------------------------------------
ora.orcl.db    application    ONLINE    ONLINE    rac1
ora....11.inst application    ONLINE    ONLINE    rac1
ora....12.inst application    ONLINE    ONLINE    rac2
ora....vice.cs application    ONLINE    ONLINE    rac2
ora....l1.srv application    ONLINE    ONLINE    rac1
ora....l1.srv application    ONLINE    ONLINE    rac2
ora....SM1.asm application    ONLINE    ONLINE    rac1
ora....DC.lsnr application    ONLINE    ONLINE    rac1
ora....idc.gsd application    ONLINE    ONLINE    rac1
ora....idc.ons application    ONLINE    ONLINE    rac1
ora....idc.vip application    ONLINE    ONLINE    rac1
ora....SM2.asm application    ONLINE    ONLINE    rac2
ora....C2.lsnr application    ONLINE    ONLINE    rac2
ora....dc2.gsd application    ONLINE    ONLINE    rac2
ora....dc2.ons application    ONLINE    ONLINE    rac2
ora....dc2.vip application    ONLINE    ONLINE    rac2
$$CRS_HOME/bin/olsnodes
rac1
rac2

This confirmed that the CRS install is valid, but the question now is why the cluster verification utility (CVU) was failing?

To find the reason I enabled the tracing of CVU as:

$export SRVM_TRACE=true

It will set the environment variable SRVM_TRACE to true and tracing of CVU will generate a trace file under $CRS_HOME/cv/log with name like “cvutrace.log.X”

After setting this and again running $CRS_HOME/bin/cluvfy comp crs -n all trace file with name cvutrace.log.0 was generated.

And a message in cvutrace.log like

<strong>"ksh: CVU_10.2.0.2_dba/exectask.sh: cannot execute"</strong>

Now its is clear that oracle is not able to execute exectask.sh and cheking the permission and ownership of exectask.sh:

$CRS_HOME/cv/remenv
ls -ltr
-rw-r--r--  1 oracle dba    184 Jan  9  2008 exectask.sh
-rw-r--r--  1 oracle dba 268386 Jan  9  2008 exectask

The permission of these two files was changed. After changing the permission back to 755 CUV was showing correct results.

$chmod 755 exectask*

It is still not discovered how the permission of these files got changed.

10g RAC – Single Node Install Error

Last week we were trying to setup a 2 Node 10g RAC System on Linux with openfiler used for shared storage. We were using the article written by Jeffery Hunter. This was not the first time I was doing it, but by mistake we chose the machine with 500Mb memory to be used for one of the RAC system and used a 1Gb memory machine for Openfiler. We carried on with the installation though cluvfy and runInstaller gave us warnings regarding the same.

But once the installation completed, I found the database was shutting down frequently with “PMON Failed to acquire Latch”. I tried to debug it, but was not able to figure out anything from Systemstate dump which was generated.

Anyways we decided to rebuild the system.So we decided to cleanup the Machine 2 and meanwhile re-installed the openfiler. I was not having the OEL Cd’s on that day,so couldn’t build the Machine 1. So I went ahead with cleaning Machine 2 for re-installing software. I saw an opportunity of setting up a single node RAC and then adding another node. I followed below steps for cleaning the RAC installation

1)Stop the Nodeapps and Clusterware

<span style="font-size: small; font-family: arial,helvetica,sans-serif;">srvctl stop nodeapss -n</span>

This will shutdown the Database,ASM instance and also the nodeapps. After this , you can stop the clusterware.

<span style="font-size: small; font-family: arial,helvetica,sans-serif;">#crsctl stop crs</span>

Please note that you can directly stop the clusterware (while cleaning up) as this will automatically stop the dependent resources.

2) Remove the installation files and other related files
I had installed CRS in /u01/app/crs and Database home was located in /u01/app/oracle. So I removed both the directories.

<span style="font-size: small; font-family: arial,helvetica,sans-serif;">rm -rf /u01/app/crs
rm -rf /u01/app/oracle</span>

Note that if you are having multiple oracle database installation, then ensure that you do not remove orainventory directoy or any other ORACLE_HOME. In my case this was the only installation. Remove following files related to clusterware

<span style="font-size: small; font-family: arial,helvetica,sans-serif;">        rm /etc/oracle/*
	rm -f /etc/init.d/init.cssd
	rm -f /etc/init.d/init.crs
	rm -f /etc/init.d/init.crsd
	rm -f /etc/init.d/init.evmd
	rm -f /etc/rc2.d/K96init.crs
	rm -f /etc/rc2.d/S96init.crs
	rm -f /etc/rc3.d/K96init.crs
	rm -f /etc/rc3.d/S96init.crs
	rm -f /etc/rc5.d/K96init.crs
	rm -f /etc/rc5.d/S96init.crs
        rm -Rf /etc/oracle/scls_scr
	rm -f /etc/inittab.crs
	cp /etc/inittab.orig /etc/inittab
        rm -f /var/tmp/.oracle</span>

Also remove the OCR and Voting disk files. In my case it was stored in OCFS2 filesystem /u02/oradata/orcl. In case it is on raw devices , you can remove it using dd command. Remove ocr.loc file present in /etc/oracle

You can also refer to Note:239998.1 – 10g RAC: How to Clean Up After a Failed CRS Install

In our case as we were re-installing after successful installation. So we even had to clean the ASM disks. They can be again cleaned up by formatting the header with dd command.

<span style="font-size: small; font-family: arial,helvetica,sans-serif;">dd if=/dev/zero of=/dev/sdb bs=1024 count=100</span>

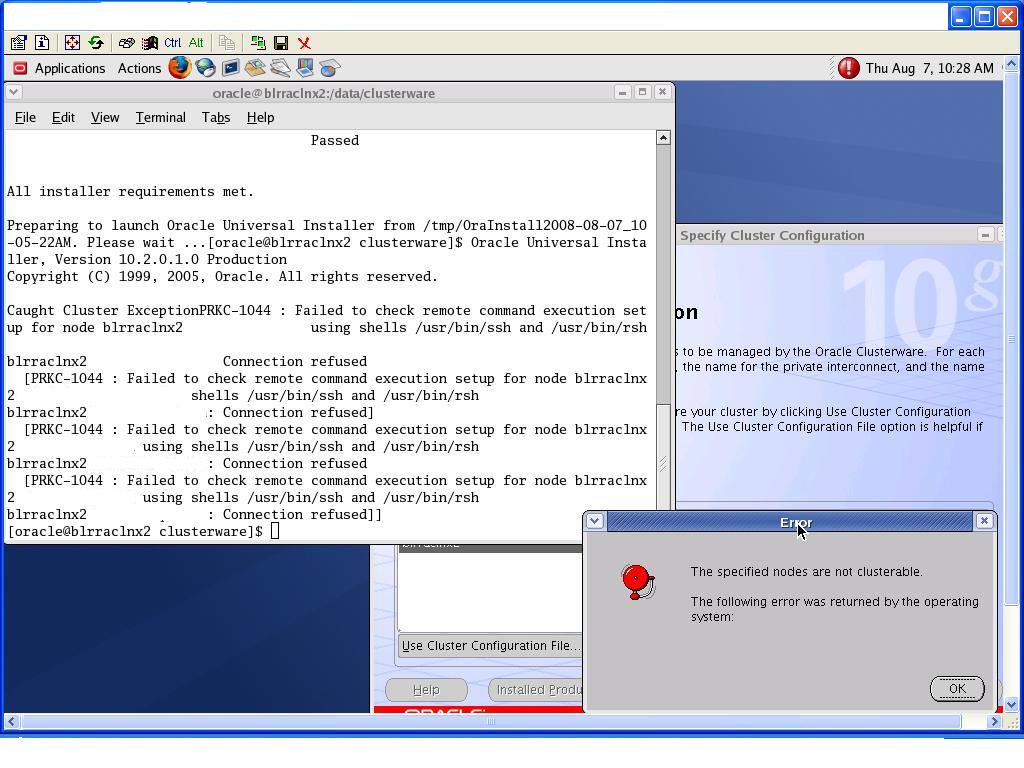
As we were removing the other node and had to reconfigure SSH, I removed /home/oracle/.ssh directory. I didn’t reconfigure SSH again thinking that as it will not be required for single node install. I restarted the Clusterware install and encountered following error

“The Specified nodes are not clusterable”

In another window, one more error was reported, which actually made it clear where the problem was

“Failed to check remote command execution setup for node <nodename> shells /us/bin/ssh and /usr/bin/rsh”

Screenshot for the error can be seen below

Above error clearly states that error was due to unavailability of ssh or rsh. After this I did setup for ssh for single node and tested this too to avoid any further errors.

<span style="font-size: small; font-family: arial,helvetica,sans-serif;">$ ssh blrraclnx2 date
Sun Aug 10 14:32:29 EDT 2008</span>

Anyways all these errors could have been avoided, had I used cluvfy utility as below

<span style="font-size: small; font-family: arial,helvetica,sans-serif;">$./runcluvfy.sh stage -pre crsinst -n blrraclnx2 -verbose</span>

Learning:- Always use Cluvfy utility to ensure all pre-requisites are met before installing RAC components

Raw Devices to be deprecated in 12G

I was browsing through the OraNA.info posts and found an interesting post from Steve Karam which referred to a metalink Note:578455.1 – Announcement of De-Support of RAW devices in Release 12G

If you go through the note, it mentions desupport of Raw devices from Oracle Database 12G. Article also lists out possibility of using ASM,OCFS as few of the alternative storage mediums for keeping OCR and Voting Disks (Used in Oracle Real Application Clusters(RAC)) .

OCFS2 already supports the storage of OCR and Voting Disk. But note also talks about ASM will be supporting the files. Hmmm… If this has to be true, lot of changes will be required in the architecture. Currently ASM instance starts after CSS (and other clusterware services in RAC) service has been started . But this change will mean that ASM has to start before these processes. Currently if you try to start the ASM instance with CSS service down, you get following error

[oracle@blrraclnx2 ~]$ export ORACLE_SID=+ASM1
[oracle@blrraclnx2 ~]$ sqlplus 

SQL*Plus: Release 10.2.0.1.0 - Production on Sun Aug 10 08:16:09 2008

Copyright (c) 1982, 2005, Oracle.  All rights reserved.

Enter user-name: / as sysdba
Connected to an idle instance.

SQL> startup
ORA-29701: unable to connect to Cluster Manager
SQL> exit
Disconnected
[oracle@blrraclnx2 ~]$ oerr ora 29701
29701, 00000, "unable to connect to Cluster Manager"
// *Cause: Connect to CM failed or timed out.
// *Action: Verify that the CM was started.  If the CM was not started,
//          start it and then retry the database startup. If the CM died
//          or is not responding, check the Oracle and CM trace files for
//          errors.

Apart from changing the architecture, it will also involve lot of effort from Oracle DBA’s to unlearn and learn new concepts 🙂 At the same time, it will help you start the ASM Instance even though CSS is not up!! (I know many people will be having a sigh of relief after reading the last line) Or is there something else in store for us! There are also lot of RAC and ASM features expected in 11gR2. So let’s wait and watch..

Enabling Flashback On RAC Database

Enabling Flashback /Archive Log mode on a Single Instance Database is quite straight forward. In case of RAC, you need to follow additional steps.

The requirements for enabling Flashback Database are:

  • Your database must be running in ARCHIVELOG mode, because archived logs are used in the Flashback Database operation.
  • You must have a flash recovery area enabled, because flashback logs can only be stored in the flash recovery area.
  • For Real Application Clusters databases, the flash recovery area must be stored in a clustered file system or in ASM.

First of all configure flash recovery area by setting db_recovery_file_dest_size and db_recovery_file_dest

<span style="font-family: arial,helvetica,sans-serif; font-size: small;">ALTER SYSTEM SET DB_RECOVERY_FILE_DEST_SIZE = 20G SCOPE=BOTH;
ALTER SYSTEM SET DB_RECOVERY_FILE_DEST = '+DG1' SCOPE=BOTH;</span>

We are using ASM Diskgroup here which is sharable and available to both the nodes.Next step is to enable archivelog mode and then to turn on flashback. To perform this, database needs to be in mount mode.

We can use srvctl to disable any associated Database service and then stop the Database

<span style="font-family: arial,helvetica,sans-serif; font-size: small;">[/home/oracle&gt;srvctl stop service -d </span><span><span style="font-family: arial,helvetica,sans-serif; font-size: small;">TESTDB</span></span><span style="font-family: arial,helvetica,sans-serif; font-size: small;">
[/home/oracle&gt;srvctl stop database -d TESTDB</span>

Now set Cluster_database=false for enabling the Archivelog mode. This is a additional step which is required in RAC Database. For Single Instance, we do not require it.

<span style="font-family: arial,helvetica,sans-serif; font-size: small;">/home/oracle&gt;sqlplus "/ as sysdba"

Connected to an idle instance.

SQL&gt; startup nomount
ORACLE instance started.

Total System Global Area 1073741824 bytes
Fixed Size                  1271564 bytes
Variable Size             314575092 bytes
Database Buffers          750780416 bytes
Redo Buffers                7114752 bytes
SQL&gt; alter system set cluster_database=false scope=spfile;

System altered.

SQL&gt; shutdown immediate
ORA-01507: database not mounted

ORACLE instance shut down.
SQL&gt; exit
SQL&gt; startup mount
ORACLE instance started.

Total System Global Area 1073741824 bytes
Fixed Size                  1271564 bytes
Variable Size             314575092 bytes
Database Buffers          750780416 bytes
Redo Buffers                7114752 bytes
Database mounted.
SQL&gt;alter database archivelog;
SQL&gt; alter database flashback on;

Database altered.
</span>

Set the Cluster_database parameter again to true.

<span style="font-family: arial,helvetica,sans-serif; font-size: small;">SQL&gt;  alter system set cluster_database=true scope=spfile;
System altered.
SQL&gt;shutdown immediate</span>

We will again use srvctl to start the database and associated service

<span style="font-family: arial,helvetica,sans-serif; font-size: small;">[/home/oracle&gt;srvctl start database -d TESTDB
[/home/oracle&gt;srvctl start service -d </span><span><span style="font-family: arial,helvetica,sans-serif; font-size: small;">TESTDB</span></span><span style="font-family: arial,helvetica,sans-serif; font-size: small;">
</span>

We can confirm whether Archivelog mode and Flashback is enabled by querying V$DATABASE

<span style="font-family: arial,helvetica,sans-serif; font-size: small;">SQL&gt; SELECT LOG_MODE,FLASHBACK_ON FROM V$DATABASE;
LOG_MODE     FLASHBACK_ON
------------ ------------------
ARCHIVELOG   YES
</span>

11g New Feature: Database Replay

Database Replay:

In critical production systems, before making changes to the environment( Hardware or software related), lots of testing is required in test systems to know the effect of those changes and this usually takes lots of time to test for the stability and effects of the change.

In Oracle 11g this thing is simplified and a new feature “database replay” is added which can be used to simulate the production workload on a test system.

Following are the three stages of DATABASE REPLAY:
1. Workload Capture
2. Workload Preprocessing
3. Workload Replay

1. Workload Capture:

Before starting the capture process you need to take care of following things:

Login as sys user

It is always recommened (not mandatory) to shutdown the database and then start the database in restricted mode. By doing so, you will be making sure that no transactions are running on the database before capture process is actually started. It will guarantee the complete workload capture and you will be running full transactions during database replay on test system.
If you do not follow this step then you have to be prepared for some divergance of results during database replay on test system.

SQL> shutdown immediate
Database closed.
Database dismounted.
ORACLE instance shut down
SQL> startup restrict
ORACLE instance started.

Total System Global Area  313860096 bytes
Fixed Size                  1299624 bytes
Variable Size             184552280 bytes
Database Buffers          121634816 bytes
Redo Buffers                6373376 bytes
Database mounted.
Database opened.
SQL > select LOGINS from v$instance;
LOGINS
----------
RESTRICTED

Important thing to note here is that, after starting the capture process the database will automatically be switched into UNRESTRICTED mode and the users will be able to connect normally.

After capturing the initial database information, the capture process will internally fire a statement to disable restricted sessions, this can be verified by setting 10046 trace before starting the capture process as:

SQL> alter session set events '10046 trace name context forever, level 4';

Now start the capture process.

SQL> alter session set events '10046 trace name context off';

You will see following information:

PARSING IN CURSOR #21 len=39 dep=1 uid=0 oct=49 lid=0 tim=121695902847 hv=14656808 ad='0' sqlid='7shphjbg23h8'
alter system disable restricted session
END OF STMT
PARSE #21:c=0,e=6,p=0,cr=0,cu=0,mis=0,r=0,dep=1,og=0,tim=121695384843

Now check the information from database:

SQL > select LOGINS from v$instance;
LOGINS
----------
ALLOWED

– Create a directory to hold the workload information.

SQL > create directory DIR as '/tmp/ss';

Check the permission of directory ss at OS level and make sure that oracle is able to write to this directory.
Also make sure that the directory is empty, before starting the capture process.

– Define Workload Filters
By adding filters we can restrict the Workload Capture process to be specific to certain user sessions. By default all the sessions will be captured.

There are two types of filters i.e INCLUDE and EXCLUDE.

If INCLUDE is used then the filter will be active and workload for the objects mentioned in the filter will not be captured rather all other user’s workload Will be captured i.e the objects defined in the filter will be FILTERED OUT from capture process.

If EXCLUDE is used, only the workload done by objects defined in the filter will be captured, no other client request to database will be captured.

EXAMPLE:
========

SQL> exec dbms_workload_capture.ADD_FILTER( fname  IN VARCHAR2, fattribute  IN VARCHAR2,fvalue IN VARCHAR2);

fname=Name of the filter.
fattribute=Attribute on which the filter will be applied i.e USER, PROGRAM, INSTANCE_NUMBER etc.
fvalue= value for the corresponding attribute.

SQL > exec dbms_workload_capture.ADD_FILTER( fname =>'FILTER_SCOTT',fattribute => 'USER',fvalue => 'SCOTT');

– Starting workload capture:

To start the workload capture START_CAPTURE procedure is used as:

SQL > exec dbms_workload_capture.start_capture(NAME => 'PEAK_LOAD_TEST',DIR => 'DIR', DURATION => 600);

Name,Dir are mandatory parameters while duration (in seconds) is optional, here the capture will run for 600 seconds, if the duration is not specified then you have to finish the capture manually as:

SQL > dbms_workload_capture.finish_capture();

– While the capture process is runnig it will generate two files : wcr_scapture.wmd and wcr_cap_000xx.start

– After using the finish_capture procedure you will get folloing files also: wcr_cr.html and wcr_cr.text

wcr_cr.html is similar to the AWR report generated by awrrpt.sql

During capture process database initiate a AWR report for the duration of capture period.

SQL>  select id,AWR_BEGIN_SNAP,AWR_END_SNAP from dba_workload_captures;

<span style="font-family: arial,helvetica,sans-serif; font-size: small;">ID AWR_BEGIN_SNAP AWR_END_SNAP
---------- -------------- ------------
1             20           21
2             29           30

– Exporting AWR data for the workload capture:

It will enable detailed analysis of the workload:

SQL> exec DBMS_WORKLOAD_CAPTURE.EXPORT_AWR (capture_id => 2);

After this you can see two more files generated under the specified directory:

wcr_ca.dmp and wcr_ca.log

2. Workload Preprocessing:

Once the workload is captured it can be replayed on the test system. For this you need to copy the capture files to the test system. Preprocessing a workload will convert the captured files into REPLAY files and create the necessary metadata for this. Preprocessing will put load on the system and is resource intensive and should be performed only on test systems and on the same version of oracle database.

– Create a new directory for the capture files placed on the test system.
Let us suppose that the capture files are placed under /tmp/ss on test system, now create a directory as:

SQL > create directory REPLAY as '/tmp/ss';

SQL>EXEC DBMS_WORKLOAD_REPLAY.PROCESS_CAPTURE(capture_dir => 'REPLAY');

After preprocessing followings files will be generated:

wcr_process.wmd, wcr_login.pp, wcr_seq_data.extb, wcr_scn_order.extb , wcr_conn_data.extb

3. Workload Replay:

You have to use an instance which is logically identical to the instance whose workload is captured and need to setup Replay Client (WRC).

– wrc executable has to be run in calibrate mode to estimate the number of replay clients.

$  wrc mode=calibrate replaydir=/tmp/sood

Workload Replay Client: Release 11.1.0.6.0 - Production on Sat Jul 26 18:49:29 2008

Copyright (c) 1982, 2007, Oracle.  All rights reserved

Report for Workload in: /tmp/sood
-----------------------

Recommendation:
Consider using at least 1 clients divided among 1 CPU(s).

Workload Characteristics:
- max concurrency: 1 sessions
- total number of sessions: 5

Assumptions:
- 1 client process per 50 concurrent sessions
- 4 client process per CPU
- think time scale = 100
- connect time scale = 100
- synchronization = TRUE

– Initialize Replay Data:


Initializing replay loads the metadata into tables required for database replay.

SQL>; exec DBMS_WORKLOAD_REPLAY.INITIALIZE_REPLAY (replay_name => 'REPLAY_1', REPLAY_DIR=> 'REPLAY');

– Put the database in “PREPARE REPLAY” mode as:

SQL > exec DBMS_WORKLOAD_REPLAY.PREPARE_REPLAY()

To check the status of replay use:

SQL > select name,status from  dba_workload_replays;
NAME                 STATUS
-------------------- ----------------------------------------
REPLAY_1             PREPARE

— Start the replay client:

Workload Replay Client: Release 11.1.0.6.0 - Production on Sat Jul 26 22:12:35 2008

Copyright (c) 1982, 2007, Oracle.  All rights reserved.

Wait for the replay to start (22:12:35)

– Start the replay as:

SQL> exec DBMS_WORKLOAD_REPLAY.START_REPLAY ();

Check the status of the replay as:

SQL> select name,status from  dba_workload_replays;

Initially it will show :
NAME                 STATUS
-------------------- ----------------------------------------
REPLAY_1             IN PROGRESS

And after that it will be shown as completed.

– Once the status is completed finish the replay as:

SQL> exec DBMS_WORKLOAD_REPLAY.CANCEL_REPLAY ();

To generate the report of the replay in HTML format you need to run :

DECLARE
My_Report  CLOB;
BEGIN
My_Report := DBMS_WORKLOAD_REPLAY.REPORT(replay_id => 1, format => DBMS_WORKLOAD_REPLAY.TYPE_HTML);
END;