11gR2

Renaming Diskgroup containing Voting Disk and OCR

Recently encountered a issue where we had to rename a diskgroup for 11.2 RAC containing OCR and Voting Disk.At this moment we had not created database .

I had done similar activity on 11.2 Single instance having database files (see this post) using renamedg. Therefore we tried using same approach to do this activity.

Pre-requisite for renamedg is that diskgroup should be dismounted. As this Diskgroup was storing OCR/Voting disk, it was not possible to dismount the diskgroup. So we stopped the cluster on both the nodes and tried running renamdg command

Old Diskgroup name – DATA
New Diskgroup name – DG_DATA01

[oracle@prod-001]~% renamedg phase=both dgname=DATA newdgname=DG_DATA01 config=/oracle/renamedg.out asm_diskstring='ORCL:DISK*' verbose=true keep_voting_files=true

Parsing parameters..

Parameters in effect:

 	 Old DG name       : DATA
	 New DG name          : DG_DATA01
	 Phases               :
	 	 Phase 1
	 	 Phase 2
	 Discovery str        : ORCL:DISK*
	 Keep_voting_files  : TRUE
	 Clean              : TRUE
	 Raw only           : TRUE
renamedg operation: phase=both dgname=DATA newdgname=DG_DATA01 config=/oracle/renamedg.out asm_diskstring=ORCL:DISK* verbose=true keep_voting_files=true
Executing phase 1
Discovering the group
Performing discovery with string:ORCL:DISK*
Identified disk ASM:/opt/oracle/extapi/64/asm/orcl/1/libasm.so:ORCL:DISK1 with disk number:0 and timestamp (32941163 273325056)
Identified disk ASM:/opt/oracle/extapi/64/asm/orcl/1/libasm.so:ORCL:DISK2 with disk number:1 and timestamp (32941163 273325056)
Identified disk ASM:/opt/oracle/extapi/64/asm/orcl/1/libasm.so:ORCL:DISK3 with disk number:2 and timestamp (32941163 273325056)
Checking for hearbeat...
Re-discovering the group
Performing discovery with string:ORCL:DISK*
Identified disk ASM:/opt/oracle/extapi/64/asm/orcl/1/libasm.so:ORCL:DISK1 with disk number:0 and timestamp (32941163 273325056)
Identified disk ASM:/opt/oracle/extapi/64/asm/orcl/1/libasm.so:ORCL:DISK2 with disk number:1 and timestamp (32941163 273325056)
Identified disk ASM:/opt/oracle/extapi/64/asm/orcl/1/libasm.so:ORCL:DISK3 with disk number:2 and timestamp (32941163 273325056)
Checking if the diskgroup is mounted
Checking disk number:0
Checking disk number:1
Checking disk number:2
KFNDG-00600: file not found; arguments: [600] [Failed to initialize CSS context
] []
LEM-00031: Error encountered in lempgmh after calling lmserr.
KFNDG-00600: file not found; arguments: [600] [Failed to initialize CSS context
] []

Terminating kgfd context 0x2b592002f0a0

As we can see it failed informing that CSS is not up. Then we tried renamedg command by starting cluster (ASM Diskgroup was mounted) but it too failed with error

Checking if the diskgroup is mounted
Checking disk number:0
KFNDG-00405: file not found; arguments: [DATA]

Description of KFNDG clearly informs that diskgroup needs to be dismounted

KFNDG-00405: specified disk group string appears to be mounted
Cause: Disk group was mounted.
Action: Unmount the disk group and retry renamed

At this moment we thought that we cannot proceed and we would be required to re-install clusterware. Thinking over problem, I thought of moving the ocr and voting disk to different diskgroup and then renaming the old diskgroup.

Checked documentation and found out that there was command for replacing voting disk. In 11gR2 you can run this command while your cluster is up and running. So we created a new diskgroup DG_DATA01 and used following command

[oracle@prod-001]/dev/oracleasm/disks% crsctl replace votedisk +DG_DATA01
Failed to create voting files on disk group DG_DATA01.
Change to configuration failed, but was successfully rolled back.
CRS-4000: Command Replace failed, or completed with errors.

Oops. This failed. Checking ASM alert log gave the exact cause of this error. As you can see , it is asking for compatible.asm to be set to 11.2

NOTE: Creating voting files in diskgroup DG_DATA01
NOTE: Voting File refresh pending for group 2/0x88b6d50 (DG_DATA01)
NOTE: Attempting voting file creation in diskgroup DG_DATA01
ERROR: Voting file allocation failed for group DG_DATA01
Errors in file /oracle/diag/asm/+asm/+ASM1/trace/+ASM1_ora_4272.trc:
ORA-15221: ASM operation requires compatible.asm of 11.2.0.0.0 or higher

Checking the compatability confirmed that it is set to 10.1

SQL> select name,COMPATIBILITY,DATABASE_COMPATIBILITY from V$ASM_DISKGROUP where name='DG_DATA01';

NAME       COMPATIBILITY      DATABASE_COMPATIBILITY
--------  ----------------   --------------------------
DG_DATA01  10.1.0.0.0        10.1.0.0.0

You can use set attribute to change the compatability. e.g

SQL> alter diskgroup DG_DATA01 SET ATTRIBUTE 'compatible.asm'='11.2';

Diskgroup altered.

Retrying the command succeeded

[oracle@prod-001]/dev/oracleasm/disks% crsctl replace votedisk +DG_DATA01
Successful addition of voting disk 241b1e0a36344f7bbfaca4a576d514e9                                                                                                                                                                                                                                .
Successful deletion of voting disk 72e47e5e3afb4fe9bfb502b1b4340503.
Successfully replaced voting disk group with +DG_DATA01.
CRS-4266: Voting file(s) successfully replaced

We verified same using below command

[root@prod-001 ~]# crsctl query css votedisk
##  STATE    File Universal Id                File Name Disk group
--  -----    -----------------                --------- ---------
 1. ONLINE   241b1e0a36344f7bbfaca4a576d514e9 (ORCL:DISK4) [DG_DATA01]
Located 1 voting disk(s).

This is external redundancy diskgroup and oracle allows only one voting disk in external redundancy diskgroup.

Next was to change ocr location. This can be done using ocrconfig which needs to be run as root user. We tried using replace command but it didn’t work as it was the only OCR configured on cluster.

[root@prod-001 ~]# ocrconfig -replace +DATA -replacement +DG_DATA01
PROT-28: Cannot delete or replace the only configured Oracle Cluster Registry location

So we added additional OCR disk to new diskgroup and dropped old one

[root@prod-001 ~]# ocrconfig -add +DG_DATA01
[root@prod-001 ~]# ocrcheck
Status of Oracle Cluster Registry is as follows :
	 Version                  :          3
	 Total space (kbytes)     :     262120
	 Used space (kbytes)      :       2424
	 Available space (kbytes) :     259696
	 ID                       :  579998313
	 Device/File Name         :      +DATA
                                    Device/File integrity check succeeded
	 Device/File Name         : +DG_DATA01
                                    Device/File integrity check succeeded

                                    Device/File not configured

                                    Device/File not configured

                                    Device/File not configured

	 Cluster registry integrity check succeeded

	 Logical corruption check succeeded

[root@prod-001 ~]# ocrconfig -delete +DATA
[root@prod-001 ~]# ocrcheck
Status of Oracle Cluster Registry is as follows :
	 Version                  :          3
	 Total space (kbytes)     :     262120
	 Used space (kbytes)      :       2424
	 Available space (kbytes) :     259696
	 ID                       :  579998313
	 Device/File Name         : +DG_DATA01
                                    Device/File integrity check succeeded

                                    Device/File not configured

                                    Device/File not configured

                                    Device/File not configured

                                    Device/File not configured

	 Cluster registry integrity check succeeded

	 Logical corruption check succeeded

We then tried dropping diskgroup DATA

SQL> drop diskgroup data including contents;
drop diskgroup data including contents
*
ERROR at line 1:
ORA-15039: diskgroup not dropped
ORA-15027: active use of diskgroup "DATA" precludes its dismount

It failed as ASM instance was using the parameter file which was kept on ASM diskgroup. So created a new pfile and then re-created spfile on new Diskgroup

SQL> create pfile from spfile;
File created.

SQL> create spfile='+DG_DATA01' from pfile;

File created.

To drop the diskgroup , you will need to restart the cluster on both the nodes as ASM instance is still using the file. Run following commands on both the nodes

crsctl stop cluster
crsctl start cluster

Verify that OCR location is pointing to the correct diksgroup on all nodes before starting cluster. We faced a issue in one more environment, where for some reason OCR location was not properly updated on second node. In that case we modified it manually (after confirming OCR location using ocrcheck)

[root@prod-002 ~]# cat /etc/oracle/ocr.loc
#Device/file +DATA getting replaced by device +DG_DATA01
ocrconfig_loc=+DG_DATA01
local_only=false

You can verify the spfile and drop the old diskgroup now

SQL> sho parameter spfile

NAME				     TYPE			       VALUE
------------------------------------ --------------------------------- ------------------------------
spfile				     string			       +DG_DATA01/prod-cluster/asmp
								       arameterfile/registry.253.7290
								       69769
SQL> drop diskgroup data including contents;

Diskgroup dropped.

In case you don’t wish to drop this diskgroup as it contains datafiles and would like to rename the diskgroup, you can refer to my earlier post 11gR2: Steps to Rename ASM Diskgroup with DB files
11gR2: CVU needs SCAN Listeners’ Manual Startup During Grid-Infrastructure Configuration

During configuration phase of Grid Infrastructure for cluster, CVU failed while performing post-checks.
Following message is displaced in the Installation Log file:

<span style="font-size: small;"><span style="font-family: arial,helvetica,sans-serif;">Checking Single Client Access Name (SCAN)...</span></span>

<span style="font-size: small;"><span style="font-family: arial,helvetica,sans-serif;">WARNING:
<strong>PRVF-5056</strong> : Scan Listener "LISTENER" not running</span></span>

<span style="font-size: small;"><span style="font-family: arial,helvetica,sans-serif;">Checking name resolution setup for "scan-test.abc.com"...</span></span>

<span style="font-size: small;"><span style="font-family: arial,helvetica,sans-serif;">Verification of SCAN VIP and Listener setup failed</span></span>

The LISTENER from Grid Infrastructure home is running fine:

$ ps -eaf | grep tns

<span style="font-size: small;"><span style="font-family: arial,helvetica,sans-serif;">/u01/app/grid_11.2/GridInfra/bin/tnslsnr LISTENER -inherit</span></span>

Same error is observerd by manually runnig CVU as:

$ cluvfy comp scan

<span style="font-size: small;"><span style="font-family: arial,helvetica,sans-serif;">Verifying scan
Checking Single Client Access Name (SCAN)...</span></span>

<span style="font-size: small;"><span style="font-family: arial,helvetica,sans-serif;">WARNING:
<strong>PRVF-5056 </strong>: Scan Listener "LISTENER" not running</span></span>

<span style="font-size: small;"><span style="font-family: arial,helvetica,sans-serif;">Checking name resolution setup for "scan-test.abc.com"...
Verification of SCAN VIP and Listener setup failed
Verification of scan was unsuccessful on all the specified nodes.</span></span>

Checking the status of SCAN using SRVCTL gives correct results:

$ srvctl config scan

SCAN name: scan-test.abc.com, Network: 1/165.101.124.0/255.255.254.0/eth0
<span style="font-size: small;">SCAN VIP name: scan1, IP: /scan-test.abc.com/165.101.125.204
SCAN VIP name: scan2, IP: /scan-test.abc.com/165.101.125.235
SCAN VIP name: scan3, IP: /scan-test.abc.com/165.101.125.180</span>

Which shows that the SCAN is configured properly.

When I tried to start the SCAN Listener manually as:

$ srvctl start scan_listener

It showed the following results:

node1:
====

<span style="font-size: small;">oracle 379 1 0 07:53 ? 00:00:00 /u01/app/grid_11.2/GridInfra/bin/tnslsnr LISTENER_SCAN1 -inherit
oracle 401 1 0 07:53 ? 00:00:00 /u01/app/grid_11.2/GridInfra/bin/tnslsnr LISTENER_SCAN3 -inherit</span>

node2:
====

<span style="font-size: small;"><span style="font-family: arial,helvetica,sans-serif;">oracle 11726 1 0 07:53 ? 00:00:00 /u01/app/grid_11.2/GridInfra/bin/tnslsnr LISTENER_SCAN2 -inherit</span></span>

$ srvctl config scan_listener

<span style="font-size: small;">SCAN Listener LISTENER_SCAN1 exists. Port: TCP:1521
SCAN Listener LISTENER_SCAN2 exists. Port: TCP:1521
SCAN Listener LISTENER_SCAN3 exists. Port: TCP:1521</span>

After this, I clicked at the retry button for the CVU post checks and this time it succeeded.
Though it worked fine after this, but still not sure why I have to manually start the SCAN-Listeners !!!!!

Cheers!!!!

11gR2: Steps to Rename ASM Diskgroup with DB files

11gR2 introduced renamedg utility to rename diskgroups. I would discuss renaming a diskgroup on a Standalone Grid Infrastructure installation with Oracle Restart. Before you use the command, ensure that ASM diskgroup is dismounted.
Below is syntax for the command. You can refer to
11gR2 docs for details

renamedg
[phase={ one|two |both } ] dgname=diskgroup
newdgname=newdiskgroup [config=configfile]
[ asm_diskstring=discoverystring, discoverystring ... ]
[ clean={true|false} ] [ check={true|false} ]
[ confirm={true|false}] [ verbose={ true|false} ]
[ keep_voting_files={true|false}]

Basically we have two phases of using renamedg command, phase 1 generates a configuration file to be used by phase 2. In phase 2 actual renaming of diskgroup is done.

Note : – I have tried these steps in a Test environment and tried to cover the most components. But would recommend you  to cross verify the steps in a test environment before implementing in production environment

Lets get Started!!

1) Gather all the information for Oracle restart Configuration and DB parameters

Database Configuration

[oracle@db11g bin]$ srvctl config database -d test11r2
Database unique name: test11r2
Database name: test11r2
Oracle home: /u02/app/oracle/product/11.2.0/dbhome_1
Oracle user: oracle
Spfile: +DATA/test11r2/spfiletest11r2.ora
Domain:
Start options: open
Stop options: immediate
Database role: PRIMARY
Management policy: AUTOMATIC
Disk Groups: DATA
Services:

ASM Information

[oracle@db11g bin]$ srvctl config asm
ASM home: /u02/app/oracle/product/11.2.0/grid
ASM listener: LISTENER
Spfile: +DATA/asm/asmparameterfile/registry.253.696489255
ASM diskgroup discovery string: /dev/oracleasm/disks/VOL*

[oracle@db11g bin]$ srvctl config listener
Name: LISTENER
Home: /u02/app/oracle/product/11.2.0/grid
End points: TCP:1521

Create Database parameter file

sql> create pfile='/tmp/param.txt' from spfile;

Oracle Restart configuration

Disable Oracle Restart so that it does not restart any component. ‘crsctl status resource’ can be used to check status of resources. As you can see I have stopped database but  ASM Diskgroup DATA is still mounted.

[oracle@db11g bin]$ crsctl disable has
[oracle@db11g bin]$ crsctl status resource
NAME=ora.DATA.dg
TYPE=ora.diskgroup.type
TARGET=ONLINE
STATE=ONLINE on db11g

NAME=ora.FLASH_ARC.dg
TYPE=ora.diskgroup.type
TARGET=ONLINE
STATE=ONLINE on db11g

NAME=ora.LISTENER.lsnr
TYPE=ora.listener.type
TARGET=ONLINE
STATE=ONLINE on db11g

NAME=ora.asm
TYPE=ora.asm.type
TARGET=ONLINE
STATE=ONLINE on db11g

NAME=ora.cssd
TYPE=ora.cssd.type
TARGET=ONLINE
STATE=ONLINE on db11g

NAME=ora.diskmon
TYPE=ora.diskmon.type
TARGET=ONLINE
STATE=ONLINE on db11g

NAME=ora.test11r2.db
TYPE=ora.database.type
TARGET=OFFLINE
STATE=OFFLINE

2) We are renaming DATA diskgroup to DG.

[oracle@db11g bin]$ renamedg dgname=data newdgname=dg asm_diskstring='/dev/oracleasm/disks/VOL*' verbose=true
NOTE: No asm libraries found in the system

Parsing parameters..

Parameters in effect:

         Old DG name       : DATA
         New DG name          : DG
         Phases               :
                 Phase 1
                 Phase 2
         Discovery str        : /dev/oracleasm/disks/VOL*
         Clean              : TRUE
         Raw only           : TRUE
renamedg operation: dgname=data newdgname=dg asm_diskstring=/dev/oracleasm/disks/VOL* verbose=true
Executing phase 1
Discovering the group
Performing discovery with string:/dev/oracleasm/disks/VOL*
Identified disk UFS:/dev/oracleasm/disks/VOL11 with disk number:2 and timestamp (32924744 398242816)
Identified disk UFS:/dev/oracleasm/disks/VOL12 with disk number:1 and timestamp (32924741 928525312)
Identified disk UFS:/dev/oracleasm/disks/VOL21 with disk number:0 and timestamp (32924744 362846208)
Identified disk UFS:/dev/oracleasm/disks/VOL22 with disk number:3 and timestamp (32924741 928525312)
Checking for hearbeat...
Re-discovering the group
Performing discovery with string:/dev/oracleasm/disks/VOL*
Identified disk UFS:/dev/oracleasm/disks/VOL11 with disk number:2 and timestamp (32924744 398242816)
Identified disk UFS:/dev/oracleasm/disks/VOL12 with disk number:1 and timestamp (32924741 928525312)
Identified disk UFS:/dev/oracleasm/disks/VOL21 with disk number:0 and timestamp (32924744 362846208)
Identified disk UFS:/dev/oracleasm/disks/VOL22 with disk number:3 and timestamp (32924741 928525312)
Checking if the diskgroup is mounted
Checking disk number:2
Checking disk number:1
Checking disk number:0
Checking disk number:3
Checking if diskgroup is used by CSS
Generating configuration file..
Completed phase 1
Executing phase 2
Looking for /dev/oracleasm/disks/VOL11
Modifying the header
Looking for /dev/oracleasm/disks/VOL12
Modifying the header
Looking for /dev/oracleasm/disks/VOL21
Modifying the header
Looking for /dev/oracleasm/disks/VOL22
Modifying the header
Completed phase 2
Terminating kgfd context 0xb7e7a050

3) Modify ASM configuration to correct the spfile location

$srvctl modify asm -p +DG/asm/asmparameterfile/registry.253.696489255
$srvctl start asm

Connect to ASM instance and mount +DG diskgroup.

sqlplus "/ as sysasm"
sql> alter diskgroup DG mount;

At this moment, you will see additional ASM diskgroup resource ora.DG.dg in crsctl configuration. Remove the old ora.DATA.dg resource

oracle@db11g ~]$ crsctl delete resource ora.DATA.dg
CRS-2730: Resource 'ora.test11r2.db' depends on resource 'ora.DATA.dg'
CRS-4000: Command Delete failed, or completed with errors.

We get above error as the test11r2 database configuration states ora.DATA.dg as dependent resource. Use -f option to drop it by force. Or you can first modify the database configuration and drop the resource later.

[oracle@db11g ~]$ crsctl delete resource ora.DATA.dg -f

4) Startup Database.

To do that we need to modify parameter file as control_files parameter and other *_file_dest needs to be changed. Change all occurence of ‘+DATA’ to ‘+DG’. Open database in mount mode as we would have to rename database files and redo logs before opening databases

SQL> startup nomount pfile='/tmp/param.txt'
ORACLE instance started.

Total System Global Area  343154688 bytes
Fixed Size                  1336428 bytes
Variable Size             218106772 bytes
Database Buffers          117440512 bytes
Redo Buffers                6270976 bytes

SQL>alter database mount;

Use below command to get sql for renaming diskgroup information for datafiles/redo logs

 select 'alter database rename file '''||name||''' to ''<strong>+DG</strong>'||substr(name,instr(name,'/',1,1))||''';' from V$DATAFILE;

select 'alter database rename file '''||member||''' to ''<strong>+DG</strong>'||substr(member,instr(member,'/',1,1))||''';' from V$logfile;

V$RECOVER_FILE view can be used to check for any issues with datafiles not being available.
If everything is fine, you can open the database. You would have noticed that I have not done anything for Temp files. Checking alert log, we see that it is renamed automatically

 Re-creating tempfile +DATA/test11r2/tempfile/temp.268.696494395 as +DG/test11r2/tempfile/temp.272.704195475

Now we need to re-create spfile on ASM Diskgroup. Use following steps

$cd $ORACLE_HOME/dbs
$cat inittest11r2.ora
SPFILE='+DATA/test11r2/spfiletest11r2.ora'
$mv inittest11r2.ora inittest11r2.ora.new
$ cp /tmp/param.txt $ORACLE_HOME/dbs/inittest11r2.ora
$sqlplus "/ as sysdba"
SQL>create spfile='+DG/test11r2/spfiletest11r2.ora' from pfile;
exit
$mv inittest11r2.ora initest11r2.old

--- Modify inittest11r2.ora.new and change diskgroup to +DG---
$cat inittest11r2.ora.new
SPFILE='+DG/test11r2/spfiletest11r2.ora'
$mv inittest11r2.ora.new inittest11r2.ora

Now we need to modify Database configuration for Oracle Restart

[oracle@db11g ~]$ srvctl config database -d test11r2
Database unique name: test11r2
Database name: test11r2
Oracle home: /u02/app/oracle/product/11.2.0/dbhome_1
Oracle user: oracle
Spfile: +DATA/test11r2/spfiletest11r2.ora
Domain:
Start options: open
Stop options: immediate
Database role: PRIMARY
Management policy: AUTOMATIC
PRCD-1012 : Failed to retrieve disk group list for database test11r2.
PRCR-1035 : Failed to look up CRS resource ora.DATA.dg for test11r2
PRCR-1001 : Resource ora.DATA.dg does not exist

As there is no DATA diskgroup available, it gives a error. If you notice initial output (before renaming diskgroup), there was entry for DATA Diskgroup. We also need to modify the entry for spfile.

[oracle@db11g ~]$ srvctl modify database -d test11r2 -p +DG/test11r2/spfiletest11r2.ora
[oracle@db11g ~]$ srvctl modify database -d test11r2 -a DG
[oracle@db11g dbs]$ srvctl config database -d test11r2
Database unique name: test11r2
Database name: test11r2
Oracle home: /u02/app/oracle/product/11.2.0/dbhome_1
Oracle user: oracle
<strong>Spfile: +DG/test11r2/spfiletest11r2.ora</strong>
Domain:
Start options: open
Stop options: immediate
Database role: PRIMARY
Management policy: AUTOMATIC
<strong>Disk Groups: DG</strong>
Services:

You can now shutdown database and use srvctl to start If you have not dropped ora.DATA.dg resource earlier (due to errors), you can drop it now without errors

 [oracle@db11g ~]$ crsctl delete resource ora.DATA.dg

You can now enable Oracle Restart

[oracle@db11g dbs]$ crsctl enable has
CRS-4622: Oracle High Availability Services autostart is enabled.

Phew!! This was quite a posting after long time!!

11gR2 – SysAsm vs SysDba

SYSASM role was introduced in 11gR1 and was designed to administer ASM instances. In 11gR1 , if you connected with SYSDBA role , you used to get a warning which was only recorded in alert log (Refer to my earlier post here). But things have changed in 11gR2. While trying to dismount a Diskgroup, I found following errors

SQL> alter diskgroup flash_arc mount;
alter diskgroup flash_arc mount
*
ERROR at line 1:
ORA-15032: not all alterations performed
ORA-15260: permission denied on ASM disk group

Above error indicates that I do not have permission on the ASM Diskgroup.  As per 11gR2 documentation, SYSASM privilege is used for carrying out administration tasks on ASM Diskgroups. SYSDBA privilege can be used only for creating/deleting aliases and querying ASM dictionary views.  Frankly speaking, you should unlearn the habit of connecting as “/ as sysdba” to ASM instance and learn connecting as “/ as sysasm”

Link:11gR2 RAC installation steps on OEL4

If you are looking for steps for 11gR2 RAC installation, you can refer to this article by Rajeev Ramdas at Dbastreet.com. Article lists down steps for installing 11gR2 RAC on 64 bit Oracle Enterprise Linux 4 (OEL4) using ASM for storage. As Raw devices are no longer supported, OCR and Voting Disks are also stored on ASM. Yes, this is one more cool New Feature available in 11gR2.

11gR2: Monitoring Real Time SQL Plan Execution from Oracle Enterprise Manager

Ever since 11gR2 has been released, it has created a lot of buzz in Oracle Blogosphere with various posts on 11g Release 2 (11gR2 ) New Features primarily ASM New features. I would like to introduce you all to a feature which has been incorporated in 11gR2 Oracle Enterprise Manager to display Real-Time SQL Monitoring information . I would say that this was much awaited feature which had to be implemented in OEM and comes as a handy tool for DBA’s to tune/monitor sql execution.

Oracle 11gR1 introduced two new views V$SQL_MONITOR and V$SQL_MONITOR_PLAN to provide runtime execution statistics. This was part of feature called Real-Time SQL Monitoring which allows you to monitor sql in near real-time as the statement executes.

To recap, please find below description for both views

V$SQL_MONITOR displays SQL statements whose execution have been (or are being) monitored by Oracle. An entry is created in V$SQL_MONITOR every time the execution of a SQL statement is being monitored. SQL monitoring is automatically started when a SQL statement runs parallel or when it has consumed at least 5 seconds of CPU or I/O time.

V$SQL_PLAN_MONITOR displays plan level monitoring statistics for each SQL statement found in V$SQL_MONITOR. Each row in V$SQL_PLAN_MONITOR corresponds to an operation of the execution plan being monitored. Timing information could be viewed by joining V$SQL_PLAN_MONITOR with V$ACTIVE_SESSION_HISTORY on SQL_ID, SQL_EXEC_START, SQL_EXEC_ID, and SQL_PLAN_LINE_ID (simply named PLAN_LINE_ID in V$SQL_PLAN_MONITOR).

In 11gR1, you could use DBMS_SQLTUNE.REPORT_SQL_MONITOR to generate html/text reports . Greg Rahn has written a post describing it in detail.

11gR2 Oracle Enterprise Manager provides a graphical interface which makes job easier.

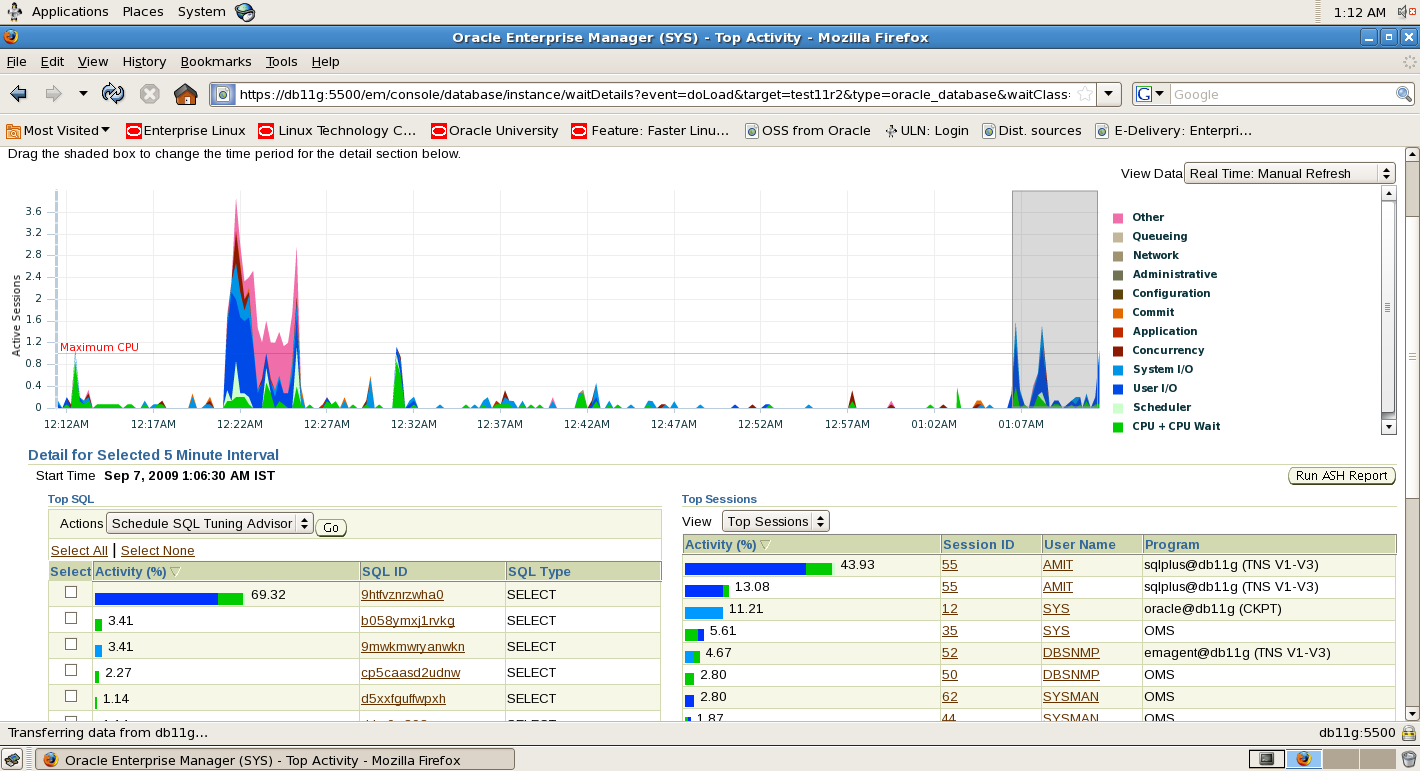
Click on “Top Activity” link under Performance Page to view the Active session details. This shows wait events classified by wait class along with Top Sql and Top sessions activity.

Top Activity

Click on “SQL Monitoring” link under Performance Page to view the Monitored SQL. SQL’s having execution time >5 second or parallel queries will be displayed here. You can also use MONITOR hint to monitor a sql statement.
Green circle shows that the SQL is being currently executing. Click on the symbol to view plan

Sql_monitor_1
This shows following details

Overview – SQL_ID and user details
Time and Wait statistics – Gives Duration for query, DB time and Wait activity %. Moving mouse on wait activity graph will give you the breakup of wait events.
I/O Statistics – This section gives I/O details
Detils – This section includes two sub headings

Plan Statistics

This gives execution plan details
sql_monitor_2

These graphs are dynamic and are refreshed as the SQL is being executed.

Activity

This gives ASH Report for session

ash_screenshot

You can also get a report by clicking on Report link
sql_report
Below screenshot shows execution plan for Parallel SQL query execution

sql_monitor_parallel_execution

parallel_execution_plan
This has additional section under Details section called “Parallel”. This gives parallel server details giving DB Time,wait activity %,IO Requests and Buffer gets detail.
Parallel Severs Breakdown

You have option to save/mail the report
11gr2_sql_monitor2

Moving mouse pointer on User under “Overview” section also shows Session information

session_info 
Right click on the report to get Session Details

session_details

To enable SQL Monitoring, STATISTICS_LEVEL parameter need’s to be set to ALL or TYPICAL. Additionally CONTROL_MANAGEMENT_PACK_ACCESS parameter must be set to DIAGNOSTIC+TUNING which requires you to have Oracle Database tuning pack.