In this post we will discuss the Automated discovery of Targets in Enterprise Manager Cloud Control(EM 12c). Once you have installed agents, you can schedule automatic discovery of new targets. Let’s get started
1)Click on Add Target>Configure Auto Discovery from the Setup menu
2)Click the Configure icon in the Multiple Target-type Discovery on Single Host row in the Discovery table.
‘
3)Select the host in the table and click Configure.
4)Set the schedule at which the discovery job will be run, in days. This schedule will be applied to all selected hosts. By default the job will run every 24 hours.
Select the Oracle component types you want to search the host for and click Ok.
5)Click “Run Discovery now” and it will report the discovered targets.
6) Next is to configure the Targets. We will first start with oradbdev-clu i.e RAC cluster
We have added all the hosts part of cluster. In case management agent is not installed on all hosts , they will not appear in “Available hosts” list
7)Next we select Cluster database tintin and click on configure
8)You will be required to put dbsnmp password for configuring database montioring. By default dbsnmp account is locked. You can verify using following sql
select username,account_status from dba_users where username='DBSNMP';
USERNAME ACCOUNT_STATUS
------------------------------ --------------------------------
DBSNMP EXPIRED & LOCKED
Unlock and reset password as below
sql>alter user DBSNMP account unlock identified by oracle;
Do test connection and verify all information is correct.
9)Then configure ASM instances and you will be required to enter ASM password
10)We are done now. We can go to Targets ->Databases ->Tintin to view the database. It would look like below
This Post would describe how to install Oracle Management Agent 12c in silent mode. We need to download the agent software which can be done using emcli utility which is present on OMS host.Login to OMS host and execute emcli utility as mentioned below
[oracle@oradbdev04]~/Middleware/oms/bin% emcli login -username=sysman
Enter password

Login successful
Following command gets list of agent software present on grid control
[oracle@oradbdev04]~/Middleware/oms/bin% emcli get_supported_platforms
Getting list of platforms ...
Check the logs at /home/oracle/Middleware/oms/bin/agent.log
About to access self-update code path to retrieve the platforms list..
Getting Platforms list  ...
-----------------------------------------------
Version = 12.1.0.1.0
 Platform = Linux x86-64
-----------------------------------------------
Platforms list displayed successfully.
Since this is a new Grid installation on Linux x86-64 we get only 1 agent software. If you need to install agent on different platform say Solaris, then you need to download software using self update option.
Note that you will have to pass your My oracle support credentials while configuring self-update.
Since our target host is also Linux x86-64 we can proceed. In below example we have specified that our 12.1.0.1.0 agent software should be placed in /tmp for Linux x86-64 platform
[oracle@oradbdev04]~/Middleware/oms/bin% ./emcli get_agentimage -destination=/tmp -platform="Linux x86-64" -version=12.1.0.1.0
Platform:Linux x86-64
Destination:/tmp
 === Partition Detail ===
Space free : 3 GB
Space required : 1 GB
Check the logs at /tmp/get_agentimage_2012-02-04_11-56-01-AM.log
Setting property ORACLE_HOME to:/home/oracle/Middleware/oms
calling pulloneoffs with arguments:/home/oracle/Middleware/oms/home/oracle/Middleware/oms/sysman/agent/12.1.0.1.0_AgentCore_226.zip12.1.0.1.0linux_x64
Check this logs for more information: /home/oracle/Middleware/oms/sysman/prov/agentpush/logs
[oracle@oradbdev04]~/Middleware/oms/bin% ls -l /tmp/12.1.0.1.0_AgentCore_226.zip
-rw-r----- 1 oracle dba 235679029 Feb  4 11:56 /tmp/12.1.0.1.0_AgentCore_226.zip
You should copy this file to the target host and unzip it.
To perform installation , we need to use agentDeploy.sh script. You can either use agent.rsp in unzipped directory or pass parameters at command line
AGENT_BASE_DIR ->Location where Agent software will be installed OMS_HOST –>OMS host name EM_UPLOAD_PORT –>Agent upload port. Script will try both http/https port. AGENT_REGISTRATION_PASSWORD –>Password for secure registration with OMS
cd $AGENT_HOME/core/12.1.0.1.0/bin ./emctl status agent ./emctl upload agent
$ ./emctl upload agent
Oracle Enterprise Manager 12c Cloud Control 12.1.0.1.0
Copyright (c) 1996, 2011 Oracle Corporation.  All rights reserved.
---------------------------------------------------------------
EMD upload completed successfully
Next step is to discover the targets. You can either manually add them or use automated discovery of new Oracle targets on machines which already have agent installed. Refer to EM12c:Automated discovery of Targets for automatic discovery and target configuration.
This post describes the steps to upgrade an existing 11g Enterprise Manager Grid Control (11.1.0.1.0) to 12c (12.1.0.1.0). The Complete Upgrade process will be carried out under 3 different stages:
1. Patch existing 11g OMS to get the 12c upgrade console. 2. Deploy and Configure 12c agents. 3. Upgrade 11g OMS to 12c.
The approach used for this upgrade is 1-system upgrade approach. This approach enables you to upgrade to Enterprise Manager Cloud Control on the same host where your earlier release of Enterprise Manager is running. This approach also upgrades the Oracle Management Repository (Management Repository) in the existing database. Since the upgrade happens on the same host, there is a reasonable downtime involved. This approach does not refer to upgrading of an Enterprise Manager system in an environment with one Oracle Management Service (OMS). It refers to upgrading of an Enterprise Manager system on the same host as the old one, and having only one Enterprise Manager system existing at any point.
The supported earlier releases for upgrade include:
Oracle Management Agent 10g Release 2 (10.2.x.x.x), Oracle Management Agent 11g Release 1 (11.1.0.1.0), Oracle Management Service 10g Release 5 (10.2.0.5.0) and Oracle Management Service 11g Release 1(11.1.0.1.0).
Unlike earlier releases Oracle Management Service 12c communicates only with Oracle Management Agent 12c. Therefore, unlike the earlier releases, you must first upgrade the Management Agents in your system before upgrading your existing OMS.
1. Patch existing 11g OMS to get the 12c upgrade console
To start the upgrade process we need to get the 12c upgrade console, which we can get by installing patch for bug# 10044087 on your existing Enterprise Manager system. To apply this patch OMS needs to be down which means that there is a downtime required for the existing GridControl environment. Download the patch and apply for your platform click HERE for download link.
This patch application is a simple patch apply process with opatch. Following are the mandatory things before you start patch apply:
— It is mandatory to apply PSU1(10065631) or later on the existing OMS home
— There is a chance of hitting bug 9953045 and bug 12360281, to escape these situations, set SQLNET.ENCRYPTION_TYPES_SERVER= (3DES168) in sqlnet.ora of your oracle database sqlnet file.
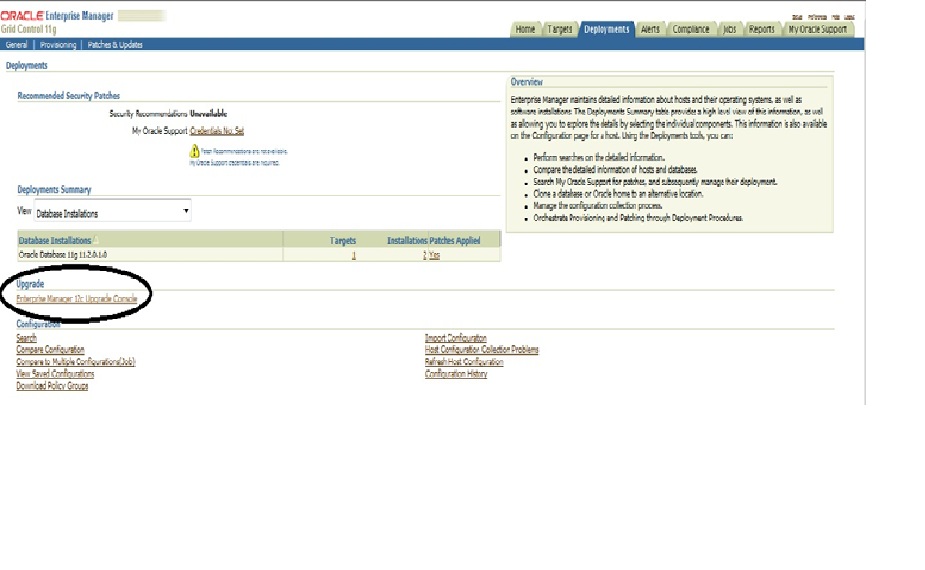
Follow the patch readme to apply this patch. Once this patch is applied and the post scripts(puc_dblink_pkgdef.sql, puc_dblink_pkgbody.sql and pre_upg_console.sql) are run and OMS is started, you can see the “Enterprise manager 12c Upgrade Console” under “Deployments” tab of Grid Control.
2. Deploy and Configure 12c agents:
Download the following software, and stage them to an accessible location:
– Oracle Management Agent 12c – All the required plug-ins
Don’t unzip the binaries after downloading them. Verify the checksum after downloading the zip files. To manage information about the location of the core Management Agent software and its associated plug-ins, follow these steps:
1. In Grid Control, click Deployments. 2. On the Deployments page, in the Upgrade section, click Enterprise Manager 12c Upgrade Console. 3. On the Upgrade Console page, in the Select Upgrade Type section, select one of the following:
– To upgrade your Enterprise Manager system with downtime (even if you manually install Management Agents), select 1-System. – To upgrade your Enterprise Manager system with “near zero” downtime (even if you manually install Management Agents), select 2-System. – To upgrade your Enterprise Manager system with downtime on a different host, select 1-System on a Different Host.
Select 1-system approach here.
Enterprise Manager Grid Control refreshes the page and displays a table with a list of tasks you need to perform for the upgrade approach you selected.
4. In the Preupgrade Steps section, from the table, click Manage Software. 5. On the Manage Software page, in the Agent Upgradability and Target Upgradability pie charts, click the hyperlinks in the respective legends and identify the Management Agents and targets that can be upgraded, and that cannot be upgraded due to unavailability of the Management Agent software or the plug-in software.
6. In the Provide Software Location section, enter the absolute path to the directory where the core Management Agent software and the plug-in software are present for the required platforms.
For example, /u01/app/plugin
And then click Validate to register that location with the Enterprise Manager system. Once validate is complete you will see the below pie charts adn these should be in all green. If they are not in green, it means that you have missed some plugin(you will find the list of all required plugins at the botton of same page), download and stage the missing plugin and validate again.
Validate
Once the software have been verified we can continue to deploy and configure the software binaries of Oracle Management Agent 12c.
1. In Grid Control, click Deployments. 2. On the Deployments page, in the Upgrade section, click Enterprise Manager 12c Upgrade Console. 3. On the Upgrade Console page, in the Select Upgrade Type section, select 1-system approach.
In the “Preupgrade Steps” section, from the table, click Deploy and Configure Agents.
4. On the Deploy and Configure Agents page, for Operation Name, enter a unique name for the deployment operation you are about to perform. The custom name you enter can be any intuitive name, and need not necessarily be in the same format as the default name. For example, Deploy_Agents_Phase1_2010_12_27. 6. In the Select Operation Type section, select Deploy Agent and Plug-In Software and Configure Agent and Plug-In Software. 7. In the Search Agents section, search and add the existing, old Management Agents for which you want to deploy the software. In the table that lists the Management Agents, enter an installation base directory and an instance home directory for each of the Management Agents.
In the Agent Credentials section, retain the default selection, that is, Use Oracle Home Preferred Credentials,if you have already set these, so that the preferred credentials stored in the Management Repository can be used for this job.In the OMS Host and Port section, validate the name and the secure port of the host where you plan to install Oracle Management Service 12c. To change the values, click Edit. After filling up the port details click next, do not select any pre and post upgrade script. Provide the root credentials and click submit. Agent will start a job with the name that you have provided, click at the job to see the status.
Generate Health Report of Deployed Oracle Management Agents. Follow the steps by clicking the “Generate help report” , once it is completed, you will see following screen:
Verify and sign off the health check report. After this you have to Switch-Over to 12c agents. Under “Agent Upgrade Steps” click switch agents:
Search for all the agents and provide the oracle preferred credentials. Click submit.
Once this job completes, the old agents will be stopped and new agents from 12g home will be started.
3. Upgrade 11g OMS to 12c
Download and unzip the 12c software from the link mentioned earlier in the post. It is mandatory to meet all the required prerequisites mentioned at ORACLE DOCUMENTATION otherwise the installation will fail at some later stage. I will list one import prerequisite step here:
Copy EMkey to repository: To do so, check the status of emkey as: [oracle@cloud1 bin]$ emctl status emkey
Oracle Enterprise Manager 11g Release 1 Grid Control
Copyright (c) 1996, 2010 Oracle Corporation. All rights reserved.
Enter Enterprise Manager Root (SYSMAN) Password : xxxxx
The EMKey is configured properly.
Copy the emkey as:
$ emctl config emkey -copy_to_repos
After meeting all the prerequisites, continue with the OMS upgrade:
Invoke runInstaller from 12c unzip location:
$ ./runInstaller
Choose your option to receive updates via MOS and click next. I opted to remain uninformed from MOS updates.
On the Software Updates screen, select one of the following sources from where the software updates can be installed while the Enterprise Manager system gets upgraded. If you do not want to apply them now, then select Skip. I opted to skip these updates for the installation. Click next.
On the Prerequisite Checks screen, check the status of the prerequisite checks run by the installation wizard, and verify whether your environment meets all the minimum requirements for a successful upgrade. It may show “Failed” for some of the packages, make sure that those were installed or higher versions of those packages are already in place. Once confirmed all settings, click next.
Under Install Type, select to upgrade an existing instance option and choose 1-system upgrade approach. It will automatically find the existing middleware home. Enter a valid middleware home location where it will install the required components for 12c. Provide the location of Middleware home . Click next.
Provide sys and sysman password and click next.
You can select the plug-ins that you want to install, the already installed plugins will be greyed-out. Click next after selecting the plugins.
If you are upgrading from Enterprise Manager 11g Grid Control Release 1 (11.1.0.1.0), then on the Extend WebLogic Server Domain screen, validate the AdminServer host name and its port, and the WebLogic user name. Enter the WebLogic user account password for extending the existing Oracle WebLogic Server Domain to the upgraded release.
Installation status.. once the installation finishes, it will ask you to run allroot.sh as root user. Run the script as root user and click finish.
Launch the Cloud Console as you will see like:
Login using sysman and now you are ready to control clouds 🙂
This is short posting on sql which can be used to get Hotsname,SID,Port information for databases registered in Grid Control repository. This information can be used to create a tns entries and we can further use it to run a sql on all these databases.
set pages 999 lines 200
col host for a50
col port for a10
col sid for a10

select
distinct mgmt$target.host_name||'|'||sid.PROPERTY_VALUE||'|'||port.PROPERTY_VALUE
from
mgmt_target_properties machine,
mgmt_target_properties port,
mgmt_target_properties sid,
mgmt_target_properties domain,
mgmt$target
where
machine.target_guid=sid.target_guid
AND sid.target_guid=port.target_guid
AND port.target_guid=domain.target_guid
AND machine.PROPERTY_NAME='MachineName'
AND port.PROPERTY_NAME='Port'
AND sid.PROPERTY_NAME='SID'
AND sid.PROPERTY_VALUE not like '%ASM%'
AND machine.TARGET_GUID in (select TARGET_GUID from mgmt_current_availability where EM_SEVERITY.get_avail_string(current_status)='UP')
AND machine.TARGET_GUID=mgmt$target.target_guid
order by 1;
Pasting a small shell script, which can be used to create tnsnames.ora
We use 10.2 Enterprise Manager Grid control to monitor our oracle database environments . Apart from the normal metrics provided by oracle we also use host based and sql user defined metrics which allows you to monitor almost anything . Coming back to the main issue, following error was reported from one of the monitored target (Non Prod server)
PROD Apr 30, 2010 8: Status
Time: May 30, 2010 2:28:14 AM PDT
Sev: Metric Error Start
Message: Metric evaluation error start - Metric execution timed out
in 360 seconds
Checking the $AGENT_HOME/sysman/log/emagent.trc, same messages were recorded in the trace file
2010-05-30 02:39:11,585 Thread-4045400992 WARN  scheduler: oracle_database:orcli.xx.xx.xx_orcli1:Response is due to run again but is still running from last schedule
2010-05-30 02:39:12,280 Thread-3981994912 ERROR fetchlets.oslinetok: Metric execution timed out in 600 seconds
2010-05-30 02:39:13,279 Thread-4088384416 ERROR fetchlets.oslinetok: Metric execution timed out in 600 seconds
I used emctl status agent but it did not report any pending files. My first step was to restart the agent but it didn’t come up properly after restart
[oracle@prod1]~% emctl status agent
Oracle Enterprise Manager 10g Release 4 Grid Control 10.2.0.4.0.
Copyright (c) 1996, 2007 Oracle Corporation.  All rights reserved.
---------------------------------------------------------------
Agent Version     : 10.2.0.4.0
OMS Version       : 10.2.0.4.0
Protocol Version  : 10.2.0.4.0
Agent Home        : /oracle/product/agent10g
Agent binaries    : /oracle/product/agent10g
Agent Process ID  : 1025
Parent Process ID : 1009
---------------------------------------------------------------
<strong>Agent is Running but Not Ready</strong>
Again looking at emagent.trc file, following error was observed
2010-05-30 03:19:30,238 Thread-4092558240 ERROR TargetManager: TIMEOUT when compute dynamic properties for target orcli.xx.xx.xx_orcli1
At this moment I enabled the blackout for this host as I didn’t wanted too many alerts for this server. On checking MOS aka metalink, I found a note recommending altering values of parameters in agent configuration file which controls the time limit for agent to make connection to databse. But on checking found those parameter’s were already set to specified value (Don’t remember the MOS article now, anyways it was not relevant in our case).
Next step was that I executed top command to see server usage
We can see that tnslsnr is consuming close to 100% cpu. I tried lsnrctl status command which hung. Then I tried pinging to the listener service using tnsping which also timed out. I restarted the listener by killing it and starting with srvctl
After this agent came up normally. This co-relates with timeout issue reported by agent while making connection to database. I think the correct approach to the problem should have been checking the listener connections instead of restarting agent.
Coming back to the problem, agent was up and running now but Grid Console reported agent as offline and emctl upload agent command failed . We again look at emagent.trc which recorded following errors
2010-05-30 03:40:31,050 Thread-4136642240 WARN recvlets.aq: Deferred nmevqd_refreshState for [orcli.xx.xx.xx_orcli1,oracle_database]
This issue was caused due to blackout . MOS note “Agent crashes with accumulation of blackouts and recvlets.aq: Failed to refreshState [ID 740000.1] ” describes the issue.
Note asks to stop the agent,then removing the blackouts.xml file, issuing emctl clearstate agent command and finally restarting the agent. Please find below commands for reference
After performing this step, ’emctl upload agent’ succeeded and grid started monitoring the target normally. Note that in case you are using clustered agent, log files and blackouts.xml file will be found under $AGENT_HOME/<node_name>/sysman/
In this article , I will discuss how to install 10.2.0.5 EM Grid using 10.2.0.4 database. This method can also be used with 11g database.When you carry out 10.2.0.1 EM Grid control installation, it creates a 10.1.0.4 Database by default which is no longer supported and requires one to upgrade to supported release i.e 10.2. In case you choose EM grid installation with existing database, then DB version need’s to be <=10.2.0.3 which you would again like to upgrade to so as to easily receive bug fixes and be on latest supported release. So if you want to use 10.2.0.4 DB or 11.1 database, you will not be able to install using existing database directly but would have to follow a upgrade path. To overcome such situation, starting 10.2.0.4 EM Grid Control we now have Software-Only install method .Using the ‘Installing Software-Only and Configuring Later’ installation method, you can install only the software of the base release and then configure it later by applying the latest patch set.
Note that 10.2.0.4 /10.2.0.5 are patchset’s and need a 10.2.0.1 base installation to work.
In case you wish to carry out the installation in silent mode, you can find OTN article at below mentioned link
There is also metalink Note 763347.1 – How to Install Enterprise Manager Grid Control 10.2.0.5.0 Using an Existing Database with the Software Only Method
One of the issue while using silent install mode is that due to Bug 7137054 (Refer Note 602750.1 ConfigureGC.pl Reports – Invalid Username/Password ), you will be required to change sys password and run the ConfigureGC.pl script multiple times. Also you would be required to enter the password’s in the response file, which you might not be comfortable with. (Yeah in some environments, people can be very particular 🙂 )
While using GUI mode, I did not face any issues arising out of bug 7137054. Below steps are tried on a 10.2.0.4 database (11g database can also be used) and Platform is AIX 5L. Installation steps would remain same for other platforms too (In windows you will have to check the steps where in you are supposed to run scripts. GUI part should remain same)
Steps To Perform 10.2.0.5 EM Grid Installation using Software-only Install Method – GUI
1. Ensure that database parameters are set to following values. This is important as OUI checks for these values and if it is not set , then installation fails
2. Ensure that dbconsole repository is not present in the database. If it is, then remove it. You need to stop the dbconsole before starting the process.
$ORACLE_HOME/bin/emctl stop dbconsole
Remove the following directories from your filesystem:
ALTER system ENABLE RESTRICTED SESSION ;
EXEC sysman.emd_maintenance.remove_em_dbms_jobs;
EXEC sysman.setEMUserContext('',5);
REVOKE dba FROM sysman;
DECLARE CURSOR c1 IS SELECT owner, synonym_name name FROM dba_synonyms WHERE table_owner = 'SYSMAN';
 BEGIN
FOR r1 IN c1
 LOOP
IF r1.owner = 'PUBLIC'
THEN
 EXECUTE IMMEDIATE 'DROP PUBLIC SYNONYM '||r1.name; ELSE EXECUTE IMMEDIATE 'DROP SYNONYM '||r1.owner||'.'||r1.name;
END IF;
 END LOOP;
 END;
/
DROP USER mgmt_view CASCADE;
 DROP ROLE mgmt_user;
DROP USER sysman CASCADE;
 ALTER SYSTEM DISABLE RESTRICTED SESSION;
3.Log in to the database as SYSDBA and run the following command to install DBMS_SHARED_POOL package:
@?/rdbms/admin/dbmspool.sql

commit;
4. Install the 10.2.0.1 database using -noconfig option i.e to skip the configuration part. This will be carried out in the end by running ConfigureGC.pl script
./runInstaller -noconfig
Choose Installation with Existing Database
Specify the ORACLE_BASE Location under which you would like to install the EM Grid
You will be now prompted to enter the database details for the Repository database. Ensure that listener is UP.
a)In the Configure Email Notification section, specify an appropriate e-mail address, and the corresponding SMTP server name. You will receive important information on the condition of the monitored targets, including critical alerts at this e-mail address.
b)Specify the My Oracle Support (formerly Metalink) credentials.
c)Specify the Proxy Information if Grid Control is using a proxy server for external access
Refer to following documentation link for more information
a)Specify the password for Securing agent
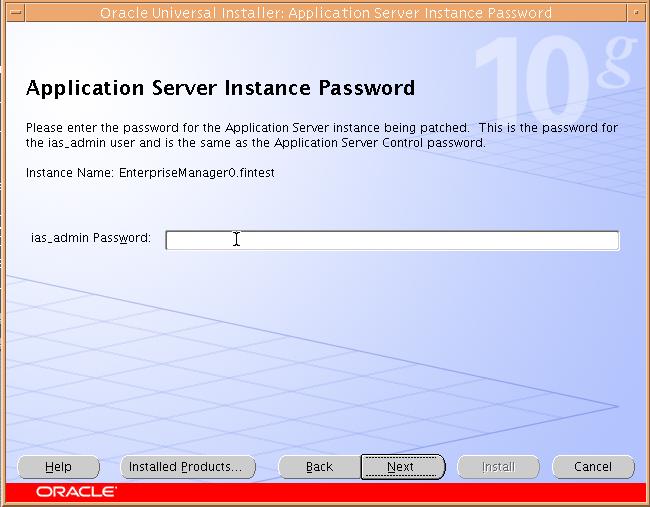
b)Specify password for SYSMAN user. Please note that default ias_admin password is the same as the password assigned to the SYSMAN account. This is required to access the Oracle application server console
OUI will install OMS under $BASE_DIR/oms10g
OUI will install Management Agent under $BASE_DIR/agent10g
Once the installation finishes , you will be prompted to run allroot.sh script (as shown below). Before executing it, stop all the OPMN processes by running the following command from the Oracle home directory of the OMS (for example, oms10g):
Open a different shell and execute following commands using Oracle Software owner
Processes in Instance: EnterpriseManager0.db11g
-------------------+--------------------+---------+---------
ias-component      | process-type       |     pid | status
-------------------+--------------------+---------+---------
DSA                | DSA                |     N/A | Down
HTTP_Server        | HTTP_Server        |     N/A | Down
LogLoader          | logloaderd         |     N/A | Down
dcm-daemon         | dcm-daemon         |     N/A | Down
OC4J               | home               |     N/A | Down
WebCache           | WebCache           |     N/A | Down
WebCache           | WebCacheAdmin      |     N/A | Down

$./opmnctl stopall
opmnctl: stopping opmn and all managed processes...

$./opmnctl status
Unable to connect to opmn.
Opmn may not be up.
Now run the script allroot.sh as Root.
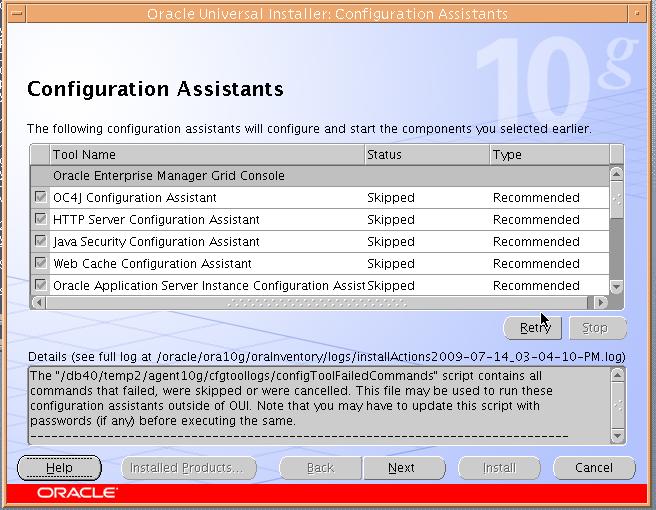
You will get a message that configuration assistants were skipped. You can ignore it as we used -noconfig method
Installation for 10.2.0.1 Base release is complete now. We now need to proceed towards 10.2.0.5 Patchset installation
5. Run following command from 10.2.0.5 patchset directory.
This script will take long time (took 2 hrs on my setup). You can monitor $OMS_ORACLE_HOME/cfgtoollogs/cfgfw/ CfmLogger*log file to check for any errors
The plug-in Starting Oracle Management Server has successfully been performed
------------------------------------------------------
------------------------------------------------------
The plug-in EMCLI Configuration is running

Operation EMCLI Setup is in progress.

The plug-in EMCLI Configuration has successfully been performed
------------------------------------------------------
The action patchsetConfiguration has successfully completed
###################################################
Once you get message that the configuration is complete, then check the status for OMS and AGENT
$OMS_ORACLE_HOME/bin/emctl status oms
$AGENT_ORACLE_HOME/bin/emctl status agent
You can now proceed with Agent installation on the targets to be monitored
This blog reflect our own views and do not necessarily represent the views of our current or previous employers.
The contents of this blog are from our experience, you may use at your own risk, however you are strongly advised to cross reference with Product documentation and test before deploying to production environments.

 ‘
‘


Recent Comments