upgrade

Upgrade Enterprise Manager Cloud Control 12.1.0.1 to 12.1.0.2

Oracle released 12.1.0.2 Enterprise Manager few days back and have released it for most of platforms.

You can directly upgrade Enterprise Manager Cloud Control 12c Release 1 (12.1.0.1) [with or without Bundle Patch 1] to 12.1.0.2
There are no pre patches required for this. But this upgrade requires considerable downtime. Oracle has termed this upgrade as 1-system upgrade approach which means that upgrades your Enterprise Manager Cloud Control on the same host—upgrades Oracle Management Service (OMS) on the same host and Oracle Management Repository (Management Repository) in the existing database.

I decided to upgrade my test EM 12c setup running on RHEL 5.6 x86_64 bit with single OMS and 11.2.0.3 database.Whole upgrade went fine without any major issues. To get started you need to download the software from here

I will be upgrading 12.1.0.1 running on Linux x86_64 bit. You can download the software from
http://download.oracle.com/otn/linux/oem/121020/em12cr2_linux64_disk1.zip
http://download.oracle.com/otn/linux/oem/121020/em12cr2_linux64_disk2.zip
http://download.oracle.com/otn/linux/oem/121020/em12cr2_linux64_disk3.zip

Once all files are downloaded, unzip them in single directory location.
To start the installation , run the runInstaller

./runInstaller

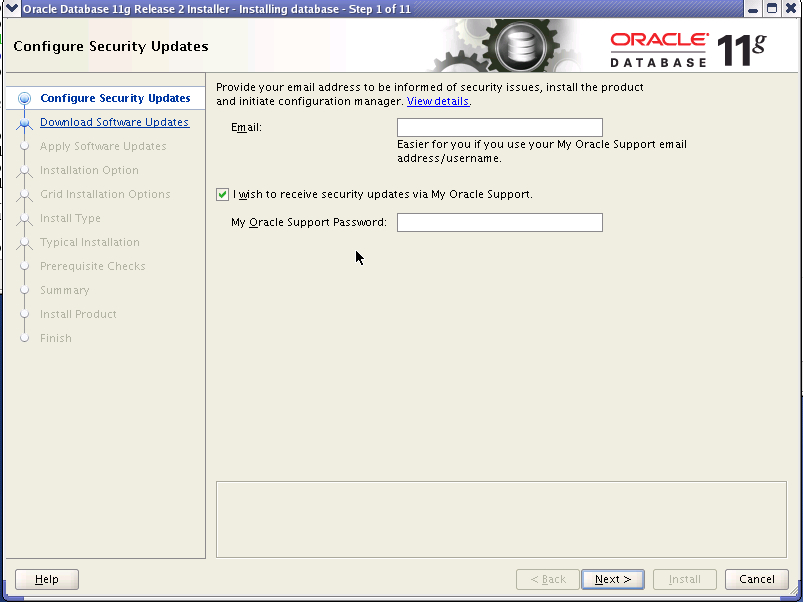
First screen asks for MOS details. You can choose to ignore it by unchecking box and click next.This will generate warning, press ok and click next

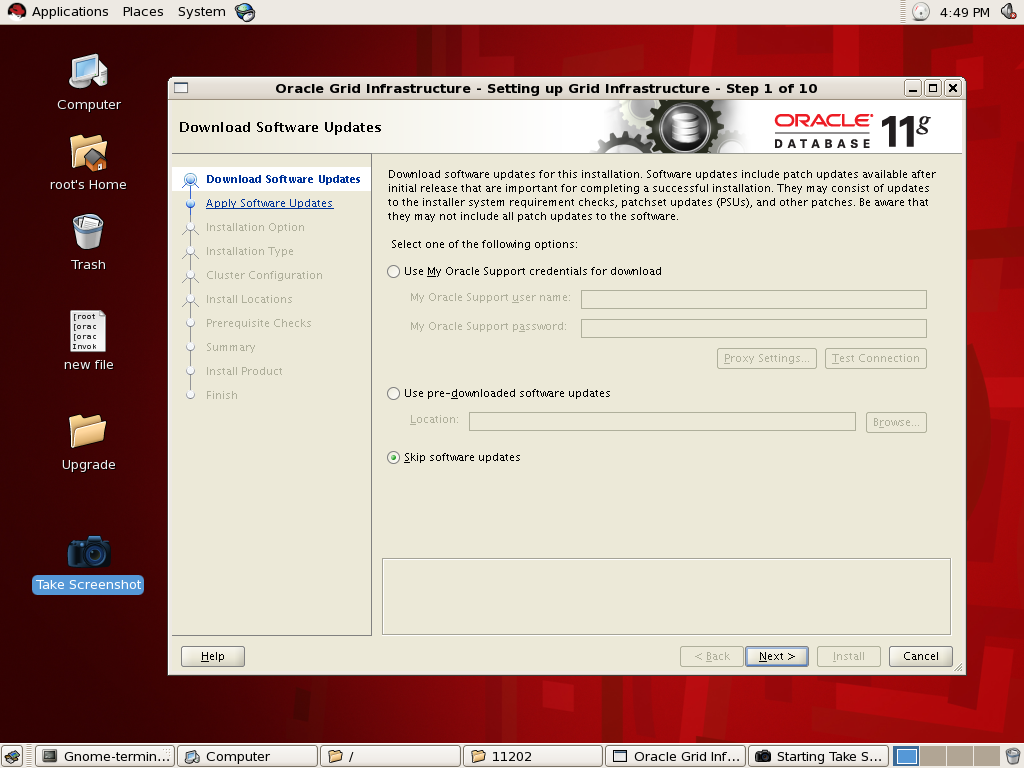
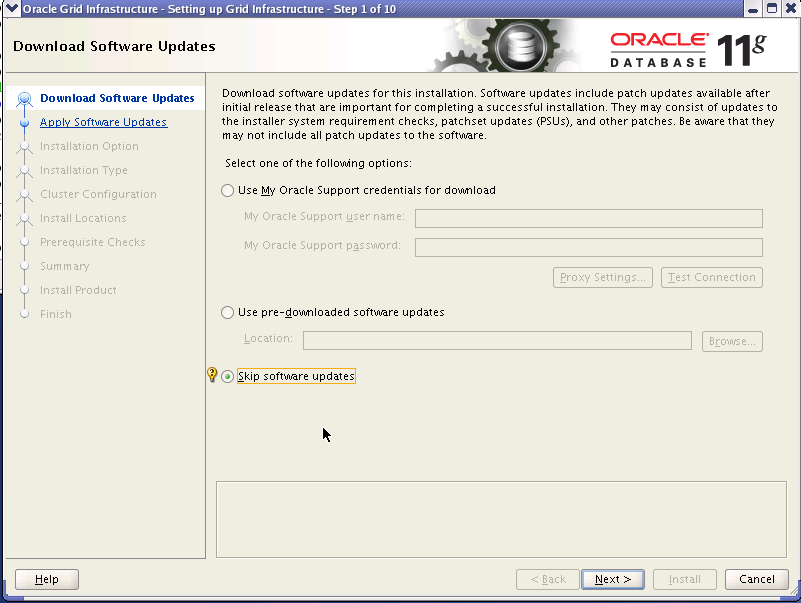
Next screen is related to software updates. You can “search for updates” and then select “My Oracle Support” to download the updates.We opted to “skip” this part.

On pre-requisite screen, installer checks whether your environment meets all the minimum requirements for a successful upgrade.
If some checks result in Warning or Failed status, then investigate and correct the problems before you proceed with the upgrade.

On the Installation Types screen, select Upgrade an Existing Enterprise Manager System, then select One System Upgrade. Then, select the OMS home you want to upgrade.

Next select the location for middleware home. 12.1.0.2 is out of place upgrade,so you need to specify new middleware home (without EM grid control) or a new home.

Next screen you pass connection details for EM repository.After you enter sys/sysman password it prompts you to stop oms

Stop the OMS using emctl utility.

$OMS_HOME/bin/emctl stop oms
Oracle Enterprise Manager Cloud Control 12c Release 12.1.0.1.0
Copyright (c) 1996, 2011 Oracle Corporation. All rights reserved.
Stopping WebTier...
WebTier Successfully Stopped
Stopping Oracle Management Server...
Oracle Management Server Successfully Stopped
Oracle Management Server is Down

Once OMS is stopped, we press ok on message and again click Next.Installer complains for pre-requisite check for emkey .This can be corrected by copying emkey to database repository.

Syntax for this is

$/bin/emctl config emkey -copy_to_repos_from_file -repos_host-repos_port-repos_sid-repos_user[-repos_pwd] -emkey_file/sysman/config/emkey.ora

I have replaced this with actual values for my setup

[oracle@oradbdev04]~% /home/oracle/Middleware/oms/bin/emctl config emkey -copy_to_repos_from_file -repos_host oradbdev04 -repos_port 1521 -repos_sid em12c -repos_user sysman -repos_pwd oracle123 -emkey_file /home/oracle/Middleware/oms/sysman/config/emkey.ora 
Oracle Enterprise Manager Cloud Control 12c Release 12.1.0.1.0  
Copyright (c) 1996, 2011 Oracle Corporation.  All rights reserved.
Enter Admin User's Password : 
The EMKey has been copied to the Management Repository. This operation will cause the EMKey to become unsecure.
After the required operation has been completed, secure the EMKey by running "emctl config emkey -remove_from_repos".

Next screen asks you to disable CBO gather stats job and set job_queue_processes to 0. You can press “Yes” and installer will automatically make changes for you.

We got next screen informing about some more pre-requisites which are not mandatory. We clicked ok and skipped them

On the Plug-In Upgrade screen, it will list plugins which are currently installed and new version post upgrade. Review them and click next

On the Plug-In Deployment screen, select the optional plug-ins you want to deploy in addition to the plug-ins that will automatically be upgraded while upgrading the OMS. ( I forgot to take screenshot of this page)

On the Extend WebLogic Server Domain screen , validate Adminserver details and enter WebLogic user account password.This is required to create a new WebLogic domain (GCDomain) on the same port and host name as the AdminServer used by the earlier release of the OMS you are upgrading.

We also need to enter new location for OMS instance base directory. As per oracle docs, it can be either inside or outside middleware home. Recommended approach is to keep it inside middleware home. We decided to use /home/oracle/product/middleware/gc_inst

You are next presented with summary screen and asked to click next

Next screen shows installation progress. This took nearly 1.5 hours.

Last step is to run $OMS_HOME/allroot.sh as root user

[root@oradbdev04 oms]# ./allroot.sh
Starting to execute allroot.sh .........
Starting to execute /home/oracle/product/middleware/oms/root.sh ......
 Running Oracle 11g root.sh script...
The following environment variables are set as:
 ORACLE_OWNER= oracle
 ORACLE_HOME= /home/oracle/product/middleware/oms
Enter the full pathname of the local bin directory: [/usr/local/bin]:
 The file "dbhome" already exists in /usr/local/bin. Overwrite it? (y/n)
 [n]:
 The file "oraenv" already exists in /usr/local/bin. Overwrite it? (y/n)
 [n]:
 The file "coraenv" already exists in /usr/local/bin. Overwrite it? (y/n)
 [n]:
Entries will be added to the /etc/oratab file as needed by
 Database Configuration Assistant when a database is created
 Finished running generic part of root.sh script.
 Now product-specific root actions will be performed.
 /etc exist
 /home/oracle/product/middleware/oms
 Finished execution of /home/oracle/product/middleware/oms/root.sh ......


Press ok on installer and we are finished with 12c installation.

Final screen lists down the url to access Enterprise manager grid control (12.1.0.2) and Weblogic Admin server.


Since one system upgrade only upgrades OMS and repository , we are still left with upgrading our central management agent.

1)Ensure that the Management Agents you want to upgrade are up and running.
2)Ensure that the Management Agents you want to upgrade are secure.

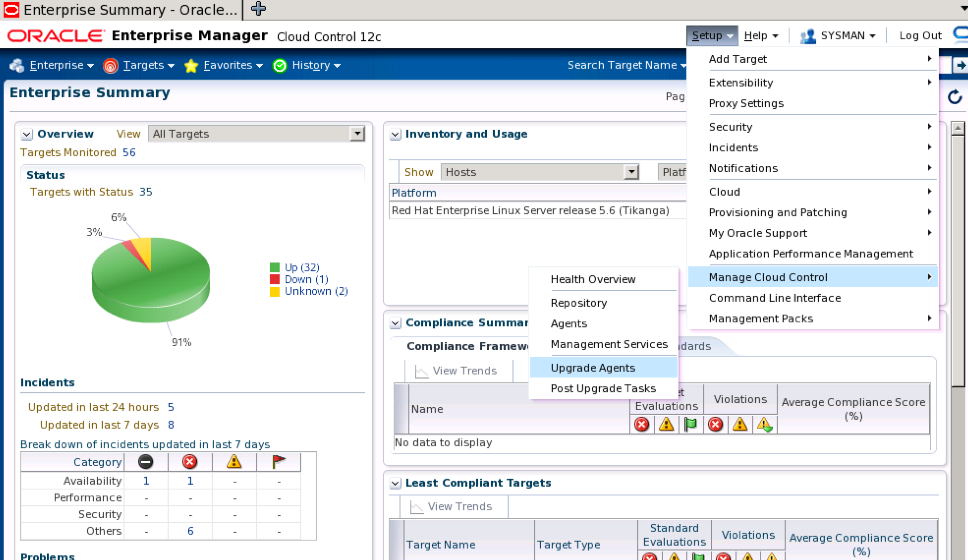
From the Setup menu, select Manage Cloud Control, then select Upgrade Agents. Click Add, select the Management Agents you want to upgrade, then click Select.

Select the Central management agent (which in this case is oradbdev04) and submit the job

Since we do not have root privileges, we have to run the $AGENT_BASE_DIR/core/12.1.0.2.0/root.sh script on the host after the upgrade.


You can monitor the agent install process

Note that oracle installs the agent in same base directory but creates new directory 12.1.0.2.0.

Before upgrade
/home/oracle/Middleware/agent/core/12.1.0.1.0

Post upgrade
/home/oracle/Middleware/agent/core/12.1.0.2.0

If you check agent status, you will find that oracle has automatically started the agent from new oracle home.

Run root.sh to complete the upgrade process

[root@oradbdev04 12.1.0.2.0]# ./root.sh
Finished product-specific root actions.
/etc exist
Finished product-specific root actions.

You can now upgrade the other management agent manually on the targets. Agent 12.1.0.1 is compatible with EMGC (12.1.0.2)

References

Oracle® Enterprise Manager Cloud Control Upgrade Guide12c Release 2 (12.1.0.2)
In-Place Upgrade 11gR2 RAC : 11.2.0.1 To 11.2.0.2

Sharing a post from my friend “Carthik” on 11gR2 RAC in-place upgrade.

Overview
========
Starting oracle 11gR2 the Oracle database and Clusterware upgrades are done via the “Out of place upgrade”. And is the easier way to perform your upgrade.  However, the intent of this blog is to explain how an “In-Place upgrade” of a RAC database is done in 11gR2, the advantages, disadvantages, pre-requisites and pain points involved in this method which is the traditional method of upgrading an oracle database. And I have chosen to upgrade a 2 Node 11.2.0.1 RAC Database to 11.2.0.2 RAC Database.

Clearly, the advantage is that you save space, Instead of installing a new Oracle Home.

The greatest disadvantage is that you need to back up the oracle home and run detach oracle home commands. This could potentially damage your oracle binaries. However, when done carefully it should not cause a problem.

The pain points Include:
1. Backing up the Oracle home
2. Restoring the Oracle Home from backup in-case of installation failure.
3. Attach the restored home, and then bring up the instance.
Clearly, there is a lot of manual intervention, which is a major pain point.

The idea behind using an in-place upgrade is to save space. And this method of upgrade requires a significant amount time. The only time one should use this method is when you lack space on your server. However, you can use this method for your test and development environments to save space. Since this method was the traditional method of doing things, I thought it’s worth checking how it works in 11gR2.

NOTE: If you have an existing Oracle Clusterware installation, then you upgrade your existing cluster by performing an out-of-place upgrade. You cannot perform an in-place upgrade to the oracle Clusterware. However, you can perform an in-place upgrade for the database. This will be elaborated in this blog.
Prerequisites for Oracle 11gR2 11.2.0.2 installation is to install patch 9655006 to the 11.2.0.1 GI home before upgrading to 11.2.0.2 from 11.2.0.1. See Bug 9413827 on MOS. For additional details you can refer to the Metalink article Pre-requisite for 11.2.0.1 to 11.2.0.2 ASM Rolling Upgrade Metalink Note : 1274629.1. Additionally ,Refer to “How to Manually Apply A Grid Infrastructure PSU Without Opatch Auto” Metalink Note 1210964.1.

Performing an In-place upgrade of a RAC DB from 11.2.0.1 to 11.2.0.2

In-order to upgrade a RAC Database from 11.2.0.1 to 11.2.0.2 you need to upgrade

1. The grid infrastructure first.
2. Then, the Oracle Database.

Environment Setup Details used in this post:
— 2 Node RAC Red Hat Linux 5.5 with RACK Servers (R710).
— Applies to any storage.

Latest OPatch
It is recommended to we use the Latest Version of OPatch. Unzip the zip file and copy OPatch folder to $ORACLE_HOME And $GI_HOME by renaming
the earlier OPatch directory. You can refer to how to download and Install OPatch Metalink ID 274526.1.

Pre- Requisite Patch:

First, let’s discuss about the mandatory patches required before upgrading to 11.2.0.2. Patch 9655006 is required in order for the upgrade
to succeed, if not rootupgrade.sh will fail.
Patch 9655006 is downloadable from http://www.metalink.oracle.com/ For information on Bug 9655006, refer to Metalink article ID 9655006.8
Download the patch and unzip it to a stage directory (it can be any directory), once you unzip the downloaded patch, 2 folders will be created. In this example I have unzipped the patch to /patches directory.

Now, let’s see how to patch the $GI_HOME with Patch 9655006.

Before the patch is installed, we need to perform a pre-req check. Let’s see how to do this.
1. [root@rac1 patches]# su – oracle

2. [oracle@rac1 ~]$ cd /opt/app/oracle/product/11.2.0/dbhome_1/OPatch/

3. [oracle@rac1 OPatch]$ ./opatch prereq CheckConflictAgainstOHWithDetail -phBaseDir /patches

Invoking OPatch 11.2.0.1.6
Oracle Interim Patch Installer version 11.2.0.1.6
Copyright (c) 2011, Oracle Corporation.  All rights reserved.
PREREQ session
Oracle Home       : /opt/app/oracle/product/11.2.0/dbhome_1
Central Inventory : /opt/app/oraInventory
 from           : /etc/oraInst.loc
OPatch version    : 11.2.0.1.6
OUI version       : 11.2.0.1.0
Log file location : /opt/app/oracle/product/11.2.0/dbhome_1/cfgtoollogs/opatch/opatch2011-08-16_19-36-09PM.log
Invoking prereq "checkconflictagainstohwithdetail"
Prereq "checkConflictAgainstOHWithDetail" passed.
OPatch succeeded.

Patching the $GI_HOME
1. Stop the Instance running on Node1
srvctl stop instance -d upgrade -i upgrade1

2. As root User run the opatch auto from the $GI_HOME
./opatch auto /patches

Note: The Opatch auto takes care of the patching of both the Grid infrastructure Home and the Oracle Home with the mandatory patch .
Once the patching is done on Node1, start the instance on Node1

3. Starting the Instance on Node1
srvctl start instance -d upgrade -i upgrade1

Repeat the process of pre-req and patching on Node2

Once the mandatory patch is applied, we can proceed with the upgrade of the grid infrastructure home.

Patches required:

The software/Patch can be downloaded from My Oracle support: patch 10098816. Select p10098816_112020_Linux-x86-64_3of7.zip
for grid infrastructure download. Once downloaded, unzip them.

Upgrading Grid Infrastructure:

Unzip the patches downloaded and invoke runInstaller from the unzipped grid folder. You will be taken to the welcome screen.

Choose Skip Software updates

Choose Upgrade Gird Infrastructure or Oracle ASM

Choose the Language

The Nodes present are selected by default, Click Next.

Leave the OS groups to Defaults

Choose the New Location where the Grid Infrastructure should be installed


The Pre-Requisite checks are performed, click next


The summary screen appears click next

Click on Install

Run rootupgrade.sh on both the nodes as specified in the screenshot

Upgrading the Database via In-place upgrade:

Patches Required:
The software/Patch can be downloaded from My Oracle support: patch 10098816.
Select p10098816_112020_Linux-x86-64_1of7.zip and p10098816_112020_Linux-x86-64_2of7.zip for database patch/software download.
Once downloaded, unzip them.

In-Place upgrades (Things to do before performing and In-place upgrade)

When performing an in-place upgrade, which uses the same Oracle home location, an error messages appears stating that the installer
detects Oracle Database software in the location that you specified.

Message: The installer has detected that the software location you have specified contains Oracle Database software release 11.2.0.1.
Oracle recommends that when upgrading to 11.2.0.2, you perform an out-of-place installation of the software into a new Oracle home and
then upgrade the database using the new software binaries.

Cause: The installer has detected that the software location you have specified contains Oracle Database software release 11.2.0.1.
Action: Either perform an in-place upgrade (Steps provided in this section), or perform an out-of-place upgrade

Performing an In-Place Upgrade for an Oracle RAC Database

To perform an in-place upgrade for Oracle RAC Database instances:
1. Back up the configuration data by backing up the following directories on all cluster nodes:
o ORACLE_HOME/dbs
o ORACLE_HOME/network/admin
o ORACLE_HOME/hostname_dbname
o ORACLE_HOME/oc4j/j2ee/OC4J_DBConsole_hostname_dbname

2. Run the following command on each of the nodes to detach the 11.2.0.1.0 Oracle RAC ORACLE_HOME:
$ORACLE_HOME/oui/bin/runInstaller -detachHome ORACLE_HOME=11.2.0.1.0 software location

3. Rename the 11.2.0.1.0 Oracle RAC ORACLE_HOME directory on all the nodes to a temporary name.

4. Install release 11.2.0.2 Software Only on all nodes:

From the unzipped folder, invoke the run Installer from the database folder

The welcome screen appears, uncheck the security updates and click next

Choose Skip Software Updates

Select Install Database Software Only and click next

Choose Oracle Real Application Clusters DB Installation and Select the Nodes and click next

Choose the Language and click next

Select Enterprise Edition and click next

Specify the location of the old home, and click next

Provide the Operating System groups and click next

Once the Pre-requisite checks are performed, click next

The summary screen appears, verify the settings and click next

The installation proceeds

Once the installation is done, run Root.sh on both the nodes as instructed and click ok.

Now, on all nodes, restore into the 11.2.0.2 ORACLE_HOME software location the backed up configuration data files
(from the backups you made of /dbs and network/admin), and also restore the following two directories:
/hostname_dbname and /oc4j/j2ee/OC4J_DBConsole_hostname_dbname. Specify the actual name for hostname_dbname.

Database Upgrade using DBUA:

Run DBUA from the 11.2.0.2 ORACLE_HOME/bin directory on the local node and select the 11.2.0.1.0 Oracle RAC database instance to
upgrade it to release 11.2.0.2.0.

The welcome screen appears once you invoke the DBUA, click next to proceed

DBUA Lists the databases that can be upgraded, select the one that you would like to upgrade

You can choose the Degree of parallelism and upgrading the time zone version and click next

Skip this screen by clicking next

The summary screen appears, click on finish for the upgrade to proceed.

The upgrade proceeds

NOTE: The only time one should use this method (in-place upgrade) is when you lack space on your server.
However, you can use this method for your test and development environments to save space.

Since this method was the traditional method of doing things,
Since this method is available, I thought it’s worth checking how it works in 11gR2.
During the entire upgrade process, I never ran into any issues, apart from the slightly higher downtime in
comparison to the out-of place upgrade. However, oracle doesn’t recommend this method. You can refer to the following metalink note 1291682.1.

Steps to Upgrade 11.2.0.1 RAC to 11.2.0.2

This post is in continuation to Grid Infrastructure upgrade post written earlier. Ensure that you have downloaded the software and  have upgraded the infrastructure database.

Following files contain database software for 11.2.0.2.

p10098816_112020_Linux-x86-64_1of7.zip

p10098816_112020_Linux-x86-64_2of7.zip

Please note that this is full release , so if you are installing new software, you can directly install 11.2.0.2 without need of first installing 11.2.0.1 database.Unzip the software and start the runInstaller from the database directory.

cd $SW_HOME/database

./runInstaller

We will be presented with OUI screen asking for MOS credentials. Please note that we would be installing software into new ORACLE_HOME, which is a new feature called out of place upgrade.

Next screen ask’s again for MOS credentials. This can be used to check if there are any patches which need’s to be applied before software can be upgraded. Since we have already applied the PSU2, we will choose skip Software updates

We are now presented with 3 options

a)Create and Configure database – installs software and creates a database using dbca

b)Install database software only – Only installs 11.2.0.2 software

c) Upgrade exisiting database – Installs software and launches dbua to upgrade database

We chose option b) i.e Install database software only

Next screen presents you with 3 options

a)Single Instance database installation

b)Oracle RAC Installation

c)Oracle RAC One Node database Installation

I will be discussing RAC one node in a future post. For our installation we are upgrading RAC database and require RAC software

Next screen gives option to choose between Enterprise edition and Standard Edition

Next screen asks for database software installation directory. Unlike Grid infrastructure, where it is mandatory to install in new ORACLE_HOME, RAC database software can be installed in existing home. But we will be choosing Out of place upgrade i.e install in new home.

Choose the OSDBA and OSOPER group

Next screen checks the pre-requisites. You can ask oracle to create fixup script. Refer to my earlier post for detail

Finally we are prompted to run root.sh from both nodes

After you have run root.sh from both nodes, you can then use dbua to upgrade the database. Note that we have not yet brought down the database. This is great benefit of using out of place upgrade . Second benefit is that you are not touching the existing binaries,so you are not required to take backup of binaries and can can easily rollback the changes (if required). You can also continue using the old binaries for databases which you cannot get downtime and can upgrade them later.

Set the ORACLE_HOME and PATH to include 11.2.0.2 software location and start dbua. Take backup of database before you start upgrade process using dbua

$dbua

We are presented with welcome screen. Press next

DBUA presents you with list of databases currently registered in /etc/oratab. We select db11g which we need to upgrade

Next screen asks for following options

a) Option to recompile invalid objects and degree of parallelism for running utlrp.sql. We keep default value of 3

b) Option to disable archiving during upgrade

c)Upgrade the timezone file. We have not selected it now and will do upgrade manually

Next screen presents with option to select Fast Recovery area and size

Next we will be presented with summary screen and asked to take backup of database. If you have not taken it till now, its good time to take backup. Also now database will be stopped and will be started from new oracle home.Please ensure that you have appropriate setting for JAVA_POOL_SIZE and SHARED_POOL_SIZE during upgrade or can use SGA_TARGET/MEMORY_TARGET to avoid ora-4031

Following screen shows database upgrade progress screen.

Once upgrade completes, it gives summary of upgrade process. As you can see it has warned for DST upgrade.

Oracle 11.2.0.2 contains version 14 file. Starting 11g you can have multiple database running out of single oracle home to have different timezone version files.

You can refer to Updating the RDBMS DST version in 11gR2 (11.2.0.1 and up) using DBMS_DST [ID 977512.1]

Giving summary of steps taken by us to upgrade from version 11 to version 14

---Check the current version of file ---
SQL> select version from V$TIMEZONE_FILE;

   VERSION
----------
	11

SQL> SELECT PROPERTY_NAME, SUBSTR(property_value, 1, 30) value
FROM DATABASE_PROPERTIES
WHERE PROPERTY_NAME LIKE 'DST_%'
ORDER BY PROPERTY_NAME;  2    3    4  

PROPERTY_NAME		       VALUE
------------------------------ ------------------------------
DST_PRIMARY_TT_VERSION	       11
DST_SECONDARY_TT_VERSION       0
DST_UPGRADE_STATE	       NONE

---Confirm if $ORACLE_HOME/oracore/zoneinfo contains timezlrg_14.dat i.e version 14 file

--Prepare for upgrade
SQL> exec DBMS_DST.BEGIN_PREPARE(14);

PL/SQL procedure successfully completed.

--Confirm status

SQL> SELECT PROPERTY_NAME, SUBSTR(property_value, 1, 30) value
FROM DATABASE_PROPERTIES
WHERE PROPERTY_NAME LIKE 'DST_%'
ORDER BY PROPERTY_NAME;  2    3    4  

PROPERTY_NAME		       VALUE
------------------------------ ------------------------------
DST_PRIMARY_TT_VERSION	       11
DST_SECONDARY_TT_VERSION       14
DST_UPGRADE_STATE	       PREPARE

---Re-running prepare statement will give below error.
SQL> exec DBMS_DST.BEGIN_PREPARE(14);
BEGIN DBMS_DST.BEGIN_PREPARE(14); END;

*
ERROR at line 1:
ORA-56920: a prepare or upgrade window or an on-demand or datapump-job loading of a secondary time zone data file is in
an active state
ORA-06512: at "SYS.DBMS_SYS_ERROR", line 79
ORA-06512: at "SYS.DBMS_DST", line 1340
ORA-06512: at line 1

-- truncate logging tables if they exist.

TRUNCATE TABLE SYS.DST$TRIGGER_TABLE;
TRUNCATE TABLE sys.dst$affected_tables;
TRUNCATE TABLE sys.dst$error_table;

-- log affected data

BEGIN
DBMS_DST.FIND_AFFECTED_TABLES
(affected_tables => 'sys.dst$affected_tables',
log_errors => TRUE,
log_errors_table => 'sys.dst$error_table');
END;
/
---Query table to check if any affected table
SQL> SQL> SELECT * FROM sys.dst$affected_tables;

no rows selected

SQL>
SQL> SELECT * FROM sys.dst$error_table;

no rows selected

-- End the prepare phase
SQL> EXEC DBMS_DST.END_PREPARE;
A prepare window has been successfully ended.

--Startup the database in upgrade mode. Ensure you have set cluster_database=false

SQL> EXEC DBMS_DST.BEGIN_UPGRADE(14);
An upgrade window has been successfully started.

PL/SQL procedure successfully completed.

-- To confirm whether it has been upgraded to version 14
SQL> SELECT PROPERTY_NAME, SUBSTR(property_value, 1, 30) value
FROM DATABASE_PROPERTIES
WHERE PROPERTY_NAME LIKE 'DST_%'
ORDER BY PROPERTY_NAME;  2    3    4  

PROPERTY_NAME		       VALUE
------------------------------ ------------------------------
DST_PRIMARY_TT_VERSION	       14
DST_SECONDARY_TT_VERSION       11
DST_UPGRADE_STATE	       UPGRADE

--Restart the database after removing cluster_database

This completes the database upgrade process. I would recommend dbua to upgrade the database as  it takes care of copying the init.ora files,password file and also modified the OCR to point to new oracle home and upgraded srvctl version. Oracle Upgrade guide does not list any method documenting steps to be taken for srvctl. I referred following link i.e Oracle Database Upgrade documentation for the upgrade purpose

http://download.oracle.com/docs/cd/E11882_01/server.112/e17222/upgrade.htm#i1011981

In case you use manual method and use srvctl modify database to point to new oracle home, you will get errors like below

srvctl stop database -d test11g
PRCD-1027 : Failed to retrieve database test11g
PRCD-1229 : An attempt to access configuration of database test11g was rejected because its version 11.2.0.1.0 differs from the program version 11.2.0.2.0. Instead run the program from /oracle/product/app/11.2.0/dbhome_1.

You can use following command to upgrade the srvctl version

srvctl upgrade database -d test11g -o /oracle/product/app/11.2.0.2/dbhome_1

Happy Upgrading.

Upgrading Grid Infrastructure 11.2.0.1 to 11.2.0.2 on RHEL4

11.2.0.2 Patchset was released few days back. I decided to upgrade a test RAC database to 11.2.0.2 yesterday and was able to do it successfully. I will be documenting the steps here for easy reference

Environment Details

2 node RAC on Red Hat Enterprise Linux AS release 4 (Nahant Update 8), 64 bit

To upgrade existing 11.2.0.1 Oracle Grid Infrastructure installations to Oracle Grid Infrastructure 11.2.0.2, you must first do at least one of the following:

– Patch the release 11.2.0.1 Oracle Grid Infrastructure home with the fix for bug 9413827.
– Install Oracle Grid Infrastructure Patch Set 1 (GIPS1) or Oracle Grid Infrastructure Patch Set 2 (GIPS2).

I will be using Oracle Grid Infrastructure Patch set 2.

Software and Patches

1) Download Patch 9655006 – 11.2.0.1.2 for Grid Infrastructure (GI) Patch Set Update from MOS

2) Latest Opatch for 11.2 – 6880880 Universal Installer: Patch OPatch 11.2

You can refer to How To Download And Install OPatch [ID 274526.1]

3)11.2.0.2 Patchset files. You can find method to download them directly to server here

p10098816_112020_Linux-x86-64_1of7.zip  – 11.2.0.2 Database Installation Files

p10098816_112020_Linux-x86-64_2of7.zip – 11.2.0.2 Database Installation Files

p10098816_112020_Linux-x86-64_3of7.zip – 11.2.0.2 Grid Installation Files

Lets get started.

Install Latest Opatch

Unzip the zip file and copy OPatch folder to $ORACLE_HOME by renaming the earlier OPatch directory. You can refer to How To Download And Install OPatch [ID 274526.1]

Apply Grid Infrastructure (GI) Patch Set Update –  9655006

It applies patch 9654983 and 9655006 to both Database and Grid home. We proceed by checking for any patch conflicts
[oracle@oradbdev01]~/software/11.2.0.2/psu% opatch prereq CheckConflictAgainstOHWithDetail -phBaseDir ./9655006
Invoking OPatch 11.2.0.1.3

Oracle Interim Patch Installer version 11.2.0.1.3
Copyright (c) 2010, Oracle Corporation.  All rights reserved.

PREREQ session

Oracle Home       : /oracle/product/app/11.2.0/dbhome_1
Central Inventory : /oracle/oraInventory
   from           : /etc/oraInst.loc
OPatch version    : 11.2.0.1.3
OUI version       : 11.2.0.1.0
OUI location      : /oracle/product/app/11.2.0/dbhome_1/oui
Log file location : /oracle/product/app/11.2.0/dbhome_1/cfgtoollogs/opatch/opatch2010-10-02_06-03-34AM.log

Patch history file: /oracle/product/app/11.2.0/dbhome_1/cfgtoollogs/opatch/opatch_history.txt

Invoking prereq "checkconflictagainstohwithdetail"

Prereq "checkConflictAgainstOHWithDetail" passed.

OPatch succeeded.<span style="font-family: Georgia, 'Times New Roman', 'Bitstream Charter', Times, serif; font-size: small;"><span style="line-height: 19px; white-space: normal;">
</span></span>

We need to use opatch auto to patch both Grid Infrastructure and RAC database home.It can be used to patch separately but I am going with patching both. This is great improvement over 10g CRS patch bundles as it had lot of steps to be run as root or oracle software owner. ( I had myself messed up once by running a command as root instead of oracle 🙁 ) Opatch starts with patching the database home and then patches the grid infrastructure home. You can stop the database instance running out of oracle home.(opatch asks for shutting down database, so in case you do not stop,don’t worry it will warn)

Note: In case you are on RHEL5/OEL5 and using ACFS for database volumes, it is recommended to use opatch auto <loc> -oh <grid home> to first patch the Grid home instead of patching them together

Unzip patch 965506 to directory say /oracle/software/gips2.It will create two directories for patch 9654983 and 9655006. Connect as root user and set the oracle home and Opatch directory . Stop the database instance running on the node

srvctl stop instance -d db11g -i db11g1

Next run opatch auto command as root

#opatch auto /oracle/software/gips2
Oracle Interim Patch Installer version 11.2.0.1.3
Copyright (c) 2010, Oracle Corporation.  All rights reserved.

UTIL session

Oracle Home       : /oracle/product/grid
Central Inventory : /oracle/oraInventory
   from           : /etc/oraInst.loc
OPatch version    : 11.2.0.1.3
OUI version       : 11.2.0.1.0
OUI location      : /oracle/product/grid/oui
Log file location : /oracle/product/grid/cfgtoollogs/opatch/opatch2010-10-02_06-35-03AM.log

Patch history file: /oracle/product/grid/cfgtoollogs/opatch/opatch_history.txt

Invoking utility "napply"
Checking conflict among patches...
Checking if Oracle Home has components required by patches...
Checking conflicts against Oracle Home...
OPatch continues with these patches:   9654983  

Do you want to proceed? [y|n]
y
User Responded with: Y

Running prerequisite checks...
Provide your email address to be informed of security issues, install and
initiate Oracle Configuration Manager. Easier for you if you use your My
Oracle Support Email address/User Name.
Visit http://www.oracle.com/support/policies.html for details.
Email address/User Name: 

You have not provided an email address for notification of security issues.
Do you wish to remain uninformed of security issues ([Y]es, [N]o) [N]:  Y

You selected -local option, hence OPatch will patch the local system only.

Please shutdown Oracle instances running out of this ORACLE_HOME on the local system.
(Oracle Home = '/oracle/product/grid')

Is the local system ready for patching? [y|n]
y
User Responded with: Y
Backing up files affected by the patch 'NApply' for restore. This might take a while...

I have not copied the whole output. It asks you to specify MOS credentials for setting up Oracle Configuration Manager. You can skip it as mentioned above. You will find following errors in the end

OPatch succeeded.
ADVM/ACFS is not supported on Redhat 4

Failure at scls_process_spawn with code 1
Internal Error Information:
  Category: -1
 Operation: fail
  Location: canexec2
  Other: no exe permission, file [/oracle/product/grid/bin/ohasd]
  System Dependent Information: 0

CRS-4000: Command Start failed, or completed with errors.

Timed out waiting for the CRS stack to start.<span style="font-family: Georgia, 'Times New Roman', 'Bitstream Charter', Times, serif; font-size: small;"><span style="line-height: 19px; white-space: normal;">
</span></span>

This is a known issue and discussed in 11.2.0.X Grid Infrastructure PSU Known Issues [ID 1082394.1]

To solve this issue, connect as root user and execute following command from your Grid Infrastructure home

cd $GRID_HOME

# ./crs/install/rootcrs.pl -patch
2010-10-02 06:59:54: Parsing the host name
2010-10-02 06:59:54: Checking for super user privileges
2010-10-02 06:59:54: User has super user privileges
Using configuration parameter file: crs/install/crsconfig_params
ADVM/ACFS is not supported on Redhat 4

CRS-4123: Oracle High Availability Services has been started.

Start oracle database instance on the node which has been patched

srvctl start instance -d db11g -i db11g1

Repeat the above steps for node 2.It took me 40 minutes for each node to complete opatch auto activity.Once it is done,execute following from one node for all databases to complete patch installation

cd $ORACLE_HOME/rdbms/admin

sqlplus /nolog

SQL> CONNECT / AS SYSDBA

SQL> @catbundle.sql psu apply

SQL> QUIT

This completes patching of Grid Infrastructure Patch or PSU2.

Upgrading Grid Infrastructure home to 11.2.0.2

Ensure following environment variables are not set :ORA_CRS_HOME; ORACLE_HOME; ORA_NLS10; TNS_ADMIN

# echo $ORA_CRS_HOME; echo $ORACLE_HOME; echo $ORA_NLS10; echo $TNS_ADMIN

Strating with 11.2.0.2, Grid infrastructure (Clusterware and ASM Home) upgrade is out of place upgrade i.e we install in new ORACLE_HOME. Unlike database home we cannot perform an in-place upgrade of Oracle Clusterware and Oracle ASM to existing homes.

Unset following variables too

$ unset ORACLE_BASE

$ unset ORACLE_HOME

$ unset ORACLE_SID

Relax permissions for GRID_HOME

#chmod -R 755 /oracle/product/grid

#chown -R oracle /oracle/product/grid

#chown oracle /oracle/product

Start the runInstaller from the 11.2.0.2 grid software directory.

On first screen, it will ask for MOS details. I have chosen skip Software update

Since we are upgrading existing installation, choose “Upgrade Oracle Grid Infrastructure or Oracle Automatic Storage Management”. This will install software and also configure ASM

Next screen displays nodes which OUI will patch

Select the OSDBA,OSASM and OSOPER group. I have chosen dba

Since I have chosen all 3 groups to be same, it gives warning. Select Yes to continue

Specify the grid software installation directory. I have used /oracle/product/oragrid/11.2.0.2 (Better to input release as we will be having out of place upgrades for future patchsets too)

OUI reports some issues with swap size ,shmmax and NTP. You can fix them or choose to ignore. OUI can create a fixup script for you.

Installation starts copying file. After files have been copied to both nodes, it asks for running the rootupgrade.sh script from all nodes

Stop the database instance running from the node at this time and then run script as root. Please note that ASM and clusterware should not be stopped as rootupgrade.sh requires them to be up and takes care of shutting down and starting with new home.In my case, running rootupgrade.sh successfully succeeded on node 1 but it hung on node 2 . I did a cancel and re-ran it. Pasting the contents from node 2 second run

[root@oradbdev02 logs]# /oracle/product/oragrid/11.2.0.2/rootupgrade.sh
Running Oracle 11g root script...

The following environment variables are set as:
    ORACLE_OWNER= oracle
    ORACLE_HOME=  /oracle/product/oragrid/11.2.0.2

Enter the full pathname of the local bin directory: [/usr/local/bin]:
The contents of "dbhome" have not changed. No need to overwrite.
The contents of "oraenv" have not changed. No need to overwrite.
The contents of "coraenv" have not changed. No need to overwrite.

Entries will be added to the /etc/oratab file as needed by
Database Configuration Assistant when a database is created
Finished running generic part of root script.
Now product-specific root actions will be performed.
Using configuration parameter file: /oracle/product/oragrid/11.2.0.2/crs/install/crsconfig_params
clscfg: EXISTING configuration version 5 detected.
clscfg: version 5 is 11g Release 2.
Successfully accumulated necessary OCR keys.
Creating OCR keys for user 'root', privgrp 'root'..
Operation successful.
CRS-1115: Oracle Clusterware has already been upgraded.

ASM upgrade has finished on last node.

Preparing packages for installation...
cvuqdisk-1.0.9-1
Configure Oracle Grid Infrastructure for a Cluster ... succeeded

On clicking next in OUI, it reported that cluvfy has failed and some of components are not installed properly. To verify I ran cluvfy manually. Pasting content for which it failed

./cluvfy stage -post crsinst -n oradbdev01,oradbdev02 -verbose 

<span style="font-family: Georgia, 'Times New Roman', 'Bitstream Charter', Times, serif; line-height: 19px; white-space: normal; font-size: 13px;">
<pre style="font: normal normal normal 12px/18px Consolas, Monaco, 'Courier New', Courier, monospace;">-------------------------------truncated output -------------------

ASM Running check passed. ASM is running on all specified nodes

Checking OCR config file "/etc/oracle/ocr.loc"...

ERROR:
PRVF-4175 : OCR config file "/etc/oracle/ocr.loc" check failed on the following nodes:

	oradbdev02:Group of file "/etc/oracle/ocr.loc" did not match the expected value. [Expected = "oinstall" ; Found = "dba"]

	oradbdev01:Group of file "/etc/oracle/ocr.loc" did not match the expected value. [Expected = "oinstall" ; Found = "dba"]

Disk group for ocr location "+DG_DATA01" available on all the nodes

OCR integrity check failed
-------------------------------truncated output -------------------

Checking OLR config file...

ERROR: 

PRVF-4184 : OLR config file check failed on the following nodes:

	oradbdev02:Group of file "/etc/oracle/olr.loc" did not match the expected value. [Expected = "oinstall" ; Found = "dba"]

	oradbdev01:Group of file "/etc/oracle/olr.loc" did not match the expected value. [Expected = "oinstall" ; Found = "dba"]

Checking OLR file attributes...

ERROR: 

PRVF-4187 : OLR file check failed on the following nodes:

	oradbdev02:Group of file "/oracle/product/oragrid/11.2.0.2/cdata/oradbdev02.olr" did not match the expected value. [Expected = "oinstall" ; Found = "dba"]

	oradbdev01:Group of file "/oracle/product/oragrid/11.2.0.2/cdata/oradbdev01.olr" did not match the expected value. [Expected = "oinstall" ; Found = "dba"]

OLR integrity check failed

-------------------------------truncated output -------------------
Checking NTP daemon command line for slewing option "-x"
Check: NTP daemon command line
  Node Name                             Slewing Option Set?
  ------------------------------------  ------------------------
  oradbdev02                            no
  oradbdev01                            no
Result:
NTP daemon slewing option check failed on some nodes
PRVF-5436 : The NTP daemon running on one or more nodes lacks the slewing option "-x"
Result: Clock synchronization check using Network Time Protocol(NTP) failed

PRVF-9652 : Cluster Time Synchronization Services check failed

We see that cluvfy is reporting error that it expected oinstall group but found dba group. I had not specified install group during installation, so can ignore it.For NTP you can correct it by setting following in ntpd.conf and restart the ntpd daemon

grep OPTIONS /etc/sysconfig/ntpd
OPTIONS=”-u ntp:ntp -p /var/run/ntpd.pid -x”

Refer How to Configure NTP to Resolve CLUVFY Error PRVF-5436 PRVF-9652 [ID 1056693.1]

At this moment Grid Infrastructure has been successfully upgraded to 11.2.0.2. Next we will upgrade the RAC database home. You can refer to Steps to Upgrade 11.2.0.1 RAC to 11.2.0.2

Get Upgrading: Steps To Upgrade To 11gR2

As 11gR2 is out for Linux, I decided to upgrade one of my existing 10.2.0.3 database to 11.2.0.1 to get the look and feel of 11gR2. Direct upgrade to 11gR2 is supported from 9.2.0.8 or higher, 10.1.0.5 or higher, 10.2.0.2 or higher and 11.1.0.6 or higher. If you have a database 9.2.0.6 then first you need to upgrade to intermediate release i.e 9.2.0.8 then to 11.2.0.1.

9.2.0.6==>9.2.0.8==>11.2.0.1
8.1.7.0==>8.1.7.4==>10.2.0.4==>11.2.0.1

I will discuss how to upgrade an existing Single Instance 10.2.0.3 database with ASM, having same ORACLE_HOME, to 11gR2 with ASM. The upgrade needs to be performed in two phases:

1. Upgrade the ASM instance
2. Upgrade the database

Upgrade ASM Instance:
===============

There are three ways to upgrade already existing ASM instance:

- Using OUI of Grid Infrastructure
- Using ASM Configuration Assistant
- Manual upgrade

The recommended method to upgrade ASM instance is to use OUI of Grid Infrastructure, which I have used .

STEP 1:

Create OSASM group:
If you want, you can create a separate group for ASM instance here it is named as ASMADMIN.

# groupadd asmadmin
# usermod -a -G asmadmin oracle

STEP 2:

Before upgrading an ASM instance to 11gR2 it is mandatory to add a ‘user and password’ combination to the password file which is local to node’s ASM instance. Login to database instance “/ as sysdba”:

SQL> create user sood identified by oracle;
SQL> grant sysdba to sood;
SQL> select * from v$pwfile_users;

USERNAME            SYSDB SYSOP
------------------------------ -----       -----
SYS                        TRUE  TRUE
SOOD                     TRUE  FALSE

STEP 3:

From 11gR2 onwards ASM is part of Grid Infrastructure and we need to download Grid Infrastructure software first. To download the software for 11gR2 Grid Infrastructure click here

Start the RunInstaller:

./runInstaller

Click on the Image to Enlarge.

1. It will automatically defaults to the “Upgrade Mode”

Upgrade Mode

Select “Upgrade Grid Infrastructure” and click Next.

2. On clicking Next, It will detect the already existing ASM instance. Shutdown the Database and ASM instance at this point.

Click “Yes”.

3.  Select the Language

Click “Next”.

4.  Enter a Password for ASMSNMP user. The password can be anything you want, though Oracle will ask you to set a password which adhers to Oracle’s standards otherwise a “Red Cross” will be shown in the tab at left hand side. Do not worry about that cross 🙂

Click “Next”.

5. Provide the Group details

Click “Next”.

Click “Yes”.

6. Provide the Base and Home location for Grid Infrastructure Home

Click “Next”.

7.  It will perform the Prerequisite checks here, For more information on this click Installation Fixup script
I have select “Ignore All”

Click “Next”.

8.  Now you will see “Summary” page, make sure that the Installation Option is shown as “Upgrade Grid Infrastructure” and Migrate ASM as “True”.

Click “Finish”.

9. Now the setup for “Grid Infrastructure’ is started

Run the rootupgrade.sh

# ./rootupgrade.sh

[root@localhost ~]# cd /u01/11g/oracle/product/11.2.0/grid/

[root@localhost grid]# pwd
/u01/11g/oracle/product/11.2.0/grid
[root@localhost grid]# ./rootupgrade.sh
Running Oracle 11g root.sh script...

The following environment variables are set as:
ORACLE_OWNER= oracle
ORACLE_HOME=  /u01/11g/oracle/product/11.2.0/grid

Enter the full pathname of the local bin directory: [/usr/local/bin]:
The file "dbhome" already exists in /usr/local/bin.  Overwrite it? (y/n)
[n]: y
Copying dbhome to /usr/local/bin ...
The file "oraenv" already exists in /usr/local/bin.  Overwrite it? (y/n)
[n]: y
Copying oraenv to /usr/local/bin ...
The file "coraenv" already exists in /usr/local/bin.  Overwrite it? (y/n)
[n]: y
Copying coraenv to /usr/local/bin ...

Entries will be added to the /etc/oratab file as needed by
Database Configuration Assistant when a database is created
Finished running generic part of root.sh script.
Now product-specific root actions will be performed.
2009-09-05 11:46:25: Checking for super user privileges
2009-09-05 11:46:25: User has super user privileges
2009-09-05 11:46:25: Parsing the host name
Using configuration parameter file: /u01/11g/oracle/product/11.2.0/grid/crs/install/crsconfig_params
Creating trace directory
LOCAL ADD MODE
Creating OCR keys for user 'oracle', privgrp 'oinstall'..
Operation successful.
CSS appears healthy
Stopping CSSD.
Shutting down CSS daemon.
Shutdown request successfully issued.
Shutdown has begun. The daemons should exit soon.
CRS-4664: Node localhost successfully pinned.
Adding daemon to inittab
CRS-4123: Oracle High Availability Services has been started.
ohasd is starting

localhost     2009/09/05 11:49:02     /u01/11g/oracle/product/11.2.0/grid/cdata/localhost/backup_20090905_114902.olr
Successfully configured Oracle Grid Infrastructure for a Standalone Server
Updating inventory properties for clusterware
Starting Oracle Universal Installer...

Checking swap space: must be greater than 500 MB.   Actual 885 MB    Passed
The inventory pointer is located at /etc/oraInst.loc
The inventory is located at /u01/10g/oraInventory
'UpdateNodeList' was successful.
[root@localhost grid]#

10. After the upgrade I have checked /etc/oratab file and found the entry of ASM pointing to new home i.e now ASM is a part of “Grid Infrastructure”
“+ASM:/u01/11g/oracle/product/11.2.0/grid:N”

Upgrade Database Instance:
===================

NOTE: DO NOT SHUTDOWN DATABASE BEFORE RUNNING DBUA.

STEP 1: Install The Software:

To download Oracle Database 11gR2 software click Here . Execute runInstaller to install “SOFTWARE ONLY” option, you can follow this link to install the software.  Make sure that you select “software only”  option as shown below rest of the steps are same as described in above link.

STEP 2: Run Pre-Upgrade Information tool

I have installed the software under “/u01/11g/oracle/product/11.2.0/dbhome_1” location. Once the software is installed, then go to location $ORACLE_HOME/rdbms/admin and copy  utlu112i.sql script to /tmp directory. Now login to 10g database “/ as sysdba” and startup the 10g database, then:

SQL> spool /tmp/upgrade.spl
SQL> @/tmp/utlu112i.sql
SQL> spool off</span>

Following is the output of this script from my database:

Oracle Database 11.2 Pre-Upgrade Information Tool    09-04-2009 01:54:32
.
**********************************************************************
Database:
**********************************************************************
--&gt; name:          ORCL10G
--&gt; version:       10.2.0.3.0
--&gt; compatible:    10.2.0.3.0
--&gt; blocksize:     8192
--&gt; platform:      Linux IA (32-bit)
--&gt; timezone file: V3
.
**********************************************************************
Tablespaces: [make adjustments in the current environment]
**********************************************************************
--&gt; SYSTEM tablespace is adequate for the upgrade.
.... minimum required size: 724 MB
.... AUTOEXTEND additional space required: 244 MB
--&gt; UNDOTBS1 tablespace is adequate for the upgrade.
.... minimum required size: 464 MB
.... AUTOEXTEND additional space required: 439 MB
--&gt; SYSAUX tablespace is adequate for the upgrade.
.... minimum required size: 447 MB
.... AUTOEXTEND additional space required: 207 MB
--&gt; TEMP tablespace is adequate for the upgrade.
.... minimum required size: 61 MB
.... AUTOEXTEND additional space required: 41 MB
.
**********************************************************************
Flashback: OFF
**********************************************************************
**********************************************************************
Update Parameters: [Update Oracle Database 11.2 init.ora or spfile]
**********************************************************************
WARNING: --&gt; "sga_target" needs to be increased to at least 336 MB
WARNING: --&gt; "java_pool_size" needs to be increased to at least 64 MB
WARNING: --&gt; "pga_aggregate_target" needs to be increased to at least 24 MB
.
**********************************************************************
Renamed Parameters: [Update Oracle Database 11.2 init.ora or spfile]
**********************************************************************
-- No renamed parameters found. No changes are required.
.
**********************************************************************
Obsolete/Deprecated Parameters: [Update Oracle Database 11.2 init.ora or spfile]
**********************************************************************
--&gt; background_dump_dest         11.1       DEPRECATED   replaced by
"diagnostic_dest"
--&gt; user_dump_dest               11.1       DEPRECATED   replaced by
"diagnostic_dest"
--&gt; core_dump_dest               11.1       DEPRECATED   replaced by
"diagnostic_dest"
.
**********************************************************************
Components: [The following database components will be upgraded or installed]
**********************************************************************
--&gt; Oracle Catalog Views         [upgrade]  VALID
--&gt; Oracle Packages and Types    [upgrade]  VALID
--&gt; JServer JAVA Virtual Machine [upgrade]  VALID
--&gt; Oracle XDK for Java          [upgrade]  VALID
--&gt; Oracle Workspace Manager     [upgrade]  VALID
--&gt; OLAP Analytic Workspace      [upgrade]  VALID
--&gt; OLAP Catalog                 [upgrade]  VALID
--&gt; EM Repository                [upgrade]  VALID
--&gt; Oracle Text                  [upgrade]  VALID
--&gt; Oracle XML Database          [upgrade]  VALID
--&gt; Oracle Java Packages         [upgrade]  VALID
--&gt; Oracle interMedia            [upgrade]  VALID
--&gt; Spatial                      [upgrade]  VALID
--&gt; Data Mining                  [upgrade]  VALID
--&gt; Expression Filter            [upgrade]  VALID
--&gt; Rule Manager                 [upgrade]  VALID
--&gt; Oracle OLAP API              [upgrade]  VALID
.
**********************************************************************
Miscellaneous Warnings
**********************************************************************
WARNING: --&gt; Database is using a timezone file older than version 11.
.... After the release migration, it is recommended that DBMS_DST package
.... be used to upgrade the 10.2.0.3.0 database timezone version
.... to the latest version which comes with the new release.
WARNING: --&gt; Database contains schemas with stale optimizer statistics.
.... Refer to the Upgrade Guide for instructions to update
.... schema statistics prior to upgrading the database.
.... Component Schemas with stale statistics:
....   SYS
....   XDB
WARNING: --&gt; Database contains schemas with objects dependent on network
packages.
.... Refer to the Upgrade Guide for instructions to configure Network ACLs.
WARNING: --&gt; EM Database Control Repository exists in the database.
.... Direct downgrade of EM Database Control is not supported. Refer to the
.... Upgrade Guide for instructions to save the EM data prior to upgrade.
WARNING:--&gt; recycle bin in use.
.... Your recycle bin turned on.
.... It is REQUIRED
.... that the recycle bin is empty prior to upgrading
.... your database.
.... The command:  PURGE DBA_RECYCLEBIN
.... must be executed immediately prior to executing your upgrade.
PL/SQL procedure successfully completed.
SQL&gt; spool off

Adjust the warnings shown by Pre-Upgrade Information tool.

STEP 3 : Upgrade using DBUA

Execute the DBUA from 11gR2 software home as

$ cd $ORACLE_HOME/bin
$./dbua

1.

Click “Next”

2.  Select the database that you want to upgrade

Click “Next”

3.  Here DBUA will show warnings that were not solved after running Pre-Upgrade Information tool

Click “Yes”

4. Turn OFF archiving while upgrading

Click “Next”

5. Check whether you want to move the datafiles while upgrade, though the “move datafile” check-box was not highlighted when I upgraded

Click “Next”.

6. Specify “FRA” and “Diagnostic Destination”

Click “Next”.

7. Check configuration for EM

Click “Next”.

8.  Check “Summary” page

Click “Finish”

Upgrade Process is started

Check the Results

12Congratulations!!!!!!!!!! Upgrade is Successful !!!!!!!!!!!!!!!

Now you are ready to use Most Powerful Database!! 🙂

Mview Complete Refresh and Atomic_refresh parameter

This post discusses issue faced by me while working on Materialized view (mview) creation at new site(database). Starting Oracle 10g, how atomic_refresh works with complete refresh has undergone a change.
Atomic_refresh parameter is to allow either all of the tasks of a transaction are performed or none of them (Atomicity). If set to TRUE, then all refreshes are done in one transaction. If set to FALSE, then the refresh of each specified materialized view is done in a separate transaction.
In case of 9i if a single mview was refreshed , it used to be truncated and then refreshed (which actually was not atomic). In case of multiple mviews being refreshed (part of refresh group), rows were deleted and then the insert was done.
As part of change in 10g, if atomic_refresh is set to true (By defualt) , rows will be deleted one by one and then insert will take place for both single mview or multiple mviews in refresh group. So if you need to truncate the mview before then set atomic_refresh =>false (default True) while doing a complete refresh.
Due to this change you will find many issues like high redo generation and longer time for complete refresh of mviews using dbms_mview.refresh as now in 10g it will go for deleting the rows and not truncate.
In our case a DBA issued a complete refresh for  mview with size of 195Gb (having around 8 indexes ). After 16 hours of running, refresh job was still deleting the rows and had not started inserting the rows. At this moment we decided to kill the refresh session. As this session had generated a lot of undo, smon kicked in to recover the transaction.
On checking the V$FAST_START_TRANSACTION , it reported that it will take around 2 months to perform the rollback.

This post discusses issue faced by me while working on Materialized view (mview) creation at new site(database). Starting Oracle 10g, how atomic_refresh works with complete refresh has undergone a change.

Atomic_refresh parameter is to allow either all of the tasks of a transaction are performed or none of them (Atomicity). If set to TRUE, then all refreshes are done in one transaction. If set to FALSE, then the refresh of each specified materialized view is done in a separate transaction.If set to FALSE, Oracle can optimize refresh by using parallel DML and truncate DDL on a materialized views.

In case of 9i  (atomic_refresh =>true), if a single mview was refreshed , it used to be truncated and then refreshed (which actually was not atomic). In case of multiple mviews being refreshed (part of refresh group), rows were deleted and then the insert was done.

As part of change in 10g, if atomic_refresh is set to true (By defualt) , rows will be deleted one by one and then insert will take place for both single mview or multiple mviews in refresh group. So if you need to truncate the mview before then set atomic_refresh =>false (default True) while doing a complete refresh.

Due to this change you will find many issues like high redo generation and longer time for complete refresh of mviews using dbms_mview.refresh as now in 10g it will go for deleting the rows and not truncate.

In our case a DBA issued a complete refresh without setting atomic_refresh to false for  mview with size of 195Gb (plus 8 indexes ). After 16 hours of running, refresh job was still deleting the rows and had not started inserting the rows. At this moment we decided to kill the refresh session. As this session had generated a lot of undo, smon kicked in to recover the transaction.

On checking the V$FAST_START_TRANSACTION , it reported that it will take around 2 months to perform the rollback.

SQL> select usn, state, undoblockstotal "Total", undoblocksdone "Done", undoblockstotal-undoblocksdone "ToDo",   decode(cputime,0,'unknown',sysdate+(((undoblockstotal-undoblocksdone) / (undoblocksdone / cputime)) / 86400))   "Estimated time to complete"
  2     from v$fast_start_transactions;

       USN STATE                 Total       Done       ToDo Estimated time to co
---------- ---------------- ---------- ---------- ---------- --------------------
        51 RECOVERING          3514498        354    3514144 12-SEP-2009 02:52:36

SQL> select * from V$fast_start_servers;

STATE       UNDOBLOCKSDONE        PID XID
----------- -------------- ---------- ----------------
RECOVERING             354         32 0033000200001C81
RECOVERING               0         33 0033000200001C81
RECOVERING               0         85 0033000200001C81
RECOVERING               0         38 0033000200001C81
RECOVERING               0         39 0033000200001C81
RECOVERING               0         40 0033000200001C81
RECOVERING               0         42 0033000200001C81
RECOVERING               0         43 0033000200001C81
RECOVERING               0         44 0033000200001C81
RECOVERING               0         45 0033000200001C81
RECOVERING               0         46 0033000200001C81
---- some output truncated -------
RECOVERING               0         68 0033000200001C81
RECOVERING               0         69 0033000200001C81
RECOVERING               0         53 0033000200001C81
RECOVERING               0         78 0033000200001C81
RECOVERING               0         79 0033000200001C81
RECOVERING               0         80 0033000200001C81
RECOVERING               0         81 0033000200001C81
RECOVERING               0         82 0033000200001C81
RECOVERING               0         83 0033000200001C81

fast_start_parallel_rollback was set to value of low. We see 50 processes were spawned and only one of the parallel server was doing the recovery indicating that the parallel servers might be interfering with each other. Metalink Note 144332.1 (- Parallel Rollback may hang database, Parallel query servers get 100% cpu) discusses this behavior. Now I decided to use the serial recovery by changing fast_start_parallel_rollback to false. But to do this , we had to disable the SMON to do transaction recovery using event 10513 at level 2.

SQL> oradebug setorapid  22
Unix process pid: 2728024, image: oracle@ods1 (SMON)
SQL> oradebug Event 10513 trace name context forever, level 2
Statement processed.
SQL> select 'kill -9 '||spid||' ' from V$process where pid in (select pid from V$FAST_START_SERVERS);

'KILL-9'||SPID||''
---------------------
kill -9 3014818
kill -9 3010772
kill -9 2916434
kill -9 2887716
kill -9 2678958
kill -9 2511030
kill -9 2224314
kill -9 2142210
kill -9 2822282
kill -9 2625696
kill -9 2506808
kill -9 2486520
kill -9 2314492
kill -9 2310186
kill -9 2752764
kill -9 2445478
kill -9 2326692
kill -9 2457716
kill -9 2654394
kill -9 2621630
kill -9 2580502
kill -9 2633960
kill -9 2412686

alter system set fast_start_parallel_rollback=false;

SQL>   select usn, state, undoblockstotal "Total", undoblocksdone "Done", undoblockstotal-undoblocksdone "ToDo",   decode(cputime,0,'unknown',sysdate+(((undoblockstotal-undoblocksdone) / (undoblocksdone / cputime)) / 86400))   "Estimated time to complete"
  2     from v$fast_start_transactions;

       USN STATE                 Total       Done       ToDo Estimated time to co
---------- ---------------- ---------- ---------- ---------- --------------------
        51 RECOVERING          3513444       6002    3507442 06-JUL-2009 17:58:03

SQL> select * from V$FAST_START_SERVERS;

no rows selected

Using serial recovery reduced estimated time to 5 hours.

To summarize, if you are still in process of upgrading 9i database to 10g database, then revisit your shell scripts and oracle dbms_jobs used for performing complete refresh of mviews and set atomic_refresh =>false explicitly to truncate the mview before refresh.