
In this article , I will discuss how to install 10.2.0.5 EM Grid using 10.2.0.4 database. This method can also be used with 11g database.When you carry out 10.2.0.1 EM Grid control installation, it creates a 10.1.0.4 Database by default which is no longer supported and requires one to upgrade to supported release i.e 10.2. In case you choose EM grid installation with existing database, then DB version need’s to be <=10.2.0.3 which you would again like to upgrade to so as to easily receive bug fixes and be on latest supported release. So if you want to use 10.2.0.4 DB or 11.1 database, you will not be able to install using existing database directly but would have to follow a upgrade path. To overcome such situation, starting 10.2.0.4 EM Grid Control we now have Software-Only install method .Using the ‘Installing Software-Only and Configuring Later’ installation method, you can install only the software of the base release and then configure it later by applying the latest patch set.
Note that 10.2.0.4 /10.2.0.5 are patchset’s and need a 10.2.0.1 base installation to work.
In case you wish to carry out the installation in silent mode, you can find OTN article at below mentioned link
http://www.oracle.com/technology/pub/articles/revitt-oem.html
There is also metalink Note 763347.1 – How to Install Enterprise Manager Grid Control 10.2.0.5.0 Using an Existing Database with the Software Only Method
One of the issue while using silent install mode is that due to Bug 7137054 (Refer Note 602750.1 ConfigureGC.pl Reports – Invalid Username/Password ), you will be required to change sys password and run the ConfigureGC.pl script multiple times. Also you would be required to enter the password’s in the response file, which you might not be comfortable with. (Yeah in some environments, people can be very particular 🙂 )
While using GUI mode, I did not face any issues arising out of bug 7137054. Below steps are tried on a 10.2.0.4 database (11g database can also be used) and Platform is AIX 5L. Installation steps would remain same for other platforms too (In windows you will have to check the steps where in you are supposed to run scripts. GUI part should remain same)
Steps To Perform 10.2.0.5 EM Grid Installation using Software-only Install Method – GUI
1. Ensure that database parameters are set to following values. This is important as OUI checks for these values and if it is not set , then installation fails
| job_queue_processes | 10 |
| db_block_size | 8192 |
| timed_statistics | TRUE |
| open_cursors | 300 |
| session_cached_cursors | 200 |
| aq_tm_processes | 1 |
| compatible | <currently installed Oracle Database release> (default) |
| undo_management | AUTO |
| undo_retention | 10800 |
| undo_tablespace | <any acceptable name> |
| processes | 150 |
| log_buffer | 1048576 |
| statistics_level | TYPICAL (Note that this value is specific only to Enterprise Manager 10g Repository Database release and later.) |
| TEMP space (Tablespace)Foot 1 | 50 MB (extending to 100 MB) |
| _b_tree_bitmap_plans | false (hidden parameter) |
2. Ensure that dbconsole repository is not present in the database. If it is, then remove it. You need to stop the dbconsole before starting the process.
$ORACLE_HOME/bin/emctl stop dbconsole
Remove the following directories from your filesystem:
rm -rf $ORACLE_HOME/(hostname_sid)
rm -rf $ORACLE_HOME/oc4j/j2ee/OC4J_DBConsole_(hostname)_(sid)
Removing DB Repository
ALTER system ENABLE RESTRICTED SESSION ;
EXEC sysman.emd_maintenance.remove_em_dbms_jobs;
EXEC sysman.setEMUserContext('',5);
REVOKE dba FROM sysman;
DECLARE CURSOR c1 IS SELECT owner, synonym_name name FROM dba_synonyms WHERE table_owner = 'SYSMAN';
 BEGIN
FOR r1 IN c1
 LOOP
IF r1.owner = 'PUBLIC'
THEN
 EXECUTE IMMEDIATE 'DROP PUBLIC SYNONYM '||r1.name; ELSE EXECUTE IMMEDIATE 'DROP SYNONYM '||r1.owner||'.'||r1.name;
END IF;
 END LOOP;
 END;
/
DROP USER mgmt_view CASCADE;
 DROP ROLE mgmt_user;
DROP USER sysman CASCADE;
 ALTER SYSTEM DISABLE RESTRICTED SESSION;
3.Log in to the database as SYSDBA and run the following command to install DBMS_SHARED_POOL package:
@?/rdbms/admin/dbmspool.sql

commit;
4. Install the 10.2.0.1 database using -noconfig option i.e to skip the configuration part. This will be carried out in the end by running ConfigureGC.pl script
./runInstaller -noconfig

Choose Installation with Existing Database

Specify the ORACLE_BASE Location under which you would like to install the EM Grid


You will be now prompted to enter the database details for the Repository database. Ensure that listener is UP.

a)In the Configure Email Notification section, specify an appropriate e-mail address, and the corresponding SMTP server name. You will receive important information on the condition of the monitored targets, including critical alerts at this e-mail address.
b)Specify the My Oracle Support (formerly Metalink) credentials.
c)Specify the Proxy Information if Grid Control is using a proxy server for external access
Refer to following documentation link for more information
http://download.oracle.com/docs/cd/B16240_01/doc/install.102/e10953/installing_em.htm#CHDJJBCJ

a)Specify the password for Securing agent
b)Specify password for SYSMAN user. Please note that default ias_admin password is the same as the password assigned to the SYSMAN account. This is required to access the Oracle application server console


OUI will install OMS under $BASE_DIR/oms10g

OUI will install Management Agent under $BASE_DIR/agent10g

Once the installation finishes , you will be prompted to run allroot.sh script (as shown below). Before executing it, stop all the OPMN processes by running the following command from the Oracle home directory of the OMS (for example, oms10g):
Open a different shell and execute following commands using Oracle Software owner
Processes in Instance: EnterpriseManager0.db11g
-------------------+--------------------+---------+---------
ias-component      | process-type       |     pid | status
-------------------+--------------------+---------+---------
DSA                | DSA                |     N/A | Down
HTTP_Server        | HTTP_Server        |     N/A | Down
LogLoader          | logloaderd         |     N/A | Down
dcm-daemon         | dcm-daemon         |     N/A | Down
OC4J               | home               |     N/A | Down
WebCache           | WebCache           |     N/A | Down
WebCache           | WebCacheAdmin      |     N/A | Down

$./opmnctl stopall
opmnctl: stopping opmn and all managed processes...

$./opmnctl status
Unable to connect to opmn.
Opmn may not be up.
Now run the script allroot.sh as Root.

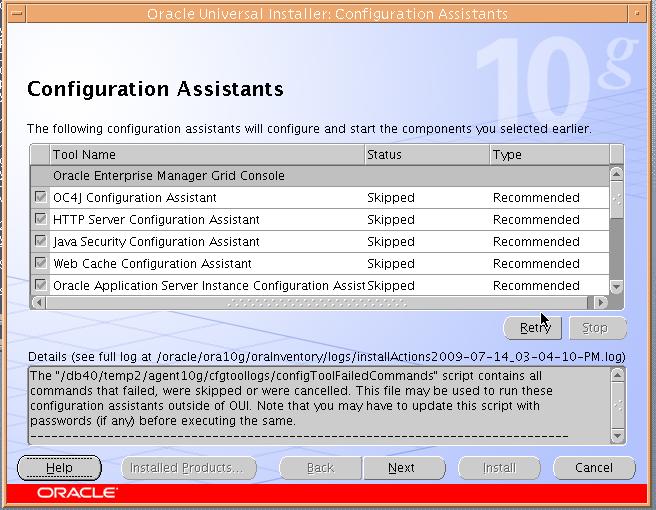
You will get a message that configuration assistants were skipped. You can ignore it as we used -noconfig method

Installation for 10.2.0.1 Base release is complete now. We now need to proceed towards 10.2.0.5 Patchset installation
5. Run following command from 10.2.0.5 patchset directory.
<span style="font-size: small;"> </span>cd $patch_dir/3731593/Disk1
./runInstaller -noconfig b_softwareonly=true
Choose OMS home to patch and proceed

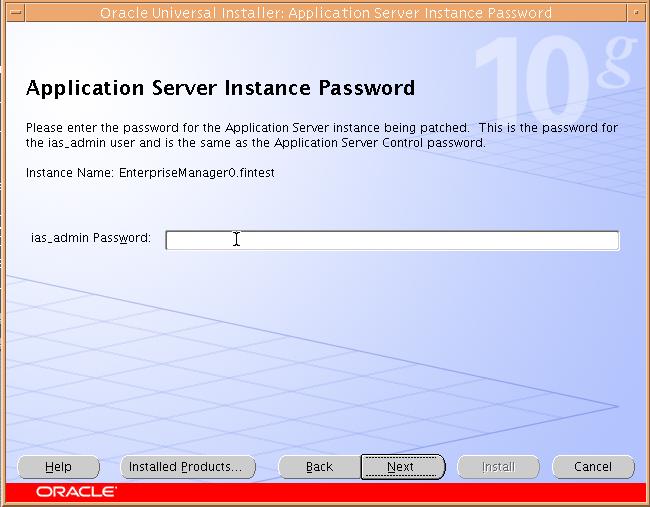
You will be prompted for Sys password

Enter ias_admin Password. This will be same as SYSMAN password
Application server console will be now shutdown. You will get a message confirming same. Click Ok.


After Installation completes , you will be prompted to run root.sh (as shown below) as root from OMS_HOME

6. Next apply 10.2.0.5 patchset to AGENT_HOME by issuing following command.
<span style="font-size: small;">.</span>/runInstaller -noconfig
Select AGENT_HOME for patching i.e agent10g

After Installation completes , you will be prompted to Run root.sh (as shown below) from Oracle Home for Management Agent ($BASE_DIR/agent10g)

7.Now the installation part is over. Next we need to run ConfigureGC.pl script which will actually configure 10.2.0.5 Grid Control.
Before making changes to the environment variable PERL5LIB, take a backup of the variable:
setenv PERL5LIB_BACKUP $PERL5LIB
Set PERL5LIB to $OMS_ORACLE_HOME/perl/lib/5.6.1
export PERL5LIB=/db40/temp2/oms10g/perl/lib/5.6.1
Configure Grid Control by running the ConfigureGC.pl script from the Oracle home directory of the OMS
/db40/temp2/oms10g/perl/bin/perl /db40/temp2/oms10g/sysman/install/ConfigureGC.pl /db40/temp2
This script will take long time (took 2 hrs on my setup). You can monitor $OMS_ORACLE_HOME/cfgtoollogs/cfgfw/ CfmLogger*log file to check for any errors
The plug-in Starting Oracle Management Server has successfully been performed
------------------------------------------------------
------------------------------------------------------
The plug-in EMCLI Configuration is running

Operation EMCLI Setup is in progress.

The plug-in EMCLI Configuration has successfully been performed
------------------------------------------------------
The action patchsetConfiguration has successfully completed
###################################################
Once you get message that the configuration is complete, then check the status for OMS and AGENT
$OMS_ORACLE_HOME/bin/emctl status oms
$AGENT_ORACLE_HOME/bin/emctl status agent

You can now proceed with Agent installation on the targets to be monitored
Recent Comments