runInstaller

Steps to Upgrade 11.2.0.1 RAC to 11.2.0.2

This post is in continuation to Grid Infrastructure upgrade post written earlier. Ensure that you have downloaded the software and  have upgraded the infrastructure database.

Following files contain database software for 11.2.0.2.

p10098816_112020_Linux-x86-64_1of7.zip

p10098816_112020_Linux-x86-64_2of7.zip

Please note that this is full release , so if you are installing new software, you can directly install 11.2.0.2 without need of first installing 11.2.0.1 database.Unzip the software and start the runInstaller from the database directory.

cd $SW_HOME/database

./runInstaller

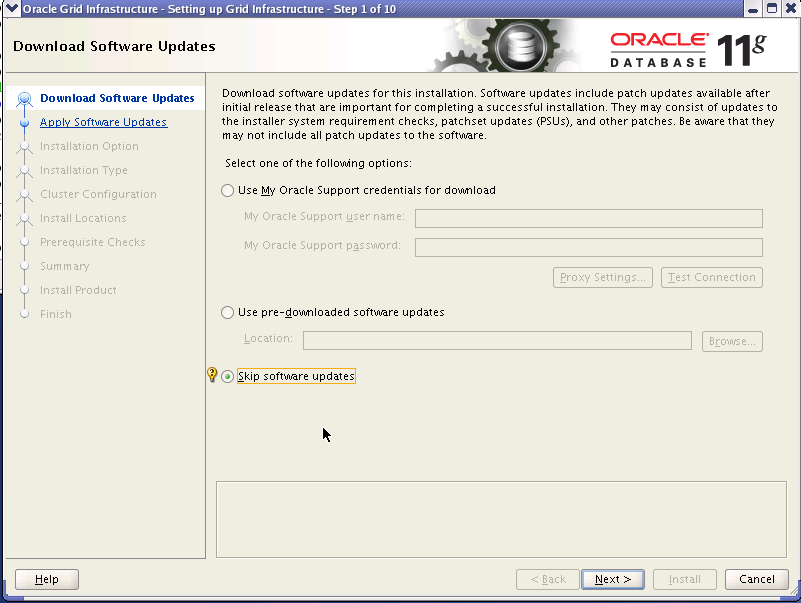
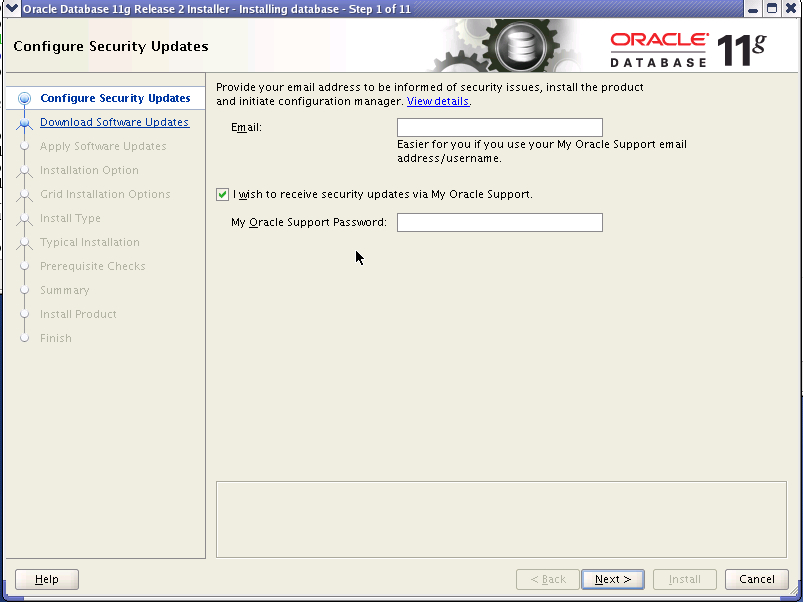
We will be presented with OUI screen asking for MOS credentials. Please note that we would be installing software into new ORACLE_HOME, which is a new feature called out of place upgrade.

Next screen ask’s again for MOS credentials. This can be used to check if there are any patches which need’s to be applied before software can be upgraded. Since we have already applied the PSU2, we will choose skip Software updates

We are now presented with 3 options

a)Create and Configure database – installs software and creates a database using dbca

b)Install database software only – Only installs 11.2.0.2 software

c) Upgrade exisiting database – Installs software and launches dbua to upgrade database

We chose option b) i.e Install database software only

Next screen presents you with 3 options

a)Single Instance database installation

b)Oracle RAC Installation

c)Oracle RAC One Node database Installation

I will be discussing RAC one node in a future post. For our installation we are upgrading RAC database and require RAC software

Next screen gives option to choose between Enterprise edition and Standard Edition

Next screen asks for database software installation directory. Unlike Grid infrastructure, where it is mandatory to install in new ORACLE_HOME, RAC database software can be installed in existing home. But we will be choosing Out of place upgrade i.e install in new home.

Choose the OSDBA and OSOPER group

Next screen checks the pre-requisites. You can ask oracle to create fixup script. Refer to my earlier post for detail

Finally we are prompted to run root.sh from both nodes

After you have run root.sh from both nodes, you can then use dbua to upgrade the database. Note that we have not yet brought down the database. This is great benefit of using out of place upgrade . Second benefit is that you are not touching the existing binaries,so you are not required to take backup of binaries and can can easily rollback the changes (if required). You can also continue using the old binaries for databases which you cannot get downtime and can upgrade them later.

Set the ORACLE_HOME and PATH to include 11.2.0.2 software location and start dbua. Take backup of database before you start upgrade process using dbua

$dbua

We are presented with welcome screen. Press next

DBUA presents you with list of databases currently registered in /etc/oratab. We select db11g which we need to upgrade

Next screen asks for following options

a) Option to recompile invalid objects and degree of parallelism for running utlrp.sql. We keep default value of 3

b) Option to disable archiving during upgrade

c)Upgrade the timezone file. We have not selected it now and will do upgrade manually

Next screen presents with option to select Fast Recovery area and size

Next we will be presented with summary screen and asked to take backup of database. If you have not taken it till now, its good time to take backup. Also now database will be stopped and will be started from new oracle home.Please ensure that you have appropriate setting for JAVA_POOL_SIZE and SHARED_POOL_SIZE during upgrade or can use SGA_TARGET/MEMORY_TARGET to avoid ora-4031

Following screen shows database upgrade progress screen.

Once upgrade completes, it gives summary of upgrade process. As you can see it has warned for DST upgrade.

Oracle 11.2.0.2 contains version 14 file. Starting 11g you can have multiple database running out of single oracle home to have different timezone version files.

You can refer to Updating the RDBMS DST version in 11gR2 (11.2.0.1 and up) using DBMS_DST [ID 977512.1]

Giving summary of steps taken by us to upgrade from version 11 to version 14

---Check the current version of file ---
SQL> select version from V$TIMEZONE_FILE;

   VERSION
----------
	11

SQL> SELECT PROPERTY_NAME, SUBSTR(property_value, 1, 30) value
FROM DATABASE_PROPERTIES
WHERE PROPERTY_NAME LIKE 'DST_%'
ORDER BY PROPERTY_NAME;  2    3    4  

PROPERTY_NAME		       VALUE
------------------------------ ------------------------------
DST_PRIMARY_TT_VERSION	       11
DST_SECONDARY_TT_VERSION       0
DST_UPGRADE_STATE	       NONE

---Confirm if $ORACLE_HOME/oracore/zoneinfo contains timezlrg_14.dat i.e version 14 file

--Prepare for upgrade
SQL> exec DBMS_DST.BEGIN_PREPARE(14);

PL/SQL procedure successfully completed.

--Confirm status

SQL> SELECT PROPERTY_NAME, SUBSTR(property_value, 1, 30) value
FROM DATABASE_PROPERTIES
WHERE PROPERTY_NAME LIKE 'DST_%'
ORDER BY PROPERTY_NAME;  2    3    4  

PROPERTY_NAME		       VALUE
------------------------------ ------------------------------
DST_PRIMARY_TT_VERSION	       11
DST_SECONDARY_TT_VERSION       14
DST_UPGRADE_STATE	       PREPARE

---Re-running prepare statement will give below error.
SQL> exec DBMS_DST.BEGIN_PREPARE(14);
BEGIN DBMS_DST.BEGIN_PREPARE(14); END;

*
ERROR at line 1:
ORA-56920: a prepare or upgrade window or an on-demand or datapump-job loading of a secondary time zone data file is in
an active state
ORA-06512: at "SYS.DBMS_SYS_ERROR", line 79
ORA-06512: at "SYS.DBMS_DST", line 1340
ORA-06512: at line 1

-- truncate logging tables if they exist.

TRUNCATE TABLE SYS.DST$TRIGGER_TABLE;
TRUNCATE TABLE sys.dst$affected_tables;
TRUNCATE TABLE sys.dst$error_table;

-- log affected data

BEGIN
DBMS_DST.FIND_AFFECTED_TABLES
(affected_tables => 'sys.dst$affected_tables',
log_errors => TRUE,
log_errors_table => 'sys.dst$error_table');
END;
/
---Query table to check if any affected table
SQL> SQL> SELECT * FROM sys.dst$affected_tables;

no rows selected

SQL>
SQL> SELECT * FROM sys.dst$error_table;

no rows selected

-- End the prepare phase
SQL> EXEC DBMS_DST.END_PREPARE;
A prepare window has been successfully ended.

--Startup the database in upgrade mode. Ensure you have set cluster_database=false

SQL> EXEC DBMS_DST.BEGIN_UPGRADE(14);
An upgrade window has been successfully started.

PL/SQL procedure successfully completed.

-- To confirm whether it has been upgraded to version 14
SQL> SELECT PROPERTY_NAME, SUBSTR(property_value, 1, 30) value
FROM DATABASE_PROPERTIES
WHERE PROPERTY_NAME LIKE 'DST_%'
ORDER BY PROPERTY_NAME;  2    3    4  

PROPERTY_NAME		       VALUE
------------------------------ ------------------------------
DST_PRIMARY_TT_VERSION	       14
DST_SECONDARY_TT_VERSION       11
DST_UPGRADE_STATE	       UPGRADE

--Restart the database after removing cluster_database

This completes the database upgrade process. I would recommend dbua to upgrade the database as  it takes care of copying the init.ora files,password file and also modified the OCR to point to new oracle home and upgraded srvctl version. Oracle Upgrade guide does not list any method documenting steps to be taken for srvctl. I referred following link i.e Oracle Database Upgrade documentation for the upgrade purpose

http://download.oracle.com/docs/cd/E11882_01/server.112/e17222/upgrade.htm#i1011981

In case you use manual method and use srvctl modify database to point to new oracle home, you will get errors like below

srvctl stop database -d test11g
PRCD-1027 : Failed to retrieve database test11g
PRCD-1229 : An attempt to access configuration of database test11g was rejected because its version 11.2.0.1.0 differs from the program version 11.2.0.2.0. Instead run the program from /oracle/product/app/11.2.0/dbhome_1.

You can use following command to upgrade the srvctl version

srvctl upgrade database -d test11g -o /oracle/product/app/11.2.0.2/dbhome_1

Happy Upgrading.
Upgrading Grid Infrastructure 11.2.0.1 to 11.2.0.2 on RHEL4

11.2.0.2 Patchset was released few days back. I decided to upgrade a test RAC database to 11.2.0.2 yesterday and was able to do it successfully. I will be documenting the steps here for easy reference

Environment Details

2 node RAC on Red Hat Enterprise Linux AS release 4 (Nahant Update 8), 64 bit

To upgrade existing 11.2.0.1 Oracle Grid Infrastructure installations to Oracle Grid Infrastructure 11.2.0.2, you must first do at least one of the following:

– Patch the release 11.2.0.1 Oracle Grid Infrastructure home with the fix for bug 9413827.
– Install Oracle Grid Infrastructure Patch Set 1 (GIPS1) or Oracle Grid Infrastructure Patch Set 2 (GIPS2).

I will be using Oracle Grid Infrastructure Patch set 2.

Software and Patches

1) Download Patch 9655006 – 11.2.0.1.2 for Grid Infrastructure (GI) Patch Set Update from MOS

2) Latest Opatch for 11.2 – 6880880 Universal Installer: Patch OPatch 11.2

You can refer to How To Download And Install OPatch [ID 274526.1]

3)11.2.0.2 Patchset files. You can find method to download them directly to server here

p10098816_112020_Linux-x86-64_1of7.zip  – 11.2.0.2 Database Installation Files

p10098816_112020_Linux-x86-64_2of7.zip – 11.2.0.2 Database Installation Files

p10098816_112020_Linux-x86-64_3of7.zip – 11.2.0.2 Grid Installation Files

Lets get started.

Install Latest Opatch

Unzip the zip file and copy OPatch folder to $ORACLE_HOME by renaming the earlier OPatch directory. You can refer to How To Download And Install OPatch [ID 274526.1]

Apply Grid Infrastructure (GI) Patch Set Update –  9655006

It applies patch 9654983 and 9655006 to both Database and Grid home. We proceed by checking for any patch conflicts
[oracle@oradbdev01]~/software/11.2.0.2/psu% opatch prereq CheckConflictAgainstOHWithDetail -phBaseDir ./9655006
Invoking OPatch 11.2.0.1.3

Oracle Interim Patch Installer version 11.2.0.1.3
Copyright (c) 2010, Oracle Corporation.  All rights reserved.

PREREQ session

Oracle Home       : /oracle/product/app/11.2.0/dbhome_1
Central Inventory : /oracle/oraInventory
   from           : /etc/oraInst.loc
OPatch version    : 11.2.0.1.3
OUI version       : 11.2.0.1.0
OUI location      : /oracle/product/app/11.2.0/dbhome_1/oui
Log file location : /oracle/product/app/11.2.0/dbhome_1/cfgtoollogs/opatch/opatch2010-10-02_06-03-34AM.log

Patch history file: /oracle/product/app/11.2.0/dbhome_1/cfgtoollogs/opatch/opatch_history.txt

Invoking prereq "checkconflictagainstohwithdetail"

Prereq "checkConflictAgainstOHWithDetail" passed.

OPatch succeeded.<span style="font-family: Georgia, 'Times New Roman', 'Bitstream Charter', Times, serif; font-size: small;"><span style="line-height: 19px; white-space: normal;">
</span></span>

We need to use opatch auto to patch both Grid Infrastructure and RAC database home.It can be used to patch separately but I am going with patching both. This is great improvement over 10g CRS patch bundles as it had lot of steps to be run as root or oracle software owner. ( I had myself messed up once by running a command as root instead of oracle 🙁 ) Opatch starts with patching the database home and then patches the grid infrastructure home. You can stop the database instance running out of oracle home.(opatch asks for shutting down database, so in case you do not stop,don’t worry it will warn)

Note: In case you are on RHEL5/OEL5 and using ACFS for database volumes, it is recommended to use opatch auto <loc> -oh <grid home> to first patch the Grid home instead of patching them together

Unzip patch 965506 to directory say /oracle/software/gips2.It will create two directories for patch 9654983 and 9655006. Connect as root user and set the oracle home and Opatch directory . Stop the database instance running on the node

srvctl stop instance -d db11g -i db11g1

Next run opatch auto command as root

#opatch auto /oracle/software/gips2
Oracle Interim Patch Installer version 11.2.0.1.3
Copyright (c) 2010, Oracle Corporation.  All rights reserved.

UTIL session

Oracle Home       : /oracle/product/grid
Central Inventory : /oracle/oraInventory
   from           : /etc/oraInst.loc
OPatch version    : 11.2.0.1.3
OUI version       : 11.2.0.1.0
OUI location      : /oracle/product/grid/oui
Log file location : /oracle/product/grid/cfgtoollogs/opatch/opatch2010-10-02_06-35-03AM.log

Patch history file: /oracle/product/grid/cfgtoollogs/opatch/opatch_history.txt

Invoking utility "napply"
Checking conflict among patches...
Checking if Oracle Home has components required by patches...
Checking conflicts against Oracle Home...
OPatch continues with these patches:   9654983  

Do you want to proceed? [y|n]
y
User Responded with: Y

Running prerequisite checks...
Provide your email address to be informed of security issues, install and
initiate Oracle Configuration Manager. Easier for you if you use your My
Oracle Support Email address/User Name.
Visit http://www.oracle.com/support/policies.html for details.
Email address/User Name: 

You have not provided an email address for notification of security issues.
Do you wish to remain uninformed of security issues ([Y]es, [N]o) [N]:  Y

You selected -local option, hence OPatch will patch the local system only.

Please shutdown Oracle instances running out of this ORACLE_HOME on the local system.
(Oracle Home = '/oracle/product/grid')

Is the local system ready for patching? [y|n]
y
User Responded with: Y
Backing up files affected by the patch 'NApply' for restore. This might take a while...

I have not copied the whole output. It asks you to specify MOS credentials for setting up Oracle Configuration Manager. You can skip it as mentioned above. You will find following errors in the end

OPatch succeeded.
ADVM/ACFS is not supported on Redhat 4

Failure at scls_process_spawn with code 1
Internal Error Information:
  Category: -1
 Operation: fail
  Location: canexec2
  Other: no exe permission, file [/oracle/product/grid/bin/ohasd]
  System Dependent Information: 0

CRS-4000: Command Start failed, or completed with errors.

Timed out waiting for the CRS stack to start.<span style="font-family: Georgia, 'Times New Roman', 'Bitstream Charter', Times, serif; font-size: small;"><span style="line-height: 19px; white-space: normal;">
</span></span>

This is a known issue and discussed in 11.2.0.X Grid Infrastructure PSU Known Issues [ID 1082394.1]

To solve this issue, connect as root user and execute following command from your Grid Infrastructure home

cd $GRID_HOME

# ./crs/install/rootcrs.pl -patch
2010-10-02 06:59:54: Parsing the host name
2010-10-02 06:59:54: Checking for super user privileges
2010-10-02 06:59:54: User has super user privileges
Using configuration parameter file: crs/install/crsconfig_params
ADVM/ACFS is not supported on Redhat 4

CRS-4123: Oracle High Availability Services has been started.

Start oracle database instance on the node which has been patched

srvctl start instance -d db11g -i db11g1

Repeat the above steps for node 2.It took me 40 minutes for each node to complete opatch auto activity.Once it is done,execute following from one node for all databases to complete patch installation

cd $ORACLE_HOME/rdbms/admin

sqlplus /nolog

SQL> CONNECT / AS SYSDBA

SQL> @catbundle.sql psu apply

SQL> QUIT

This completes patching of Grid Infrastructure Patch or PSU2.

Upgrading Grid Infrastructure home to 11.2.0.2

Ensure following environment variables are not set :ORA_CRS_HOME; ORACLE_HOME; ORA_NLS10; TNS_ADMIN

# echo $ORA_CRS_HOME; echo $ORACLE_HOME; echo $ORA_NLS10; echo $TNS_ADMIN

Strating with 11.2.0.2, Grid infrastructure (Clusterware and ASM Home) upgrade is out of place upgrade i.e we install in new ORACLE_HOME. Unlike database home we cannot perform an in-place upgrade of Oracle Clusterware and Oracle ASM to existing homes.

Unset following variables too

$ unset ORACLE_BASE

$ unset ORACLE_HOME

$ unset ORACLE_SID

Relax permissions for GRID_HOME

#chmod -R 755 /oracle/product/grid

#chown -R oracle /oracle/product/grid

#chown oracle /oracle/product

Start the runInstaller from the 11.2.0.2 grid software directory.

On first screen, it will ask for MOS details. I have chosen skip Software update

Since we are upgrading existing installation, choose “Upgrade Oracle Grid Infrastructure or Oracle Automatic Storage Management”. This will install software and also configure ASM

Next screen displays nodes which OUI will patch

Select the OSDBA,OSASM and OSOPER group. I have chosen dba

Since I have chosen all 3 groups to be same, it gives warning. Select Yes to continue

Specify the grid software installation directory. I have used /oracle/product/oragrid/11.2.0.2 (Better to input release as we will be having out of place upgrades for future patchsets too)

OUI reports some issues with swap size ,shmmax and NTP. You can fix them or choose to ignore. OUI can create a fixup script for you.

Installation starts copying file. After files have been copied to both nodes, it asks for running the rootupgrade.sh script from all nodes

Stop the database instance running from the node at this time and then run script as root. Please note that ASM and clusterware should not be stopped as rootupgrade.sh requires them to be up and takes care of shutting down and starting with new home.In my case, running rootupgrade.sh successfully succeeded on node 1 but it hung on node 2 . I did a cancel and re-ran it. Pasting the contents from node 2 second run

[root@oradbdev02 logs]# /oracle/product/oragrid/11.2.0.2/rootupgrade.sh
Running Oracle 11g root script...

The following environment variables are set as:
    ORACLE_OWNER= oracle
    ORACLE_HOME=  /oracle/product/oragrid/11.2.0.2

Enter the full pathname of the local bin directory: [/usr/local/bin]:
The contents of "dbhome" have not changed. No need to overwrite.
The contents of "oraenv" have not changed. No need to overwrite.
The contents of "coraenv" have not changed. No need to overwrite.

Entries will be added to the /etc/oratab file as needed by
Database Configuration Assistant when a database is created
Finished running generic part of root script.
Now product-specific root actions will be performed.
Using configuration parameter file: /oracle/product/oragrid/11.2.0.2/crs/install/crsconfig_params
clscfg: EXISTING configuration version 5 detected.
clscfg: version 5 is 11g Release 2.
Successfully accumulated necessary OCR keys.
Creating OCR keys for user 'root', privgrp 'root'..
Operation successful.
CRS-1115: Oracle Clusterware has already been upgraded.

ASM upgrade has finished on last node.

Preparing packages for installation...
cvuqdisk-1.0.9-1
Configure Oracle Grid Infrastructure for a Cluster ... succeeded

On clicking next in OUI, it reported that cluvfy has failed and some of components are not installed properly. To verify I ran cluvfy manually. Pasting content for which it failed

./cluvfy stage -post crsinst -n oradbdev01,oradbdev02 -verbose 

<span style="font-family: Georgia, 'Times New Roman', 'Bitstream Charter', Times, serif; line-height: 19px; white-space: normal; font-size: 13px;">
<pre style="font: normal normal normal 12px/18px Consolas, Monaco, 'Courier New', Courier, monospace;">-------------------------------truncated output -------------------

ASM Running check passed. ASM is running on all specified nodes

Checking OCR config file "/etc/oracle/ocr.loc"...

ERROR:
PRVF-4175 : OCR config file "/etc/oracle/ocr.loc" check failed on the following nodes:

	oradbdev02:Group of file "/etc/oracle/ocr.loc" did not match the expected value. [Expected = "oinstall" ; Found = "dba"]

	oradbdev01:Group of file "/etc/oracle/ocr.loc" did not match the expected value. [Expected = "oinstall" ; Found = "dba"]

Disk group for ocr location "+DG_DATA01" available on all the nodes

OCR integrity check failed
-------------------------------truncated output -------------------

Checking OLR config file...

ERROR: 

PRVF-4184 : OLR config file check failed on the following nodes:

	oradbdev02:Group of file "/etc/oracle/olr.loc" did not match the expected value. [Expected = "oinstall" ; Found = "dba"]

	oradbdev01:Group of file "/etc/oracle/olr.loc" did not match the expected value. [Expected = "oinstall" ; Found = "dba"]

Checking OLR file attributes...

ERROR: 

PRVF-4187 : OLR file check failed on the following nodes:

	oradbdev02:Group of file "/oracle/product/oragrid/11.2.0.2/cdata/oradbdev02.olr" did not match the expected value. [Expected = "oinstall" ; Found = "dba"]

	oradbdev01:Group of file "/oracle/product/oragrid/11.2.0.2/cdata/oradbdev01.olr" did not match the expected value. [Expected = "oinstall" ; Found = "dba"]

OLR integrity check failed

-------------------------------truncated output -------------------
Checking NTP daemon command line for slewing option "-x"
Check: NTP daemon command line
  Node Name                             Slewing Option Set?
  ------------------------------------  ------------------------
  oradbdev02                            no
  oradbdev01                            no
Result:
NTP daemon slewing option check failed on some nodes
PRVF-5436 : The NTP daemon running on one or more nodes lacks the slewing option "-x"
Result: Clock synchronization check using Network Time Protocol(NTP) failed

PRVF-9652 : Cluster Time Synchronization Services check failed

We see that cluvfy is reporting error that it expected oinstall group but found dba group. I had not specified install group during installation, so can ignore it.For NTP you can correct it by setting following in ntpd.conf and restart the ntpd daemon

grep OPTIONS /etc/sysconfig/ntpd
OPTIONS=”-u ntp:ntp -p /var/run/ntpd.pid -x”

Refer How to Configure NTP to Resolve CLUVFY Error PRVF-5436 PRVF-9652 [ID 1056693.1]

At this moment Grid Infrastructure has been successfully upgraded to 11.2.0.2. Next we will upgrade the RAC database home. You can refer to Steps to Upgrade 11.2.0.1 RAC to 11.2.0.2

11gR2 Silent Install errors with [SEVERE] – Invalid My Oracle Support credentials

While performing  11gR2 RAC Database Software installation with response file (silent mode), I got this error.

[SEVERE] - Invalid My Oracle Support credentials

I was using default response files for performing this installation. Searching on MOS (My Oracle Support ), I got a note indicating that following parameter need’s to be specified

MYORACLESUPPORT_USERNAME = 

MYORACLESUPPORT_PASSWORD =

I provided a dummy value for these two paramters but the installation again failed with same errors. Then I gave correct credentials and tried again, this time installation was succesful. My initial thought was ” Is Oracle forcing people to have valid MOS account for performing installation” But this couldn’t be true as I had earlier done GUI installation without providing these credentials. It was clear that there was some other parameter which controlled this behavior. So as to diagnose it , I created a response file using GUI (Un checking the check box for my oracle support credentials) . This time response file had two additional parameters

#------------------------------------------------------------------------------
# Specify whether to enable the user to set the password for
# My Oracle Support credentials. The value can be either true or false.
# If left blank it will be assumed to be false.
#
# Example    : SECURITY_UPDATES_VIA_MYORACLESUPPORT=true
#------------------------------------------------------------------------------
SECURITY_UPDATES_VIA_MYORACLESUPPORT=false

#------------------------------------------------------------------------------
# Specify whether user wants to give any proxy details for connection.
# The value can be either true or false. If left blank it will be assumed
# to be false.
#
# Example    : DECLINE_SECURITY_UPDATES=false
#------------------------------------------------------------------------------
DECLINE_SECURITY_UPDATES=true

We can see that DECLINE_SECUIRTY_UPDATES value is changed from default value of false to true.  From 11.2 docs

DECLINE_SECURITY_UPDATES
If the direct connection is unavailable, set this parameter to false if you do not want to configure Oracle Configuration Manager, or do not want to provide any proxy details for the connection. The default is False.

If you do not set MYORACLESUPPORT_USERNAME to any value and you set this parameter to true, the Oracle Configuration Manager is not configured.

So to workaround this problem, we need to set DECLINE_SECURITY_UPDATES=true

Cluvfy Reports CRS not Installed on Nodes

Before I start my post, I would like to wish all our readers a “Happy New Year”.

While reviewing a 10gR2 RAC configuration I faced following errors on invoking cluvfy utility

$ ./cluvfy stage -post crsinst -n prod01,prod02 -verbose

Performing post-checks for cluster services setup 

Checking node reachability...

Check: Node reachability from node "prod01-fe"
  Destination Node                      Reachable?
  ------------------------------------  ------------------------
  prod01                              yes
  prod02                              yes
Result: Node reachability check passed from node "prod01-fe".

Checking user equivalence...

Check: User equivalence for user "oracle"
  Node Name                             Comment
  ------------------------------------  ------------------------
  prod02                              passed
  prod01                              passed
Result: User equivalence check passed for user "oracle".

ERROR:
CRS is not installed on any of the nodes.
Verification cannot proceed.

Post-check for cluster services setup was unsuccessful on all the nodes.

Cluvfy has reported that Clusterware has not been installed on the server. But this was strange and unexpected as one RAC Database was already running on these nodes and crs_stat reported the status of all CRS resources. ocrcheck also did not report any problems with the OCR. To dig further I checked Cluvfy logs located under $ORA_CRS_HOME/cv/log. It had recorded following errors

[main] [15:52:41:800] [OUIData.readInventoryData:393]  ==== CRS home added: Oracle home properties:
Name     : OraCRS
Type     : CRS-HOME
Location : /app/oracle/product/10.2/crs
Node list: [prod01-fe, prod02-fe]
; Thu Dec 24 15:52:41 GMT+08:00 2009
[main] [15:52:41:800] [OUIData.readInventoryData:401]  ==== ORACLE home added: Oracle home properties:
Name     : OraHome
Type     : ORACLE-HOME
Location : /app/oracle/product/10.2/db_1
Node list: [prod01, prod02]
; Thu Dec 24 15:52:41 GMT+08:00 2009
[main] [15:52:41:800] [VerificationUtil.isCRSInstalled:1262]  CRS wasn't found installed  on node: prod02; Thu Dec 24 15:52:41
 GMT+08:00 2009
[main] [15:52:41:800] [VerificationUtil.isCRSInstalled:1262]  CRS wasn't found installed  on node: prod01; Thu Dec 24 15:52:41
 GMT+08:00 2009

You can notice that CRS_HOME has recorded Node list as [prod01-fe, prod02-fe] and for DB_HOME it is [prod01, prod02]. Actual hostname for the nodes are prod01 and prod02. prod01-fe and prod02-fe were aliases for the two nodes.

Cluvfy uses Central Oracle Inventory to obtain ORACLE_HOME information. Checking the $ORACLE_BASE/oraInventory/ContentsXML/inventory.xml confirmed that the nodes corresponding to CRS_HOME were stored as prod01-fe and prod02-fe ( I have changed the Angled brackets to Round brackets as html considers them as tags. Don’t worry your inventory file is not corrupted 🙂 )

(INVENTORY)
(VERSION_INFO)
   (SAVED_WITH)10.2.0.1.0(/SAVED_WITH)
   (MINIMUM_VER)2.1.0.6.0(/MINIMUM_VER)
(/VERSION_INFO)
(HOME_LIST)
(HOME NAME="OraCRS" LOC="/app/oracle/product/10.2/crs" TYPE="O" IDX="1" CRS="true")
   (NODE_LIST)
      (NODE NAME="prod01-fe"/)
      (NODE NAME="prod02-fe"/)
   (/NODE_LIST)
(/HOME)
(HOME NAME="OraHome" LOC="/app/oracle/product/10.2/db_1" TYPE="O" IDX="2")
   (NODE_LIST)
      (NODE NAME="prod01"/)
      (NODE NAME="prod02"/)
   (/NODE_LIST)
(/HOME)

There are few reported issues on metalink but they relate to CRS=”true” not being present for CRS_HOME entry. There is one more reported issue listed here by Surachart which was caused by incorrect permissions on /etc/oraInst.loc file.

To correct this problem, we had to run runInstaller -updateNodelist command to update the correct nodes in file. Even though some metalink notes recommend to change this file manually,  I would recommend using runInstaller command for updating inventory.
Before executing the command, I ran olsnodes command to confirm that OCR stored prod01,prod02 in its repository.

runInstaller -updateNodeList -silent "CLUSTER_NODES={prod01,prod02}" ORACLE_HOME="/app/oracle/product/10.2/crs" ORACLE_HOME_NAME="OraCRS" LOCAL_NODE="prod01" CRS=true
Starting Oracle Universal Installer...

No pre-requisite checks found in oraparam.ini, no system pre-requisite checks will be executed.
The inventory pointer is located at /var/opt/oracle/oraInst.loc
The inventory is located at /app/oracle/oraInventory
'UpdateNodeList' was successful.

Now the cluvfy worked fine. I do not have any reasoning for why the incorrect nodes were recorded in Oracle Inventory, but above solution should take care of this.

11gR2 Database Installation with ASM on OEL5

I will be listing down steps for 11g Release 2 installation on Linux x86. There has been few changes incorporated in 11gR2 which must be given due consideration before starting installation. ASM instance now runs from new Oracle Home called Grid Infrastructure.

If you wish to use ASM for storing database files, then you should install first Oracle grid infrastructure for a standalone server. It is also required if you wish to use Oracle Restart feature (Provides for automatic restart of DB and other components after a hardware or software failure or whenever your database host computer restarts) for single instance.

Environment used for this setup
Operating System – Oracle Enterprise Linux Release 5(OEL5) on Vmware
Physical Ram – 1Gb

Asmlib for labeling ASM Disks.Refer to following OTN article for configuring asmlib and creating disks.

Software can be downloaded from OTN at following link

Oracle Database 11g Release 2 Grid Infrastructure (11.2.0.1.0) for Linux x86

Oracle Database 11g Release 2 (11.2.0.1.0) for Linux x86

All the pre-requisites for installation can be found here
http://download.oracle.com/docs/cd/E11882_01/install.112/e10840/pre_install.htm

I have tried to shorten it by keeping things which are relevant to our setup.

Check Packages

binutils-2.17.50.0.6
compat-libstdc++-33-3.2.3
elfutils-libelf-0.125
elfutils-libelf-devel-0.125
elfutils-libelf-devel-static-0.125
gcc-4.1.2
gcc-c++-4.1.2
glibc-2.5-24
glibc-common-2.5
glibc-devel-2.5
glibc-headers-2.5
kernel-headers-2.6.18
ksh-20060214
libaio-0.3.106
libaio-devel-0.3.106
libgcc-4.1.2
libgomp-4.1.2
libstdc++-4.1.2
libstdc++-devel-4.1.2
make-3.81
sysstat-7.0.2
unixODBC-2.2.11
unixODBC-devel-2.2.11

If you have yum installed on your machine, then it is very easy to install the packages. You can copy the list of packages in a text file and insert ‘yum install ‘ in beginning and execute it as root. This will install any missing packages. To know more about setting up yum, refer to my previous post

If Kernel parameters are not setup correctly, Oracle 11g OUI provides you  a fixup script and also ability to resume the installation process without need to re-run the earlier steps. Please refer to article here

Users,Roles and Groups for Installation

osdba group for ASM – Membership in the OSDBA group allows access to the files managed by Automatic Storage Management. It can be same as database osdba group. We will be using group dba in our setup.
OSASM group – Members of the OSASM group can use SQL to connect to an Automatic Storage Management instance as SYSASM using operating system authentication. The SYSASM privileges permit mounting and dismounting disk groups, and other storage administration tasks. SYSASM privileges provide no access privileges on an RDBMS instance. We will use asmadmin

OSOPER group – Similar to SYSOPER privilege in RDBMS, this is used for limited privileges like starting up and stopping the Oracle ASM instance. We will not be using separate group for it, will be selecting dba in our setup

oinstall – This is similar to previous releases, and used for Oracle Inventory group

I am using oracle user for installing Grid Infrastructure and Oracle Database Software. You can have a separate user say oragrid with oinstall membership and permission on oracle inventory directory.

Create Base directory where software will be installed. I used /u02/app/oracle

Add users and groups

/usr/sbin/groupadd -g 501 dba
/usr/sbin/groupadd -g 504 asmadmin
/usr/sbin/groupadd oinstall

/usr/sbin/useradd -u 502 -g oinstall -G dba,asmadmin oracle

Add following entries to /etc/security/limits.conf

oracle              soft    nproc   2047
oracle              hard    nproc   16384
oracle              soft    nofile  1024
oracle              hard    nofile  65536

Add or edit the following line in the /etc/pam.d/login file, if it does not already exist:

session    required     pam_limits.so

Add/replace following entries in /etc/sysctl.conf

fs.aio-max-nr = 1048576
fs.file-max = 6815744
kernel.shmall = 2097152
kernel.shmmax = 536870912
kernel.shmmni = 4096
kernel.sem = 250 32000 100 128
net.ipv4.ip_local_port_range = 9000 65500
net.core.rmem_default = 262144
net.core.rmem_max = 4194304
net.core.wmem_default = 262144
net.core.wmem_max = 1048586

Execute following command as root to change the current kernel parameters:

/sbin/sysctl -p

Copy following in your login profile.

if [ $USER = "oracle" ]; then
        if [ $SHELL = "/bin/ksh" ]; then
              ulimit -p 16384
              ulimit -n 65536
        else
              ulimit -u 16384 -n 65536
        fi
umask 022
fi

We need to start with Grid Infrastructure installation. Unzip the contents and execute  runInstaller . This would require 2.8Gb of disk space.

$./runInstaller

Please click on image below for  displaying screenshots for 11gR2 Grid Infrastructure installation

Grid_infra_install

Execute root.sh from Grid ORACLE_HOME as root user

The following environment variables are set as:
    ORACLE_OWNER= oracle
    ORACLE_HOME=  /u02/app/oracle/product/11.2.0/grid

Enter the full pathname of the local bin directory: [/usr/local/bin]:
The file "dbhome" already exists in /usr/local/bin.  Overwrite it? (y/n)
[n]: y
   Copying dbhome to /usr/local/bin ...
The file "oraenv" already exists in /usr/local/bin.  Overwrite it? (y/n)
[n]: y
   Copying oraenv to /usr/local/bin ...
The file "coraenv" already exists in /usr/local/bin.  Overwrite it? (y/n)
[n]: y
   Copying coraenv to /usr/local/bin ...

Entries will be added to the /etc/oratab file as needed by
Database Configuration Assistant when a database is created
Finished running generic part of root.sh script.
Now product-specific root actions will be performed.
2009-09-02 05:07:26: Checking for super user privileges
2009-09-02 05:07:26: User has super user privileges
2009-09-02 05:07:26: Parsing the host name
Using configuration parameter file: /u02/app/oracle/product/11.2.0/grid/crs/install/crsconfig_params
Creating trace directory
LOCAL ADD MODE
Creating OCR keys for user 'oracle', privgrp 'oinstall'..
Operation successful.
CRS-4664: Node db11g successfully pinned.
Adding daemon to inittab
CRS-4123: Oracle High Availability Services has been started.
ohasd is starting

db11g     2009/09/02 05:09:24     /u02/app/oracle/product/11.2.0/grid/cdata/db11g/backup_20090902_050924.olr
Successfully configured Oracle Grid Infrastructure for a Standalone Server
Updating inventory properties for clusterware
Starting Oracle Universal Installer...

Checking swap space: must be greater than 500 MB.   Actual 2399 MB    Passed
The inventory pointer is located at /etc/oraInst.loc
The inventory is located at /u01/app/oraInventory
'UpdateNodeList' was successful.

To install Database software, Unzip the contents of both the zip files and execute runInstaller . Ensure you have 3.95Gb of free disk space

$./runInstaller

Please click on image for  displaying screenshots for 11gR2 Database installation .

11g_db_install

You are done 🙂

Component

Value /Commands to Check

Physical RAM >1 Gb

1Gb
grep MemTotal /proc/meminfo

Swap should be 1.5 times the RAM.

In our case it will be 1.5G
grep SwapTotal /proc/meminfo

/dev/shm to be configured to use MEMORY_TARGET

# df -h /dev/shm/

1Gb of /tmp space

df -h /tmp

Disk space Requirement for Grid Infrastructure Software (Enterprise edition)

2.95 Gb

Disk space Requirement for Database Software (Enterprise edition)

3.95 Gb

Packages for OEL5

binutils-2.17.50.0.6
compat-libstdc++-33-3.2.3
elfutils-libelf-0.125
elfutils-libelf-devel-0.125
elfutils-libelf-devel-static-0.125
gcc-4.1.2
gcc-c++-4.1.2
glibc-2.5-24
glibc-common-2.5
glibc-devel-2.5
glibc-headers-2.5
kernel-headers-2.6.18
ksh-20060214
libaio-0.3.106
libaio-devel-0.3.106
libgcc-4.1.2
libgomp-4.1.2
libstdc++-4.1.2
libstdc++-devel-4.1.2
make-3.81
sysstat-7.0.2
unixODBC-2.2.11
unixODBC-devel-2.2.11

Installing 10.2.0.5 EM using software-only on 10.2.0.4/11g DB (GUI)

In this article , I will discuss how to install 10.2.0.5 EM Grid using 10.2.0.4 database. This method can also be used with 11g database.When you carry out 10.2.0.1 EM Grid control installation, it creates a 10.1.0.4 Database by default which is no longer supported and  requires one to upgrade to supported release i.e 10.2. In case you choose EM grid installation with existing database, then DB version need’s to be <=10.2.0.3 which you would again like to upgrade to so as to easily receive bug fixes and be on latest supported release. So if you want to use 10.2.0.4 DB or 11.1 database, you will not be able to install using existing database directly but would have to follow a upgrade path. To overcome such situation, starting 10.2.0.4 EM Grid Control we now have Software-Only install method .Using the ‘Installing Software-Only and Configuring Later’ installation method, you can install only the software of the base release and then configure it later by applying the latest patch set.

Note that 10.2.0.4 /10.2.0.5 are patchset’s and need a 10.2.0.1 base installation to work.

In case you wish to carry out the installation in silent mode, you can find OTN article at below mentioned link

http://www.oracle.com/technology/pub/articles/revitt-oem.html

There is also metalink Note 763347.1 – How to Install Enterprise Manager Grid Control 10.2.0.5.0 Using an Existing Database with the Software Only Method

One of the issue while using silent install mode is that due to Bug 7137054 (Refer Note 602750.1 ConfigureGC.pl Reports – Invalid Username/Password ), you will be required to change sys password and run the ConfigureGC.pl script multiple times. Also you would be required to enter the password’s in the response file, which you might not be comfortable with. (Yeah in some environments, people can be very particular 🙂 )

While using GUI mode, I did not face any issues arising out of bug 7137054. Below steps are tried on a 10.2.0.4 database (11g database can also be used) and Platform is AIX 5L. Installation steps would remain same for other platforms too (In windows you will have to check the steps where in you are supposed to run scripts. GUI part should remain same)

Steps To Perform 10.2.0.5 EM Grid Installation using Software-only Install Method – GUI

1. Ensure that  database parameters are set to following values. This is important as OUI checks for these values and if it is not set , then installation fails

job_queue_processes 10
db_block_size 8192
timed_statistics TRUE
open_cursors 300
session_cached_cursors 200
aq_tm_processes 1
compatible <currently installed Oracle Database release> (default)
undo_management AUTO
undo_retention 10800
undo_tablespace <any acceptable name>
processes 150
log_buffer 1048576
statistics_level TYPICAL (Note that this value is specific only to Enterprise Manager 10g Repository Database release and later.)
TEMP space (Tablespace)Foot 1 50 MB (extending to 100 MB)
_b_tree_bitmap_plans false (hidden parameter)

2. Ensure that dbconsole repository is not present in the database. If it is, then remove it. You need to stop the dbconsole before starting the process.

 $ORACLE_HOME/bin/emctl stop dbconsole

Remove the following directories from your filesystem:

rm -rf $ORACLE_HOME/(hostname_sid)
rm -rf $ORACLE_HOME/oc4j/j2ee/OC4J_DBConsole_(hostname)_(sid)

Removing DB Repository

ALTER system ENABLE RESTRICTED SESSION ;
EXEC sysman.emd_maintenance.remove_em_dbms_jobs;
EXEC sysman.setEMUserContext('',5);
REVOKE dba FROM sysman;
DECLARE CURSOR c1 IS SELECT owner, synonym_name name FROM dba_synonyms WHERE table_owner = 'SYSMAN';
 BEGIN
FOR r1 IN c1
 LOOP
IF r1.owner = 'PUBLIC'
THEN
 EXECUTE IMMEDIATE 'DROP PUBLIC SYNONYM '||r1.name; ELSE EXECUTE IMMEDIATE 'DROP SYNONYM '||r1.owner||'.'||r1.name;
END IF;
 END LOOP;
 END;
/
DROP USER mgmt_view CASCADE;
 DROP ROLE mgmt_user;
DROP USER sysman CASCADE;
 ALTER SYSTEM DISABLE RESTRICTED SESSION;

3.Log in to the database as SYSDBA and run the following command to install DBMS_SHARED_POOL package:

@?/rdbms/admin/dbmspool.sql

commit;

4. Install the 10.2.0.1 database using -noconfig option i.e to skip the configuration part. This will be carried out in the end by running ConfigureGC.pl script

./runInstaller -noconfig

Choose Installation with Existing Database

Specify the ORACLE_BASE Location under which you would like to install the EM Grid

You will be now prompted to enter the database details for the Repository database. Ensure that listener is UP.

a)In the Configure Email Notification section, specify an appropriate e-mail address, and the corresponding SMTP server name. You will receive important information on the condition of the monitored targets, including critical alerts at this e-mail address.

b)Specify the My Oracle Support (formerly Metalink) credentials.

c)Specify the Proxy Information if Grid Control is using a proxy server for external access


Refer to following documentation link for more information

http://download.oracle.com/docs/cd/B16240_01/doc/install.102/e10953/installing_em.htm#CHDJJBCJ

a)Specify the password for Securing agent
b)Specify password for SYSMAN user. Please note that default ias_admin password is the same as the password assigned to the SYSMAN account. This is required to access the Oracle application server console


OUI will install OMS under $BASE_DIR/oms10g

OUI will install Management Agent under $BASE_DIR/agent10g

Once the installation finishes , you will be prompted to run allroot.sh script (as shown below). Before executing it, stop all the OPMN processes by running the following command from the Oracle home directory of the OMS (for example, oms10g):

Open a different shell and execute following commands using Oracle Software owner

Processes in Instance: EnterpriseManager0.db11g
-------------------+--------------------+---------+---------
ias-component      | process-type       |     pid | status
-------------------+--------------------+---------+---------
DSA                | DSA                |     N/A | Down
HTTP_Server        | HTTP_Server        |     N/A | Down
LogLoader          | logloaderd         |     N/A | Down
dcm-daemon         | dcm-daemon         |     N/A | Down
OC4J               | home               |     N/A | Down
WebCache           | WebCache           |     N/A | Down
WebCache           | WebCacheAdmin      |     N/A | Down

$./opmnctl stopall
opmnctl: stopping opmn and all managed processes...

$./opmnctl status
Unable to connect to opmn.
Opmn may not be up.

Now run the script allroot.sh as Root.


You will get a message that configuration assistants were skipped. You can ignore it as we used -noconfig method


Installation for 10.2.0.1 Base release is complete now. We now need to proceed towards 10.2.0.5 Patchset installation


5. Run following command from 10.2.0.5 patchset directory.

<span style="font-size: small;"> </span>cd $patch_dir/3731593/Disk1
./runInstaller -noconfig b_softwareonly=true

Choose OMS home to patch and proceed


You will be prompted for Sys password


Enter ias_admin Password. This will be same as SYSMAN password


Application server console will be now shutdown. You will get a message confirming same. Click Ok.

After Installation completes , you will be prompted to run root.sh (as shown below) as root from OMS_HOME


6. Next apply 10.2.0.5 patchset to AGENT_HOME by issuing following command.

<span style="font-size: small;">.</span>/runInstaller -noconfig

Select AGENT_HOME for patching i.e agent10g


After Installation completes , you will be prompted to Run root.sh (as shown below) from Oracle Home for Management Agent ($BASE_DIR/agent10g)


7.Now the installation part is over. Next we need to run ConfigureGC.pl script which will actually configure 10.2.0.5 Grid Control.

Before making changes to the environment variable PERL5LIB, take a backup of the variable:

 setenv PERL5LIB_BACKUP $PERL5LIB

Set PERL5LIB to $OMS_ORACLE_HOME/perl/lib/5.6.1

export PERL5LIB=/db40/temp2/oms10g/perl/lib/5.6.1

Configure Grid Control by running the ConfigureGC.pl script from the Oracle home directory of the OMS

/db40/temp2/oms10g/perl/bin/perl /db40/temp2/oms10g/sysman/install/ConfigureGC.pl /db40/temp2

This script will take long time (took 2 hrs on my setup). You can monitor $OMS_ORACLE_HOME/cfgtoollogs/cfgfw/ CfmLogger*log file to check for any errors

The plug-in Starting Oracle Management Server has successfully been performed
------------------------------------------------------
------------------------------------------------------
The plug-in EMCLI Configuration is running

Operation EMCLI Setup is in progress.

The plug-in EMCLI Configuration has successfully been performed
------------------------------------------------------
The action patchsetConfiguration has successfully completed
###################################################

Once you get message that the configuration is complete, then check the status for OMS and AGENT

$OMS_ORACLE_HOME/bin/emctl status oms
$AGENT_ORACLE_HOME/bin/emctl status agent

You can now proceed with Agent installation on the targets to be monitored