I had installed a 11.2.0.2 RAC setup few days back with incorrect timezone. It had to be PDT but I installed with UTC.
Starting/stopping clusteware with correct timezone didn’t solve the issue.
In 11.2.0.2 Oracle stores timezone information in file $GRID_HOME/crs/install/s_config_(hostname).txt. In my case file looked like this
cd /oragrid/product/11.2/crs/install
cat s_crsconfig_prod1.txt
<strong>TZ=UTC</strong>
NLS_LANG=AMERICAN_AMERICA.AL32UTF8
TNS_ADMIN=
ORACLE_BASE=
To resolve the issue we need to change TZ to US/Pacific on all nodes and restart clusterware. So entry would be like
<strong>TZ=US/Pacific</strong>
On Restarting clusteware , database and clusteware starts with correct timezone.
In case you wish to have different database timezone only for Oracle database, then it is possible using srvctl command. E.g
This would require database bounce. Also note that in case database is started manually it would not start with correct timezone. To unset the parameter use following command
I was not able to join Oracle President Mark Hurd’s webcast where he supposed to announce a new Oracle product[It was at 1AM my time and I was sleeping], now viewing this webcast HERE
Kerry Osborne has shared information about this product, click link to see it, here you will see some good information about ODA.
I was working on a issue where in Clusterware was not coming up as private interface was down. Following errors were recorded in ocssd.log which informed that issue was with private interface
2011-08-31 15:03:38.051: [ CSSD][1090451776]clssnmvDHBValidateNCopy: node 2, testrac2, has a disk HB, but no network HB, DHB has rcfg 205815745, wrtcnt, 4418998, LATS 4634324, lastSeqNo 4418997, uniqueness 1314797539, timestamp 1314803017/4632384
Checking status of crs informed that the OHASD process was up and running but CRS,CSSD and EVMD processes were not running.
[root@testrac1 cssd]# /oragrid/product/11.2/bin/crsctl check crs
CRS-4638: Oracle High Availability Services is online
CRS-4535: Cannot communicate with Cluster Ready Services
CRS-4530: Communications failure contacting Cluster Synchronization Services daemon
CRS-4534: Cannot communicate with Event Manager
After fixing the interface issue, we tried starting CRS with ‘crsctl start crs‘ command and it failed with following errors
[root@testrac1 cssd]# /oragrid/product/11.2/bin/crsctl start crs
CRS-4640: Oracle High Availability Services is already active
CRS-4000: Command Start failed, or completed with errors.
CRS-4640 is reported since OHASD is already running. In 11.2 OHASD is supposed to start the other dependent processes.
crsctl stop crs command failed
[root@testrac1 cssd]# /oragrid/product/11.2/bin/crsctl stop crs
CRS-2796: The command may not proceed when Cluster Ready Services is not running
CRS-4687: Shutdown command has completed with errors.
CRS-4000: Command Stop failed, or completed with errors.
Since ohasd was already running, I tried crsctl start cluster (this command requires ohasd to be up), and this command succeeded
[root@testrac1 cssd]# /oragrid/product/11.2/bin/crsctl start cluster
CRS-2672: Attempting to start 'ora.cssd' on 'testrac1'
CRS-2676: Start of 'ora.cssd' on 'testrac1' succeeded
CRS-2672: Attempting to start 'ora.cluster_interconnect.haip' on 'testrac1'
CRS-2672: Attempting to start 'ora.ctssd' on 'testrac1'
CRS-2676: Start of 'ora.ctssd' on 'testrac1' succeeded
CRS-2672: Attempting to start 'ora.crsd' on 'testrac1'
CRS-2672: Attempting to start 'ora.evmd' on 'testrac1'
CRS-2676: Start of 'ora.crsd' on 'testrac1' succeeded
CRS-5702: Resource 'ora.crsd' is already running on 'testrac1'
CRS-2676: Start of 'ora.evmd' on 'testrac1' succeeded
CRS-2676: Start of 'ora.cluster_interconnect.haip' on 'testrac1' succeeded
CRS-5702: Resource 'ora.cluster_interconnect.haip' is already running on 'testrac1'
CRS-4000: Command Start failed, or completed with errors.

[root@testrac1 ~]# /oragrid/product/11.2/bin/crsctl check crs
CRS-4638: Oracle High Availability Services is online
CRS-4537: Cluster Ready Services is online
CRS-4529: Cluster Synchronization Services is online
CRS-4533: Event Manager is online
Ideally crsctl start crs should be used to start the Clusterware components. But in case they fail to come up due to some issue (e.g voting disk inaccessible,interface issue) and you are in situation when ohasd is up then you can use crsctl start cluster to start the remaining clusterware processes after fixing underlying issue.I believe crsctl stop crs -f option can also be used, though I didn’t try it for this issue.
Oracle has introduced a utility called Chopt in 11gR2 to enable/disable few database features after database installation. To perform this, you need to shut down database and run the utilty present under $ORACLE_HOME/bin. Find below list of options allowed
Value
Description
dm
Oracle Data Mining Database Files
dv
Oracle Database Vault
lbac
Oracle Label Security
olap
Oracle OLAP
partitioning
Oracle Partitioning
rat
Oracle Real Application Testing
ode_net
Oracle Database Extensions for .NET 1.x
ode_net_2
Oracle Database Extensions for .NET 2.0
e.g To enable Database Vault, you need to issue following command
$chopt enable dv
As of now no option to enable/disable RAC option. It would still be enabled/disabled using (make -f ins_rdbms.mk rac_off ioracle)
Sharing a post from my friend “Carthik” on 11gR2 RAC in-place upgrade.
Overview ======== Starting oracle 11gR2 the Oracle database and Clusterware upgrades are done via the “Out of place upgrade”. And is the easier way to perform your upgrade. However, the intent of this blog is to explain how an “In-Place upgrade” of a RAC database is done in 11gR2, the advantages, disadvantages, pre-requisites and pain points involved in this method which is the traditional method of upgrading an oracle database. And I have chosen to upgrade a 2 Node 11.2.0.1 RAC Database to 11.2.0.2 RAC Database.
Clearly, the advantage is that you save space, Instead of installing a new Oracle Home.
The greatest disadvantage is that you need to back up the oracle home and run detach oracle home commands. This could potentially damage your oracle binaries. However, when done carefully it should not cause a problem.
The pain points Include: 1. Backing up the Oracle home 2. Restoring the Oracle Home from backup in-case of installation failure. 3. Attach the restored home, and then bring up the instance. Clearly, there is a lot of manual intervention, which is a major pain point.
The idea behind using an in-place upgrade is to save space. And this method of upgrade requires a significant amount time. The only time one should use this method is when you lack space on your server. However, you can use this method for your test and development environments to save space. Since this method was the traditional method of doing things, I thought it’s worth checking how it works in 11gR2.
NOTE: If you have an existing Oracle Clusterware installation, then you upgrade your existing cluster by performing an out-of-place upgrade. You cannot perform an in-place upgrade to the oracle Clusterware. However, you can perform an in-place upgrade for the database. This will be elaborated in this blog. Prerequisites for Oracle 11gR2 11.2.0.2 installation is to install patch 9655006 to the 11.2.0.1 GI home before upgrading to 11.2.0.2 from 11.2.0.1. See Bug 9413827 on MOS. For additional details you can refer to the Metalink article Pre-requisite for 11.2.0.1 to 11.2.0.2 ASM Rolling Upgrade Metalink Note : 1274629.1. Additionally ,Refer to “How to Manually Apply A Grid Infrastructure PSU Without Opatch Auto” Metalink Note 1210964.1.
Performing an In-place upgrade of a RAC DB from 11.2.0.1 to 11.2.0.2
In-order to upgrade a RAC Database from 11.2.0.1 to 11.2.0.2 you need to upgrade
1. The grid infrastructure first. 2. Then, the Oracle Database.
Environment Setup Details used in this post: — 2 Node RAC Red Hat Linux 5.5 with RACK Servers (R710). — Applies to any storage.
Latest OPatch It is recommended to we use the Latest Version of OPatch. Unzip the zip file and copy OPatch folder to $ORACLE_HOME And $GI_HOME by renaming the earlier OPatch directory. You can refer to how to download and Install OPatch Metalink ID 274526.1.
Pre- Requisite Patch:
First, let’s discuss about the mandatory patches required before upgrading to 11.2.0.2. Patch 9655006 is required in order for the upgrade to succeed, if not rootupgrade.sh will fail. Patch 9655006 is downloadable from http://www.metalink.oracle.com/ For information on Bug 9655006, refer to Metalink article ID 9655006.8 Download the patch and unzip it to a stage directory (it can be any directory), once you unzip the downloaded patch, 2 folders will be created. In this example I have unzipped the patch to /patches directory.
Now, let’s see how to patch the $GI_HOME with Patch 9655006.
Before the patch is installed, we need to perform a pre-req check. Let’s see how to do this. 1. [root@rac1 patches]# su – oracle
2. [oracle@rac1 ~]$ cd /opt/app/oracle/product/11.2.0/dbhome_1/OPatch/
Invoking OPatch 11.2.0.1.6
Oracle Interim Patch Installer version 11.2.0.1.6
Copyright (c) 2011, Oracle Corporation.  All rights reserved.
PREREQ session
Oracle Home       : /opt/app/oracle/product/11.2.0/dbhome_1
Central Inventory : /opt/app/oraInventory
 from           : /etc/oraInst.loc
OPatch version    : 11.2.0.1.6
OUI version       : 11.2.0.1.0
Log file location : /opt/app/oracle/product/11.2.0/dbhome_1/cfgtoollogs/opatch/opatch2011-08-16_19-36-09PM.log
Invoking prereq "checkconflictagainstohwithdetail"
Prereq "checkConflictAgainstOHWithDetail" passed.
OPatch succeeded.
Patching the $GI_HOME 1. Stop the Instance running on Node1 srvctl stop instance -d upgrade -i upgrade1
2. As root User run the opatch auto from the $GI_HOME ./opatch auto /patches
Note: The Opatch auto takes care of the patching of both the Grid infrastructure Home and the Oracle Home with the mandatory patch .
Once the patching is done on Node1, start the instance on Node1
3. Starting the Instance on Node1 srvctl start instance -d upgrade -i upgrade1
Repeat the process of pre-req and patching on Node2
Once the mandatory patch is applied, we can proceed with the upgrade of the grid infrastructure home.
Patches required:
The software/Patch can be downloaded from My Oracle support: patch 10098816. Select p10098816_112020_Linux-x86-64_3of7.zip for grid infrastructure download. Once downloaded, unzip them.
Upgrading Grid Infrastructure:
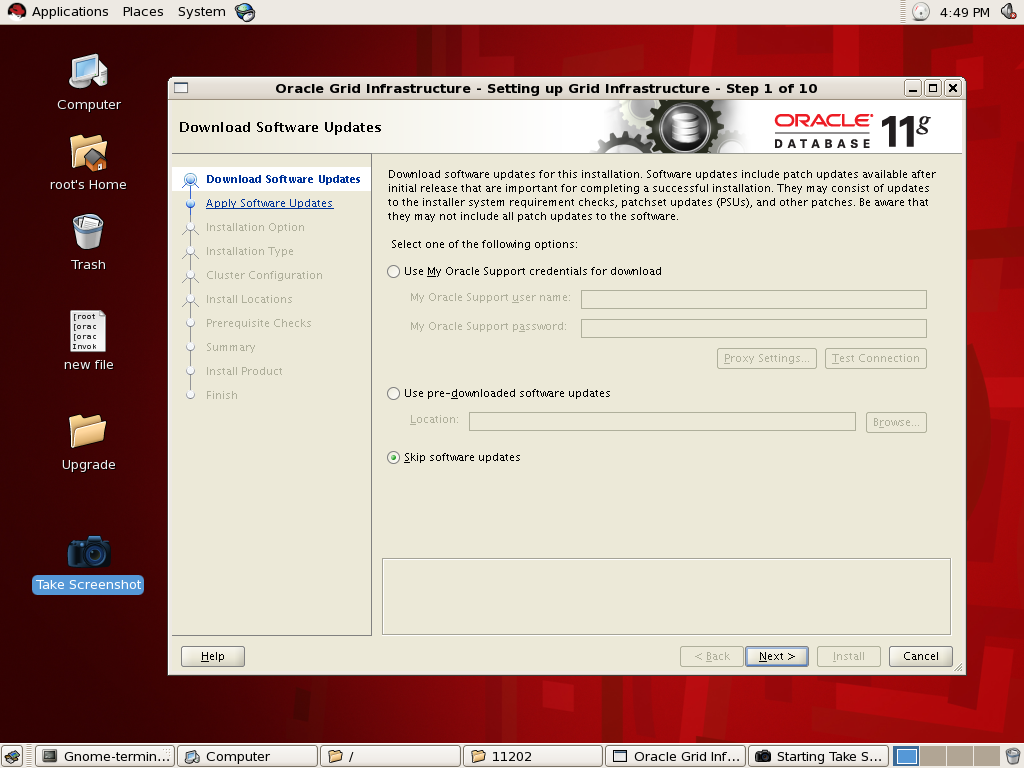
Unzip the patches downloaded and invoke runInstaller from the unzipped grid folder. You will be taken to the welcome screen.
Choose Skip Software updates
Choose Upgrade Gird Infrastructure or Oracle ASM
Choose the Language
The Nodes present are selected by default, Click Next.
Leave the OS groups to Defaults
Choose the New Location where the Grid Infrastructure should be installed
The Pre-Requisite checks are performed, click next
The summary screen appears click next
Click on Install
Run rootupgrade.sh on both the nodes as specified in the screenshot
Upgrading the Database via In-place upgrade:
Patches Required: The software/Patch can be downloaded from My Oracle support: patch 10098816. Select p10098816_112020_Linux-x86-64_1of7.zip and p10098816_112020_Linux-x86-64_2of7.zip for database patch/software download. Once downloaded, unzip them.
In-Place upgrades (Things to do before performing and In-place upgrade)
When performing an in-place upgrade, which uses the same Oracle home location, an error messages appears stating that the installer detects Oracle Database software in the location that you specified.
Message: The installer has detected that the software location you have specified contains Oracle Database software release 11.2.0.1. Oracle recommends that when upgrading to 11.2.0.2, you perform an out-of-place installation of the software into a new Oracle home and then upgrade the database using the new software binaries.
Cause: The installer has detected that the software location you have specified contains Oracle Database software release 11.2.0.1.
Action: Either perform an in-place upgrade (Steps provided in this section), or perform an out-of-place upgrade
Performing an In-Place Upgrade for an Oracle RAC Database
To perform an in-place upgrade for Oracle RAC Database instances: 1. Back up the configuration data by backing up the following directories on all cluster nodes: o ORACLE_HOME/dbs o ORACLE_HOME/network/admin o ORACLE_HOME/hostname_dbname o ORACLE_HOME/oc4j/j2ee/OC4J_DBConsole_hostname_dbname
2. Run the following command on each of the nodes to detach the 11.2.0.1.0 Oracle RAC ORACLE_HOME: $ORACLE_HOME/oui/bin/runInstaller -detachHome ORACLE_HOME=11.2.0.1.0 software location
3. Rename the 11.2.0.1.0 Oracle RAC ORACLE_HOME directory on all the nodes to a temporary name.
4. Install release 11.2.0.2 Software Only on all nodes:
From the unzipped folder, invoke the run Installer from the database folder
The welcome screen appears, uncheck the security updates and click next
Choose Skip Software Updates
Select Install Database Software Only and click next
Choose Oracle Real Application Clusters DB Installation and Select the Nodes and click next
Choose the Language and click next
Select Enterprise Edition and click next
Specify the location of the old home, and click next
Provide the Operating System groups and click next
Once the Pre-requisite checks are performed, click next
The summary screen appears, verify the settings and click next
The installation proceeds
Once the installation is done, run Root.sh on both the nodes as instructed and click ok.
Now, on all nodes, restore into the 11.2.0.2 ORACLE_HOME software location the backed up configuration data files (from the backups you made of /dbs and network/admin), and also restore the following two directories: /hostname_dbname and /oc4j/j2ee/OC4J_DBConsole_hostname_dbname. Specify the actual name for hostname_dbname.
Database Upgrade using DBUA:
Run DBUA from the 11.2.0.2 ORACLE_HOME/bin directory on the local node and select the 11.2.0.1.0 Oracle RAC database instance to upgrade it to release 11.2.0.2.0.
The welcome screen appears once you invoke the DBUA, click next to proceed
DBUA Lists the databases that can be upgraded, select the one that you would like to upgrade
You can choose the Degree of parallelism and upgrading the time zone version and click next
Skip this screen by clicking next
The summary screen appears, click on finish for the upgrade to proceed.
The upgrade proceeds
NOTE: The only time one should use this method (in-place upgrade) is when you lack space on your server. However, you can use this method for your test and development environments to save space.
Since this method was the traditional method of doing things, Since this method is available, I thought it’s worth checking how it works in 11gR2. During the entire upgrade process, I never ran into any issues, apart from the slightly higher downtime in comparison to the out-of place upgrade. However, oracle doesn’t recommend this method. You can refer to the following metalink note 1291682.1.
A short write-up on a problem faced in few newly upgraded databases to 11.2.0.1 :
I faced this issue in couple of databases which were recently upgraded to 11gR2, the problem is so severe that even connecting using “/ as sysdba” is not working and erroring out with
<span style="font-family: arial,helvetica,sans-serif; font-size: small;">ORA-04031: unable to allocate 254 bytes of shared memory ("shared pool","unknown object","PCUR^bb2f222c","kkscsAddChildNodeToContext)</span>
The SGA is sized efficiently, SGA_TARGET=8GB and shared_pool_size=900MB. Looking at the trace file generated by this error, there were 4 subpools generated and the all the 4 subpools have enough “free momory” under them.
======================= Memory Utilization of Subpool 1 =======================
======================= Memory Utilization of Subpool 4 ======================= Allocation Name Size ______________ ____________ “free memory ” 370 023 728
We can see that all the subpools have more than 300MB of memory as free, But in the “Subpool 3” we can see some unusual amount of memory allocated to heap area “PCUR” 4 955 061 232 i.e 5GB Approx.
Now its time to find where “PCUR’ is leaking memory??
Searching in Metalink for this showed a known BUG in 11.2.0.1 and 11.2.0.2 :
<span style="font-family: arial,helvetica,sans-serif; font-size: small;">Bug 10082277 Excessive allocation in PCUR heap of "kkscsAddChildNo" (ORA-4031)</span>
As per this BUG, memory type “”kkscsAddChildNo”” under the “perm” space of “PCUR” subheap is growing over the time and is not getting deallocated leading to this situation. The solution is to apply this patch.
This blog reflect our own views and do not necessarily represent the views of our current or previous employers.
The contents of this blog are from our experience, you may use at your own risk, however you are strongly advised to cross reference with Product documentation and test before deploying to production environments.


Recent Comments